Archive for January, 2016
Frugal Living – Reassess your Bills

January is the time when I get all my tax paperwork ready. It is also the time I reassess my bills, like utilities, water, trash, insurance, etc., to make sure I am getting the best possible deals. This can be different from region to region across the county. Find out if there are alternatives to utilities and review the costs. If you can get a better deal elsewhere, switch. If you have a landline, check to see if they have a bare bones price or cancel options you’re not using.
Check how many cell phone or internet data minutes you’re using. If you’re not using all of them switch to a cheaper plan. Review the channels you watch most often on cable and reduce your package to get rid of one’s you don’t watch or seldom watch.
Bundle your home and auto insurance, if it’s not already, and ask your agent how a higher deductable will effect your coverage and monthly bill.
Little changes made now can save you money all year long.
How to Make Homemade Suet Cakes
There’s nothing a chicken likes better than a little bit of fat during the long cold winter months to keep it healthy, happy and full of energy. Suet cakes provide all this and a few treats as well. But, commercially purchased suet cakes can be expensive and contain other chemical ingredients that you may not want your girls to have.
Making your own, homemade, suet cakes is easy. It’s even easier if you get in the habit of saving your fat or grease from cooking. I keep a container in the freezer to store grease from cooking bacon, sausage, meatloaf and hamburger (anything that produces fat, really). I don’t worry too much about using bacon fat because I don’t use a lot of it and it is mixed with the other kinds of fat. I store my fat in the freezer because our hot summer and early fall weather makes me nervous about the fat spoiling, and I’d rather be safe than sorry.
When I’m ready to make suet I can make several at one time, saving me time. The spent grease, tallow or suet is a great binder to hold everything together, and it will only take a few minutes.
Ready to make your own suet cakes?
Here’s what you’ll need:
- A container to store fat in (remember…store all year long)
- A plastic lidded freezer container
- ½ cup chicken scratch or bird seed
- ¼ cup chopped nuts (I use the flat side of a meat mallet and just give the nuts a few whacks)
- ¼ cup dried fruit like raisins, apples, apricots, anything)
- ¼ cup cracked corn (for energy and heat while they digest it)
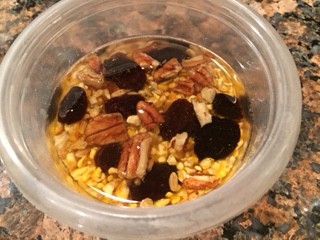
Here’s how I did it:
- Gather all ingredients
- Layer dried sliced apples in the bottom of the freezer container
- Pour the scratch or bird seed over the apples
- Layer raisins on top of scratch
- Sprinkle with chopped nuts
- Slowly heat fat until it is liquefied, let cool, but not solidify
- Pour fat over to cover everything by about ¼-inch
- Gently poke a fork around or stir to make sure fat reaches the bottom (remember, the fat holds the whole thing together)
- Cover and place in the freezer to harden.
When you’re ready to use, run a knife around the edge of the container to loosen the cake, then turn it upside down and whack it on the counter until the cake falls out. At this point you can cut it to fit a purchased suet cage or you can do like I did and make a hole in the middle, thread some twine through and hang the cake where the chickens can play and peck at it.
This is a basic recipe for making suet. You can change it up with any combination of seeds, nuts and dried fruit you want. Try oatmeal, squash seeds, or dried meal worms (yum) and send your girls wild. You can also use any type of container you have—from decorative molds to cupcake liners. When the cakes have set just remove them from the freezer container and store in a zipper bag until ready to use.
One more note: Suet blocks are best used when the weather is cold, otherwise the grease will liquefy and your cake will fall to pieces.
How to Roast the Perfect Chicken
There’s nothing better than a kitchen filled with the savory, satisfying aroma of a roasting chicken; at least in my opinion. It’s an important cooking skill too – roasting a bird that can eventually be made into 4 or 5 different meals. With just a few bought or homegrown onions, carrots and potatoes or parsnips, and a home raised or store bought broiler you’ll be on your way to a heart-warming meal the whole family will love. It’s easy, cheap and turns out wonderfully every time. It takes just a few minutes to prep and everything you need you probably already have on hand. Follow these simple instructions and I promise you’ll want to roast a chicken every week. I was taught this method by my father-in-law; one of the best meat cooks I know.
Here’s what you’ll need to roast the bird:
Whole roasting chicken
3 to 4 tablespoons, room temperature butter
Rosemary, garlic, and sage, chopped if fresh, crumbled if dry (or commercial poultry rub)
Tin foil
Roasting pan, without rack
Meat thermometer
1 medium onion, chopped
2 or 3 medium baking potatoes, peeled & quartered (parsnips can be added or substituted)
3 to 4 medium carrots, cut into chunks
These are the basics, but any seasonal veggie will do. Shake things up a bit by using yams, winter squash or summer squash, Brussels sprouts, or beets. Make it your own!
Preheat your oven to 400 degrees. I know that seems high, but you’ll see why in a minute.
Thaw frozen chickens in the fridge. Rinse thawed or fresh birds in cold water; making sure to rinse inside the cavity, under the wings and around the legs, then shake off excess water. Place your bird in a large bowl and take out your roasting pan. I use a 3-inch deep Calphon pan with high handles for easy lifting.
Chop the onions, carrots, potatoes or parsnips into chunks no large than 3- inches and spread them around the bottom of the pan. The veggies will act as a rack for the bird, letting air underneath so the bird cooks thoroughly as well as being cooked in the bird’s juices and fat. Drizzle the veggies with olive oil and sprinkle with salt and pepper or poultry rub. Set the roasting pan aside and go back to your bird-in-a-bowl.
Shake the bird again to get off any excess water and set it on a cutting board. Smear the bird all over with butter, making sure to get under the wings and around the legs. Gently slip your fingers under the skin that is over the breast and smear butter under the skin as well.
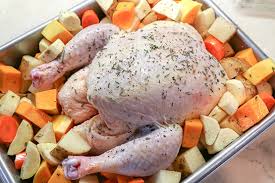
Now, take your finely chopped rosemary, garlic, sage or commercial chicken rub, and sprinkle them all over your bird. For a nice presentation on a serving platter, tie the drumsticks together with some kitchen string, and place the bird on top of your cut veggies.
Your buttery herb-rubbed chicken is ready for the oven.
Place the roasting pan on the center rack of your 400 degree oven. The flash of a hot oven followed by a slow roast will give the bird a luscious, crispy, golden skin. Let it crackle and pop for about 20 or 30 minutes before lowering the temp to 350. At this point you can cover the bird with foil which will keep it from scoarching the skin, but will allow it get crispy. I let mine cook undisturbed for an hour before taking it out to check for “doneness”. The skin should be a nice rich brown color and the internal temperature should be about 170 at the thickest part of the breast. I usually make a slice near the thigh to see if the juices run clear and not red or pink. If this happens just pop it back into the oven and recheck it every 5 to 10 minutes until it is done.
When you’re confident it’s done, pull the pan out and let it stand for about 15 or 20 minutes (the meat will continue cooking as it cools). As the bird cools, spoon the pan juices into a fat separator, pour off the juices into a small saucepan, add a tablespoon of butter and boil until reduced by about half. Taste and adjust the seasonings. Now you’re ready to slice the meat and serve it with a side of savory roasted veggies and a fabulous rich, herb infused gravy. Enjoy!
The leftovers from this easy roasted chicken make a great chicken salad, chicken sandwich, or chicken and rice casserole. And — don’t forget to simmer down the carcass (bones, skin and all) and pull off any remaining bits of meat for the best chicken soup base ever!
Learn to raise your own homegrown chicken with these helpful posts.
Raising Meat Chickens in Suburbia
Why Raise Chickens on a Suburban Homestead?
Frugal Friday – “Eating-In” from your Pantry
To reduce your grocery bill and save a few bucks after all that holiday spending, dedicate the next 10-days to eating out of your pantry. Take a day and prepare meals using what’s on-hand from your pantry and freezer. This is a great opportunity to use up freezer items you’ve had for a while and learn new recipes using just the ingredients you already have. Only shop for essential perishable items, like milk, eggs and produce (if you don’t already produce them yourself). You’ll not only save money, but also have a chance to inventory your pantry, creating a list of “to buy” items.
To extend your savings even more “eat-in” for another 10-days and watch the savings grow. You may even be inspired to not spend on other items, like clothing, toys, or entertainment.
7 Ways to Keep Poultry Warm This Winter
Wild winter weather may not have arrived yet in many parts of the country, but that doesn’t mean you can forego getting your coop ready for frigid temperatures.
If fall chores and holiday preps kept you from attending to this very important task, you still have time. Remember the weather thing? It’s unpredictable.
Here on the coast of California we rarely get bitter cold temps, but we can get nights below freezing, so as a course of action we get the coop ready for cold weather. It’s just a good habit to get into, like cleaning gutters or splitting firewood.
Chickens are fairly tough creatures and can handle the cold much better than they handle the heat, if they have proper shelter. Below are a few tips to help keep your flock warm and comfortable all winter long; how ever long that may be.
1. Check the coop–give the coop a good look over for cracked or broken windows, leaky roof, and vermin digging in. Make sure the wire is safe and secure, and the nesting boxes are in good shape. You don’t want anything sticking out or sharp that may cause injury. Make any repairs needed.
The coop doesn’t need to be air-tight. In fact, you want to have a bit of ventilation as chicken poop is damp, creating moisture build up inside the coop, which can cause mold and respiratory problems.
2. Embrace the “deep litter” method of bedding. Not only will the thick layer of bedding keep your chickens warm, it will give them something to scratch in. The microorganism action, spurred on by nitrogen rich chicken poop will give you a head start on spring composting, too.
To get started–gather up whatever you have that’s free–straw, hay, leaves, shavings, wood chips and pile it in the coop until it’s about a foot deep. Supplement this with purchased straw if you need to. It may seem like a huge amount, but don’t worry. The girls will scratch around and mash it down. At night you can scatter scratch grains in the coop to encourage the girls to hunt and peck in the morning, fluffing up the bedding.
Turn the bedding each week with a pitchfork, paying special attention to the areas below the roosts because they can become damp. If they do, simply scoop out the damp areas and add more bedding. Add more bedding material as needed.
If you have brutally cold winters and your coop is large enough, consider lining the sidewalls with straw bales. Not only will this give great insulation, but adding more bedding will be close at hand.
Extend the “deep bedding” into the outside run of your coop to draw your girls out into the sun. You can use spent vegetable plants from fall garden clean-up, grass clippings and other organic matter. Your girls will have a ball finding out what’s at the bottom.
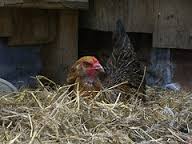
3. Make sure nesting boxes have plenty of bedding, too. Especially if they are metal like mine. I like to use a mixture of shavings and straw. The shavings make a good protective layer on the bottom, while the straw gives each box a loftiness for the hens to nestle into.
4. Keep water flowing. Although the weather may be freezing your chickens still need plenty of fresh, clean water. This may be a challenge if water troughs are constantly freezing.
To help keep water flowing use a large diameter black rubber tub instead of a metal waterer. Set the water bowl in the sun so the black rubber can absorb the heat. Putting ping pong balls (or other floaties) in the bowl will also help keep water from freezing because the balls move with the wind preventing the water from icing over.
You can also create a mini greenhouse lean-to with old windows. It’s similar to sitting next to a window in your house. It’s always warmer. Another option is to purchase a heated waterer. These work in most winter climates, but require electricity near the coop, and will increase your electric bill. Simple and free are always worth trying first before going the expensive route.
5. Let it shine. If you have electricity in your coop you also have the option of installing a heat lamp for warmth and for extra light, which encourages the girls to lay during dark winter months. I know there are two sides to this topic, and I won’t go into them here because we’re talking about keeping chickens warm, not extending laying or preventing molting.
If you decide to use a heat lamp, make sure to buy the kind with a protective cage so the chickens can’t touch the bulb and use a red bulb rather than white. White is very bright and hard on the eyes. Also, make sure the heat lamp is secured to a solid surface so it can’t fall and cause a fire. I’ve used a heat lamp for decades with no problems at all. Mine is clipped to a chain hanging from the roof joists with snap hooks.
6. Create heat from the inside out. Supplementing lay mash and scratch with a bit of cracked corn every evening creates energy to breakdown and digest the corn, which helps to build internal heat, keeping your chickens warm from the inside out.
7. Banish winter boredom to prevent feather picking, egg eating or pecking each other. Let’s face it, if you don’t like being stuck inside all winter long then why think your chickens would? We have cabin fever. They have coop fever.
When your chickens don’t have weeds or grass to munch on, bugs to scratch for or dust to bathe in they can get bored. Boredom can also be caused by a coop and run that are too small to provide interesting things for your chickens to do. So, send them outdoors to entertain themselves. If weather, and predator control permit, let chickens free range outside their normal confines. Having seasonal perches or stumps to stand on will encourage chickens to spend much of their day outdoors. Hanging overgrown squash, sunflower heads or whole cabbages will give your chickens endless hours of entertainment, not to mention treats and added nutrients.
Anything new and different in, or out, of the coop will pique your chicken’s curiosity, keeping them busy all winter long. Before you, or they, know it spring will be here, the sun will be out and temperatures will be on the rise. Just wait.
More ways to protect chickens from winter’s wrath.
Keeping Poultry Warm During Colder Months
How to Cook Crispy Brussels Sprouts
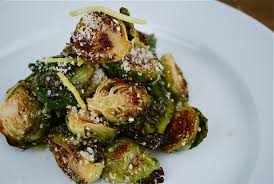
At our house, Brussels sprouts have become the quintessential winter vegetable. Those small, tightly bound, cabbage looking globes that most people hate happen to be our favorite. But, that wasn’t always the case. I wasn’t always this much in love, it came gradually over time. I can only describe my past views on the leafy orb as loathing. It wasn’t until I ate at an upscale restaurant in TN that the love affair began. The simple mix of olive oil and sea salt and the pan roasting made them taste amazing and convinced me that my prior judgments were unfounded.
On a cool fall day I set out to recreate the simple sprouts with olive oil and sea salt I had in TN. As usual I was doing too many things at once and got side tracked with God knows what because I forgot about my experiment. When the smell from the oven brought me back my little globes had “over-cooked” a bit, or so I thought. Being the frugal farmgirl that I am and not wanting to waste anything I popped one into my mouth to see if they could be salvaged. One right after the other they went into my mouth until I realized I had hit on something! They were browned, almost to the point of being caramelized, crispy with slightly blackened leaves, and the center was tender and meaty. That’s right…meaty.
A drizzle more of olive oil and another sprinkle of sea salt and we had hit the jackpot.
Below is my “go-to” way of roasting sprouts. But, don’t stop there. Brussels sprouts are the perfect canvas to creating many different flavors with spices, glazes, and sauces, whatever strikes your fancy.
Now—for one important point, they are a pain to prep. There…I said it.
It must be done, though, so get to it. Halve and peel the outer leaves. It shouldn’t take more than a few minutes to do a pound.
INGREDIENTS:
- 1 pound Brussels sprouts, washed, trimmed, halved and outer leaves removed
- 1 tablespoon olive oil, plus more for serving
- ½ teaspoon fine sea salt
- Fresh ground pepper to taste
DIRECTIONS:
Preheat oven to 400F and coat a large baking sheet with spray oil (preferably olive oil).
Use a paring knife to trim the ends, then slice in half lengthwise, remove any loose outer leaves.
Place prepped sprouts in a large bowl.
Add oil over sprouts and stir or toss with hands until thoroughly coated.
Add the salt and stir to combine.
Spread Brussels sprouts in a single layer on baking sheet. Season with freshly ground black pepper.
Roast at 400F on middle rack for 20 minutes then turn sprouts. Continue roasting for another 5-15 minutes until browned to your liking. To make them “crispy” and charred, brown a bit more than you think you should. This is where personal taste comes in. You may have to make a few batches to find your desired doneness. Keep in mind, smaller sprouts will brown faster than larger ones. Choosing sprouts the same size will help with this.
Before serving, drizzle with a teaspoon or so of olive oil and toss to coat. This will infuse them with flavor and moisten them a bit after roasting. Taste and add salt and pepper, if desired. Serve piping hot, immediately.
For variations on this recipe, try:
Adding a ½ teaspoon of Harissa spice blend to the above recipe
Sprinkling with grated Parmesan cheese before serving
Drizzling with pomegranate molasses or balsamic reduction before serving
Minced garlic cloves, garlic-infused oil, instead of the olive oil or garlic salt, instead of sea salt during the preparations
Drizzling with teriyaki sauce and sprinkling with sesame seeds before serving
Using BBQ sauce as a dipping sauce
Sprinkling toasted ground nuts, like pecans, or sesame seeds over the top
Or, use the recipe as a base and come up with your own creations. Brussels sprouts go well with spicy and hot seasonings, even hummus, so have fun experimenting.
Frugal Friday – Winter Heat Savings Tricks
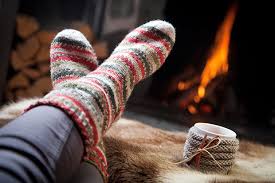
25% of your houses heat can escape through windows and doorways, not to mention a few other sneaky places. Take steps now to close off the escape routes and save a bundle on your winter heating bill.
• Check door thresh holds and replace if they do not fit tight. If you can see daylight you’re losing heat…and money.
• Switch plates on outside walls are notorious for leaking heat because insulation is not installed close enough to stop the airflow. Remove the plate and fill small gaps around the box with an acrylic caulking. For larger gaps, use a foam sealant. Then, place a foam gasket over the outlet and reinstall the switch plate. This small investment will save you loads of heat from escaping and tons of money.
• Water lines, gas lines and cables that come into your house from an outside wall can also leak air and heat, plus they are entry points for bugs and mice. Seal with an expanding foam sealant to keep heat in and critters out. For water lines, slide back the metal ring around the pipe before you caulk. It’s purely decorative and won’t stop air escaping. Check yearly as the caulking can crack or peel off.
• If you work in or gather in one room most of the day use a space heater and turn down the thermostat. The rest of the house will be cool, but you’ll be toasty warm in the room you occupy.
• Use the sun to warm you and your house. If your work at home or are relaxing move furniture to a sunny window where the rays can keep you warm. Keep curtains open, especially on south facing windows to bring in more direct light and heat, and then close curtains at night to act as a barrier, keeping the warmth in.
Even in the middle of winter, you can slash your energy bills without sacrificing your comfort.
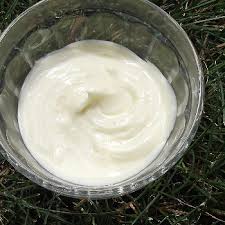
How to Make Udder Butter
For more than 40 years I raised sheep, with a few goats and cows thrown in here and there. I have seen plenty of udders stretch beyond the size of a basketball, sometimes wondering how the poor girls ever managed the ever expanding skin much less the weight. And, when the babies were born mom had to endure months of young sharp teeth gripping teats and anxious mouths aggressively nudging mom’s udder to let her milk down. I don’t think there is any other body part that takes such a beating as the livestock udder.
The weather doesn’t help much either. Most female livestock give birth in cold weather months, where low temps and frigid winds can chap and crack the skin of an udder, making nursing even more uncomfortable.
Running to the feed store to buy a can of udder cream or salve may be an easy solution, but making your own is easy and more organic for both mom and baby. Imagine a baby nursing from an udder that has been smeared with a chemical laden balm. No thank you!
INGREDIENTS:
- 1 ounce beeswax
- 2 ounces Shea butter
- 2 ounces coconut oil
- 6 ounces olive oil
- 4 drops Lavender essential oil
- 4 drops Tea Tree oil
- Plastic container large enough to reach in to scoop out the butter
DIRECTIONS:
In a double boiler, melt the beeswax over medium-high heat
When the beeswax is melted, add the Shea butter and coconut oil
Stir gently as it melts to incorporate
Add olive oil, mix thoroughly and remove from heat
Stir in lavender and tea tree oils
Cool slightly before carefully pouring into plastic container (let cool completely so it can set)
Apply to udder (for cows and goats apply after milking. For sheep who are nursing, apply morning and evening, when lambs are likely to nurse)
Store in the house, as a cold barn will make the butter a solid mass
Within a few minutes time you’ll be on your way to relieving the sore, chapped udders of farm girls who work just as hard we do.
As a side note, this udder butter works great on our hard worked human hands as well.
When the farm girls are happy, EVERYBODY’S happy! Right?
White Bean & Chicken Chili

I like chili. That thick spicy concoction that goes great with shredded cheese and sour cream or scooped with tortilla chips. It just says cold day, with a warm filling smile.
It was the perfect lambing season food when time was a luxury and we never really had time to sit down to a real multi-course meal. We could take it to the barn in a thermos and eat whenever we were in between ewes lambing. Life on a farm moves quickly and never rests so the humans can eat!
There are multiple ways to make chili–with beef, pork, chicken, even turkey. Over the years I have tried to experiment with different kinds and find an alternative to our old favorite to no avail. Not until this year, that is, when I stumbled on a chicken chili made with white beans, mild green chili’s, spices and corn. It’s the kind of bold richness in a bowl that chases away the cold weather screaming outside. And, we have needed to chase away a lot of cold windy weather lately.
I read over the recipe and made a few adjustments to the original to fit my style and I think it turned out great. The best part is you can make this chili on the stovetop for a quick to put together meal, or you can dump all the ingredients into a crockpot and let it meld all day long, coming home to a house filled with the aroma of chicken and chili’s. And, you can use leftover chicken (as I did) or use store bought rotisserie chicken. How easy is that!
Try it. I think you’ll like it!
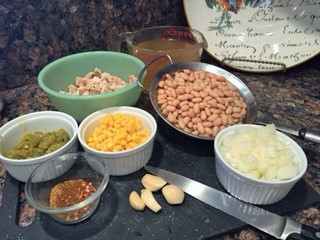
INGREDIENTS:
- 2 (14.5-ounce) cans white beans, drained and rinsed
- 4 cups chicken broth
- 1 tablespoon avocado oil
- 1 large yellow onion, diced small
- 1 (8-ounce) can mild green chili’s
- 1 tablespoon cumin
- 1 generous teaspoon Penzey’s chili 9000
- 1/2 teaspoon red pepper flakes
- 4 garlic cloves, minced
- 1/2 teaspoon salt (more if needed)
- 4 cups cooked chicken, chopped or shredded (leftovers or rotisserie)
- 1 (14.5 ounce) canned corn, drained
- 1/4 cup fresh chopped cilantro
- 1 tablespoon fresh lime juice, plus more to taste
DIRECTIONS:
Using a stick blender, puree about 1 cup of beans with 1 cup of chicken broth and set aside.
Pour oil into a large pot or Dutch oven and heat over medium high. Add the onion and sauté until soft, about 4 minutes. Add the garlic and sauté for another minute. Add the spices and continue to cook, stirring frequently, for a minute so spices can toast. Add canned chili’s and stir for 1 minute. Add the chicken stock, puréed beans and 1/2 teaspoon of salt; bring to a boil. Reduce the heat to low and simmer, uncovered, for 20 minutes.
Stir in the chicken, whole beans, corn, cilantro and lime juice; bring to a simmer and cook for about 20 minutes. Taste and adjust salt and lime juice, if necessary. (The broth will look soupy — that’s fine, it will thicken up as it sits). Serve in individual bowls with a dollop of sour cream, crushed tortilla chips, and lime wedges.
On a side note: If you make this in a crockpot, combine all ingredients except for the cilantro. Add that about 1/2-hour before serving.
Another note: The chili thickens as it sits. If you make it ahead of time, you may need to add more broth to thin it out, but that’s your call. I like a thick chili.
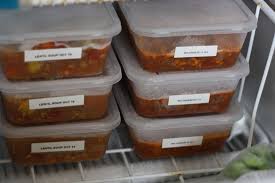
Frugal Friday – Bits & Pieces Make Big Pots

Store small bits of leftover veggies, rice and meat in a sealed refrigerator or freezer container for later use. You know what I mean. Those small bits of leftovers that are not enough for a serving, even for one person.
At the end of the week or end of the month make a big pot soup or a vegetable stew. You’ll be surprised at how much you’ve gathered and what a hearty wholesome meal it will make. Add a salad and some crusty bread to round things out.
Do the same with leftover fruit and make yourself a yummy blended treat.
Did you know that 40% of all food in the U.S. goes to waste?
And, 90% of consumers throw food away while it is still edible?
Recent comments
Aenean nonummy hendrerit mauris. Phasellus porta.