Archive for August, 2016
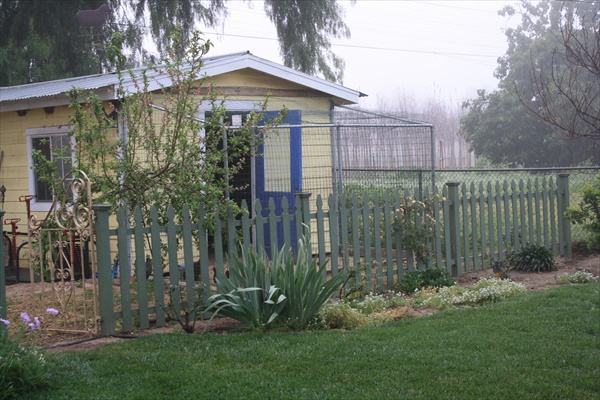
12 Ways to Begin Homesteading in Suburbia
It’s a lazy summer day laying on my vintage patio daybed.
I close my eyes, drifting away as a warm breeze envelops me. My mind meanders to gently rolling hills with green grass swaying in the breeze, pastures dotted with grazing sheep, new spring lambs sprinting from mama to mama, a dairy cow lying quietly chewing her cud, and a steer growing fat waiting to fill a family’s freezer. I see chickens clucking and scratching around the barnyard and bees buzzing in the garden.
BUT,…
…and there’s always a but, isn’t there?
When I open my eyes instead of rolling pastures and a white picket fence I see a house on a small lot at the edge of town. Not exactly the picturesque farm I see in my mind’s eye.
That suburban reality is the reality for most of America.
But, (again with the but)
A suburban dwelling doesn’t mean you have to give up your homesteading dreams. It only means you have to readjust your thinking about what homesteading is.
Modern homesteading means different things to different people. One person might be interested in old-time remedies to keep their family healthy, while another embraces baking bread or growing herbs on an apartment balcony, and yet another combs yard sales and antique auctions for vintage watering cans or Mason jars to adorn a kitchen or patio.
Today’s homesteader can be whatever they want to be, they are not bound by the realms of farms, small towns or rural life.
Different strokes for different folks, right?
We do have a few similarities with our more rural cousins, though. We crave returning to our roots, to old time skills and a slower way of life. We want to create a more self-sufficient life for ourselves and our family. We want to be self-reliant.
If this sounds like you, you’re in luck. There is no requirement that a homesteader must live in the country or on 100-acres. You can do it right now, right where you are, even if where you are is a downtown apartment…a city lot…or a 1-acre plot.
So let’s get you started with 10 simply things you can do right now to set yourself on the path of becoming a modern day homesteader.
1. First and foremost…decide what you want as a homesteader. It may sound simplistic, but it is actually crucial and sometimes very difficult to decide what you want or why you want to homestead. Do you want it all—gardens, orchard, animals, the whole shebang? Or, do you only want pieces of a homestead life, like baking bread, canning vegetables or growing flowerbeds. The choice is yours, so take your time. There’s no right or wrong way to homestead in our modern world.
2. If you decide to “go big” then you’ll need to assess your property. What do you have room for? What don’t you have room for? What are the “must haves”, and what are the “can do with outs”? This is an important step so you don’t over extend yourself or your property. Be realistic about you and your property. While homesteading can be fun and rather addictive, it WILL be a whole lot of work. The more you have, the more work there will be and your homesteading journey won’t be so fun in the end if you overextend yourself.
I moved into my 1/3-acre home on Labor Day weekend and spent the entire winter drawing plans and laying in supplies for my “bigger picture”. By early spring were we ready to rock the barn building and garden layout.
Remember…a homestead is a constant work in progress, enjoy the journey.
3. While you’re pondering Steps 1 and 2, do some fun things.
Create a potted herb garden even if it’s on your balcony, windowsill or patio.
Begin seeking out new recipes to start cooking from scratch more often.
Try your hand at making a simple chevre cheese.
Teach yourself to bake bread, even if it’s with a bread maker.
Whip out your sewing machine and make an apron.
Here are a few ways to begin homesteading in suburbia:
4. GROW SOME OF YOUR OWN FOOD.
No matter how big your garden is you will relish a bounty of fresh veggies that will provide you with nutritious, pesticide-free meals, and save you money in the process. There are many types of gardens perfect for any suburban homestead no matter where you live. There is the traditional backyard garden with lots of raised beds or rows of produce. There’s edible landscaping where fruits and vegetables are intermixed right alongside your other plants. Then there’s potted gardens that are perfect for small spaces or apartment living. Fruit trees can be planted to take the place of shade trees giving you useful shade and using valuable water to produce food for your family.
There are few things more fulfilling than taking a bite out of a juicy, sweet, unbelievably tasty tomato that you just grew yourself. The difference in taste between those and the ones picked green and shipped from Central America or halfway across the country is absolutely astounding.
5. SET UP A RAIN BARREL AND COLLECT WATER.
Rain water is one of the few free things in this life, so why not collect it to use in the garden. Many cities have water collection programs where rain barrels are free or at a low cost. The water you save can add greatly to your household savings, especially during dry spells. Diverting grey water from the washing machine can also add to your water savings program.
6. PREPARE FOR THE UNFORESEEN.
Life is unexpected at best. We never know when the next storm will hit, knocking out power or making it impossible to get to town. The best precaution to any natural disaster is a well-stocked pantry. A closet, the basement or an extra bedroom can all be outfitted with shelves and stocked with staple items and family favorites.
Picking up a few extra items at the market will have your pantry stocked in no time. And, if a natural disaster never strikes you will have put food away at a lower price than future inflated prices.
7. CAN OR FREEZE FOR LONG TERM STORAGE.
Once you’ve had a few fresh veggies from the garden and gotten the hang of cooking from scratch chances are you won’t want to go back to store bought foods, especially if you live in an area that has long, cold winters. Preserving the harvest is the next logical step in your homestead journey. There are many ways to preserve—canning, freezing, dehydrating, salt curing, pickling, fermenting, root cellaring and more. Start with something simple, like homemade pickled beets. They are practically full proof!
8. RAISE YOUR OWN CHICKENS.
Chickens are my “go to” livestock for beginning homesteaders. A small flock of 3 to 4 laying hens is fun, easy to care for and will give you fresh eggs for the kitchen and manure for the garden. You can build a simple coop in an afternoon, or be creative and look for a large used doghouse or garden shed. Be sure to check out local ordinances so you know if you can have them and how many you are allowed.
9. START A COMPOST PILE.
A compost pile is a must have for any homestead. The rich soil you make from decomposing kitchen scrapes, grass clippings, fall leaves and manure will improve your gardens and give you a better bounty. Fall is the perfect time to start because of all those free leaves. Four wooden pallets is q quick and easy way to start making your own soil.
10. BUILD YOUR COMMUNITY.
New homesteaders may find the process of starting to homestead a bit daunting, but once you start talking to people you will quickly realize there is a whole community of like-mined people out there who are dying to help you be successful, so embrace their generosity. A great place to start talking to people is the Farmer’s Market, a local farm stand or plant nursery. While you’re making plans you can gain knowledge and build friendships that will carry you into the future.
Another great way to meet new people and get your kids involved in your homesteading journey is to enroll them in a youth program that focuses on the many areas of homesteading. 4-H and Grange are both farming centered programs that have lots to offer. Check out your county Cooperative Extension office or Grange Hall for programs near you. You will build lifelong skills and friendships while also learning about leadership.
11. SET UP A CLOTHES LINE.
This sounds so simple, I know. Sometimes it’s the simple things that really get you inspired to do more. My outdoor clothesline was the first thing I put in and the time I spend hanging clothes or taking them down is one of the most enjoyable parts of my day. It’s kind of therapeutic as well as being productive.
12. BUILD YOUR SKILLS.
No matter what kind of homestead you decide on you will need many skills to make it work. From gardening and preserving to building or cutting firewood, now is a good time to start. Learning can take place in classes offered at local Grange Halls or home improvement stores, on the internet watching YouTube videos or by spending time in the library or bookstore reading about the skill you want to learn. But, don’t forget to put your new found knowledge to work by practicing what you’ve learned. Be patient too. And remember, a homesteader is a lifelong learner willing to continue gaining skills throughout their life.
I’ve barely scratched the surface here, but this will get you started and hopefully inspire you to delve deeper into the wonderful world of homesteading.
Check out our categories for lots more information on turning your suburban lot into a productive mini-farm.
5-Color Peanut Coleslaw

Over the years I have created a “go-to” list of favorite summer side dishes. You know the kind—baked beans, potato salad, pasta salad, corn salad, pea salad—the kind of cool, refreshing and creamy dishes that go great with BBQ’s or potlucks or just eaten by themselves when the hot weather makes eating the last thing on your mind.
This recipe has it all. Crunch. Cool. Sweet. Tang. It’s our favorite slaw and goes great with steaks and burgers, or chicken and fish. Add a handful of shredded leftover chicken and make it a meal for those hot days when heating up the kitchen is anything but appealing. It’s that good!
5-Color Peanut Coleslaw
INGREDIENTS:
1 pound cabbage, shredded
1 ½ cups red cabbage, shredded
3/4 cup celery, finely sliced
3/4 cup julienned carrots
3/4 cup julienned orange bell pepper
1/3 cup green onion, finely chopped
1/3 cup red wine vinegar
1 tablespoon water
1 ½ tablespoon sugar
1/2 teaspoon seasoning salt
1/4-1/2 teaspoon garlic powder
1/3 cup vegetable oil
1 cup roasted unsalted peanuts
DIRECTIONS:
1. In a large mixing bowl, combine coleslaw, red cabbage, celery, carrots and green onions. (Using a mandolin makes shredding quick and easy)
2. In a pint size Mason jar, combine wine vinegar, water, sugar, seasoned salt, garlic powder and oil. Shake gently to incorporate.
3. Mix dressing with coleslaw; stir in peanuts and toss well.
4. Refrigerate until ready to serve.
NOTE: This is one of those great recipes that can be added to to create a variety of styles. Add edamame, almonds and wontons for an Asian flare; or roasted corn, jalapenos and tortilla strips for a slightly Latin flavor; or add chopped kale, broccoli and peas for big veggie packed meal.
INGREDIENTS:
- 1 pound cabbage, shredded
- 1 ½ cups red cabbage, shredded
- 3/4 cup celery, finely sliced
- 3/4 cup julienned carrots
- 3/4 cup julienned orange bell pepper
- 1/3 cup green onion, finely chopped
- 1/3 cup red wine vinegar
- 1 tablespoon water
- 1 ½ tablespoon sugar
- 1/2 teaspoon seasoning salt
- 1/4-1/2 teaspoon garlic powder
- 1/3 cup vegetable oil
- 1 cup roasted unsalted peanuts
DIRECTIONS:
- 1. In a large mixing bowl, combine coleslaw, red cabbage, celery, carrots and green onions. (Using a mandolin makes shredding quick and easy)
- 2. In a pint size Mason jar, combine wine vinegar, water, sugar, seasoned salt, garlic powder and oil. Shake gently to incorporate.
- 3. Mix dressing with coleslaw; stir in peanuts and toss well.
- 4. Refrigerate until ready to serve.
- NOTE: This is one of those great recipes that can be added to to create a variety of styles. Add edamame, almonds and wontons for an Asian flare; or roasted corn, jalapenos and tortilla strips for a slightly Latin flavor; or add chopped kale, broccoli and peas for big veggie packed meal.
Trapping Flies and Gnats Naturally
During the warmer months my windows and doors are wide open. It’s my natural air conditioner, it makes the house less stuffy and I can smell all the scents the garden has to offer. Open windows and doors are also a gold sealed invitation welcoming flies into the house.
During summer’s harvest the kitchen counter is laden with the day’s pick, fermenting jars of sauerkraut or whatever, granules of sugar from the last jam making session and bowls of ripening fruit waiting to be eaten. It’s all too much for flies to ignore.
The goal is to protect your fresh produce. Your mission is to abate (or bait) the unwanted fly population.
These simple homemade fly trap solutions can help put a stop to pesky flies or ruining your bounty and summer serenity.
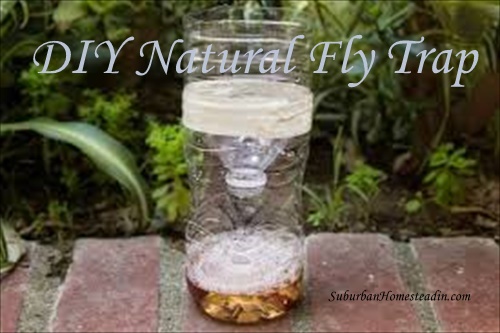
TRAP #1: This is a simple DIY project that involves a plastic bottle, water and stinky stuff. This larger trap is great for using outdoors, or in the barn or coop.
Take a 1-gallon water bottle and cut the top off, about 3-4-inches down from the mouth of the bottle.
Invert the cut off portion into the body of the bottle, leaving a several inch gap between the top and bottom of the bottle.
Pour about a cup of water in the bottom and add the stinky stuff, i.e. overripe soft fruit, a bit of leftover meat, manure, you get the picture. You can also use sweet stuff like sugar or honey.
Now—put in a few drops of liquid dish soap, 3 to 5 should do the trick.
The stinky or sweet attracts the flies while the soap weighs down their wings making it impossible for them to fly. Mission accomplished!
Remember…flies love stinky and sweet stuff, so use whatever you have around.
TRAP #2: This is a variation on the plastic bottle trap, using a Mason jar, wine bottle or decorative jar. I use a decorative jar because this trap sits on my kitchen counter, and who wants to look at dead flies in a trap? Not me!
Similar to the stinky, sweet version, this one uses a cup apple cider vinegar as the attractant.
Pour a cup of apple cider vinegar into the jar and add 3 to 5 drops of liquid dish soap. Place it near where you keep ripening fruit.
TRAP #3: Who said the sediment in the bottom f a wine bottle wasn’t useful?
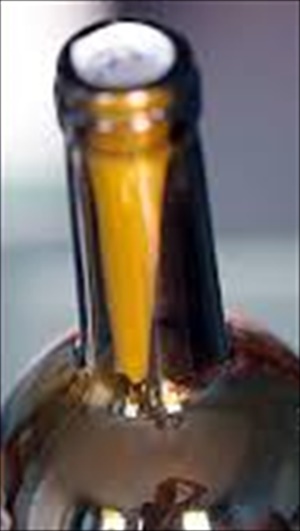
Leave an empty wine bottle open on the counter. Make a small funnel using an 8-1/2 x 11 inch piece of paper and insert it into the neck of the bottle. The small amount of wine that remains in the bottom will attract the flies. They will fly in, but they won’t fly out.
TRAP #4: This is probably the least appealing fly trap, but it works.
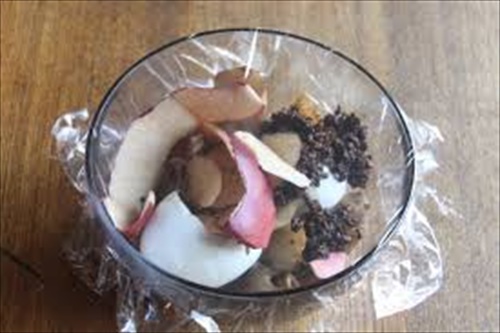
Place overripe fruit or peels in a bowl and cover with plastic wrap. Punch several small holes in the plastic. Amazingly, the flies find their way in, but can’t find their way out.
Remember—flies like stinky and sweet, so the stinkier or sweeter the better. Don’t be afraid to let your trap sit and get really smelly.
When the trap is full…or you just can’t stand to look at it anymore anymore, dump the contents into the compost bin and wash out the bottle or jar to use again. If you’ve used the plastic bottle version, simple toss the whole messy thing into the trash and make yourself a new one.
This is war, folks. Fight to win!
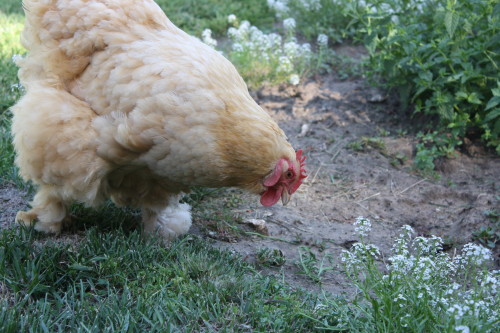
9 Ways to Keep Chickens Cool in Hot Weather
Baby it’s Cold Outside. What the heck!!
It’s not cold, it’s HOT, HOT, HOT!! And, not just hot, but the blistering hot that hangs on you like a heavy wool blanket.
The kind of hot that sees the thermometer hit 70 by 7:00 am, push past 80 by 8:00 am, climb to 90 by 9:00 am and soar over 100 by 10:00 am.
The kind of heat that wilts plants and kills livestock, if you don’t keep them cool.
I was enjoying our fairly mild summer of mid-80’s during the day and mid-60’s through the night, until we were hit with a weather whiplash that swing our temps from seasonably pleasant to scorching hot, like 105+ hot…for days on end. With that kind of extreme heat it’s important to keep a close eye on your critters especially chickens.
We have fairly mild winters here in So Cal, but our summers are a completely different story. Multiple days of triple digit temperatures can exhaust a flock’s ability to cool themselves and you have to be ready to step in and help. It could be the difference between ending the summer with a live flock or a dead one. I much prefer live.
How Chickens Cool Themselves
Mother Nature has equipped chickens to cool themselves by panting and holding their wings away from their body to let the air circulate. Their combs also help release heat, acting like a radiator. Too much panting, though, is a sign of distress.
Signs of Heat Stress
When chickens are having a hard time coping with the heat they will become heat stressed, which presents itself as gasping, panting, listlessness, spreading of wings, not eating or drinking, or diarrhea (if you get to this point your hens in immediate danger).
Did you know that smaller breeds and bantams, large combed breeds or lighter colored breeds are better able to withstand hot weather?
But, in extreme heat most breeds will be affected by the heat in one way or another.
Tips to help your chickens beat the heat until fall’s cool air comes along.
1. Provide lots and lots of cool water. Putting water bowls in the shade and putting small ice blocks in the water will help keep it cool. (I use small freezer containers to make 1-cup ice blocks) Freeze chopped up fruits and veggies in water to create a refreshing treat!
2. Limiting corn based feed and supplementing with juicy fruits and veggies will also help keep chickens cool and hydrated. The energy it takes to digest grains heats up a chicken’s body and can cause overheating.
3. Overripe produce can be frozen and offered “free-choice”, allowing chickens to pick at whatever intices them. Or, cube up and freeze melons for a frozen melon ice cube.
4. Allowing chickens to free range on hot summer days gets them out of a hot, stuffy coop and into the fresh air where they can settle in under bushes, dig and fluffy in soft cool dirt or find a breezy place in a shady tree. If free ranging isn’t possible, make sure to provide lots of shade in the chicken run, or fans or misters in the coop. (I planted my peach tree near the coop run so when it got bigger it would give shade as well as peaches)
5. You can also set a shallow pan of water in the run so the chickens can wade in the cool water. Check it every so often to make sure that it hasn’t gotten too hot.
6. Chickens will drink a lot of water on hot days, so make sure they will never run out by adding a few more water troughs to drink from.
7. Laying hens may also prefer nesting in cooler open areas. Providing boxes, crates or baskets out in the open for hens to use will give them a choice between laying eggs under shrubs and somewhere you can find them.
8. If your coop is set up with nipple waterers, consider putting out a few pans of water as an extra source.
9. I also like to offer a slightly deeper pan of water so my hens can dunk their heads in it. The cool water on their wattles helps to lower their body temperature quickly.
Hot summer days are not the only time you have to worry about the heat; when night time temperatures are high and chickens are cooped for the night it’s important that the coop is well ventilated to allow the air to flow. As the temperature drops, the air flow will cool off the coop. It may be necessary to install a fan to help move out the hot air. Hanging a frozen –gallon water bottle in front of the fan will help cool the air also.
Prevention of heat stress and keeping chickens hydrated is key, but if weather is extremely hot or your chickens are showing signs of stress you can add electrolytes to their water or give it to individual chickens using an eye dropper or a syringe without the needle attached.
Homemade Electrolytes
INGREDIENTS:
1 Cup Water
2 teaspoons sugar
1/8 teaspoon salt
1/8 teaspoon baking soda
DIRECTIONS:
Place all ingredients into a jar and mix gently until sugar and salt dissolve.
TO USE: use at full strength for severely stressed chickens or mix 1 cup per one gallon of drinking water.
Keeping your chickens cool in hot weather could mean the difference between life and death. Whatever you can do to help keep them cool and comfortable will not only save their life, but their egg production as well. Overheated hens don’t like laying eggs.
Recent comments
Aenean nonummy hendrerit mauris. Phasellus porta.