Archive for September, 2016
Roasted Sweet Potatoes & Brussels Sprouts

Do you have a favorite fall vegetable? I do.
I have always been crazy for sweet potatoes. They are my “go-to” fall vegetable, whether they are baked and smothered with butter then sprinkled with salt and pepper, smashed with sweet maple syrup and nutmeg, or roasted with fragrant herbs.
I love trying new fall veggies to add to my kitchen arsenal. But, I have to admit I’ve never been a fan of Brussels sprouts. Those little globe-like cabbage looking things never really appealed to me, probably because my family never ate them…ever. Really—I can’t remember one time growing up that my mom cooked Brussels sprouts.
So, when I found a recipe on the internet for roasted Brussels sprouts I was less than tempted. Even though the picture was beautiful and they looked appealing I refused to be tricked into trying them.
It wasn’t until I had them at a restaurant that I became a convert. They were tender, flavorful and downright yummy. I was sold, and they now make regular appearances on our fall dinner table.
I have never had them any other way but roasted, and I have several different ways to flavor them during the roasting process. Why mess with a good thing, right?
Boy was I ever wrong!
It was a few weeks ago and sis and I were making dinner. I had bought some Brussels sprouts from the market, but they weren’t enough for two people. When I looked around my kitchen I spied a few small sweet potatoes. Not enough for two people either.
At that moment a stroke of brilliance came over me. Why not fix both? Together.
I combed through recipes and combined pieces of a few different one’s and voila! A masterpiece was born.
I cleaned and halved the Brussels sprouts and peeled and cut the sweet potatoes into chunks. Then I drizzled everything with almond oil, sprinkled it with ground cumin, salt and pepper, and tossed the whole thing together. Best idea ever!
I loved the nutty flavor from the almond oil and the cumin brought out a wonderful earthy dimension to the whole dish. After they were roasted, I splashed a bit of balsamic vinegar over, added a bit of thyme springs for good measure and sprinkled on some chopped pecans.
The whole thing turned out divine.
What started out as not enough veggies for our two-person dinner, turned into a flavorful fall mixture and ended in discovering a new favorite side dish. Don’t ya just love experimental cooking?
NOTE: This would make a great holiday side dish. But, if you’re worried about commandeering your oven for 45 minutes make them a day or two ahead and store in a lidded container, then pop them in a 400 degree oven for 5 to 10 minutes, just until they sizzle and are hot. They turn out great!
Roasted Sweet Potatoes & Brussels Sprouts
INGREDIENTS:
1 pound of Brussels sprouts, washed, outer leaves removed and stems trimmed
4 small or 1 large sweet potato, peeled and cut into chunks
2 cloves garlic, peeled and chopped
1/3 cup Almond oil (be adventurous and try other nut oils or olive oil)
1 teaspoon ground cumin
¼ teaspoon garlic salt
1 teaspoon sea salt
Ground pepper to taste
Splash of balsamic vinegar
Thyme leaves for garnish
1/8 cup chopped pecans
DIRECTIONS:
Preheat oven to 400 degrees.
Rinse, remove outer leaves, trim stems and cut Brussels sprouts in half. Small one’s can be kept whole. Place in a large bowl.
Peel and cube sweet potatoes. Add to bowl.
Peel and mince garlic cloves. Add to bowl.
Pour almond oil over vegetables and toss to coat.
Add cumin, garlic salt, sea salt and pepper. Toss to mix.
Drizzle cookie sheet or large casserole dish with oil and spread to coat.
Pour vegetables into pan and arrange so they are in a single layer.
Roast for 30-35 minutes. Veggies are done when they are browned and fork tender.
Spoon into a serving dish and sprinkle with balsamic vinegar (about 1-2 tbsp.) Garnish with thyme and chopped pecans.
Eat hot!
INGREDIENTS:
- 1 pound of Brussels sprouts, washed, outer leaves removed and stems trimmed
- 4 small or 1 large sweet potato, peeled and cut into chunks
- 2 cloves garlic, peeled and chopped
- 1/3 cup Almond oil (be adventurous and try other nut oils or olive oil)
- 1 teaspoon ground cumin
- ¼ teaspoon garlic salt
- 1 teaspoon sea salt
- Ground pepper to taste
- Splash of balsamic vinegar
- Thyme leaves for garnish
- 1/8 cup chopped pecans
DIRECTIONS:
- Preheat oven to 400 degrees.
- Rinse, remove outer leaves, trim stems and cut Brussels sprouts in half. Small one’s can be kept whole. Place in a large bowl.
- Peel and cube sweet potatoes. Add to bowl.
- Peel and mince garlic cloves. Add to bowl.
- Pour almond oil over vegetables and toss to coat.
- Add cumin, garlic salt, sea salt and pepper. Toss to mix.
- Drizzle cookie sheet or large casserole dish with oil and spread to coat.
- Pour vegetables into pan and arrange so they are in a single layer.
- Roast for 30-35 minutes. Veggies are done when they are browned and fork tender.
- Spoon into a serving dish and sprinkle with balsamic vinegar (about 1-2 tbsp.) Garnish with thyme and chopped pecans.
- NOTE: This would make a great holiday side dish. But, if you’re worried about commandeering your oven for 45 minutes make them a day or two ahead and store in a lidded container, then pop them in a 400 degree oven for 5 to 10 minutes, just until they sizzle and are hot. They turn out great!
Brewing & Using Manure Tea
Looking to make your garden grow even better than it does now?
Well—if you have chickens, rabbits, sheep, goats, cows or horses you have all you need to make your own power packed liquid fertilizer.
Yep, that’s right. Manure can be made into a liquid fertilizer, often referred to as “manure tea”.
Mulching your garden with leaves, grass clippings, used livestock bedding or any other organic material is a great way to add nutrients back into the soil, making it friable and easy to work. But, adding a dose of manure tea will punch up the nutrients ten-fold.
We have a routine around our homestead…late fall is the time when the livestock trailer is cleaned out and old shavings and straw is used to fill the nesting boxes in the chicken coop. It’s wintered over in the coop and the hens add another layer of manure to the mix. Come spring we have a good amount of compost to add to the garden beds, enriching the soil and increasing the good bacteria and microorganism population. Gotta keep up the good stuff in our soil, right?
But now we have one added step. We add a generous dose of manure tea to the beds before mixing in all that great compost. Unlike compost tea, which increases the good microbes in the soil, manure tea pulls the nutrients out of the manure, dissolving them into a liquid tea. Making manure tea is also a simple and fast process, so it won’t take long before your garden can benefit from all those added nutrients.
Although chicken manure has the highest level of nitrogen and one of the highest levels of Phosphorous and Potassium, any manure can be used to make manure tea. Since we have chickens, rabbits, ducks and sheep that’s what we’ve used over the years.
So—how simple is making manure tea?
This simple:
- Grab yourself a 5-gallon bucket (preferably one without a crack, (sometimes hard to find around here).
- Dump in a heaping shovel full of aged manure. (Use aged, as fresh can burn your plants and roots).
- Fill the bucket with water and vigorously stir to churn everything up.
- Let the bucket sit for about a week so the “tea” can brew. Stir every day to aerate the mixture so bad bacteria doesn’t grow.
I told you it was simple.
How to Use Manure Tea
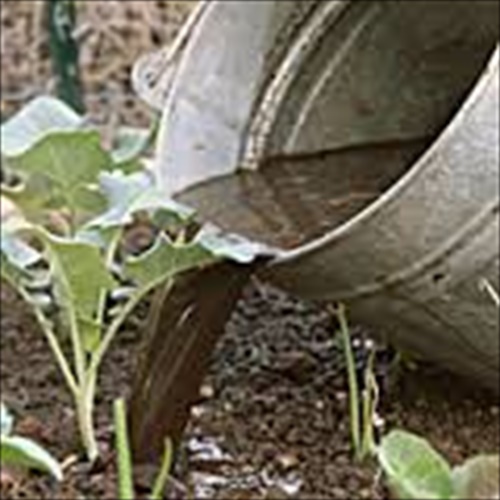
Finished manure tea can be used straight from the bucket using a ladle or watering can.
If your tea turns out really dark it should be diluted at a 1:1 ratio. Simply pour half the tea into a new bucket and fill with water, then strain out the solids from the original bucket and fill with water. Now you have two buckets of tea. Add the solids to your compost pile or till them into garden beds.
Manure tea is best used around the base of young seedlings or plants, giving them a boost of nitrogen to help them grow. Applications can be made once a week using a watering can or pump sprayer. Be cautious, though. Manure has pathogens that can cause illness, so manure tea should not be used on root crops like beets, carrots, onions or potatoes. Also, it should not be applied to the leaves of edible plants like lettuce, kale, spinach or other greens where the leaves can be eaten.
NOTE: I make a big batch of manure tea using an old 35-gallon water tub. Because of the container size I fill it with about 8 to 10-inches of manure, then fill with water. I let it steep and pull out the finished tea using a bucket or watering can. It is used straight on the garden beds as I am preparing them for planting in early spring. I wait about a week or so before planting. After planting I can reapply using a watering can or ladle.
7 Steps to Improve Garden Soil Through the Winter Months
Last fall I was about to pull my hair out!!!
Seriously.
Have you ever had a conversation with someone…the same conversation you’ve had with them for years? Well, that was me this past summer, and I’m still recovering.
For the umpteen millionth time my mom asked me what is wrong with her garden. And—for the umpteen millionth time I have responded…STOP ADDING SAND AND GYPSUM!!!
Mom thinks that if a little is good a whole lot more is better.
Let me explain…
Years ago someone, somewhere convinced my mom that adding sand and gypsum to her soil would help break up the clay and make the soil more plant friendly. But, somehow I don’t think they meant she should make those additions every year for 50 years.
Yep…you got it. For the past 50 years my mom has been dumping buckets of sand and bags of gypsum onto her garden beds. Rather than creating the dark rich workable soil that is deep with organic material and teaming with life all she has managed to do is make CEMENT!
Ya know what grows in cement? Not much of anything.
This is a conversation we’ve had every year since I became an avid gardener and suburban homesteader. Every year I tell her how to improve her soil, and every year she tells me I have no idea what she deals with because my soil is so wonderful.
Well…I have a news flash…my soil wasn’t always wonderful. Great soil is created more often than it just exists. Soil can be good, but great soil is constant work and somewhat of an art form, albeit not fine art.
I think I’ve made a breakthrough, though. Mom has finally decided to take my advice on how to improve her soil so she can finally have the garden she has always wanted.
So how does one go from dead and barren soil to dark, rich, friable soil that plants actually want to live and thrive in? One step at a time, that’s how.
7 Steps to Improve Your Garden Soil During the Winter Months
Grass Clipping & Yard Trimmings:
If you still have a lawn to mow, layer the clippings in the garden instead of dumping them in the yard waste barrel. Alternate with trimmings from flowering plants, vegetables, and non-woody shrubs. Any soft plant material can be laid right on ground, like our forefathers use to do.
Pile on the Manure:
Manure is one thing most farms have in abundance. I consider my chicken, rabbit and sheep manure to be “gold” for my garden. Although chicken manure can be a bit “hot” to spread directly on plants, it is perfect for building up your soil before the planting begins. Cow manure is a great all-round addition, but may be hard to find in suburban areas. Check with local 4-H Clubs or FFA programs for possible sources. Horse is usually very plentiful, but it can contain more salt from the urine than is good for your garden. Apply it sparingly or mix with other less “salty” manures from sheep or goats. I’ve had success finding large qualities of cow and horse manure on CraigsList, but a word of caution here…you may get weed or grain seeds in the bargin, so be sure to mulch heavily so the heat of decomposition will kill them.
Add Mulch:
I’m a hug fan of mulch as the primary source to build up your soil. Straw, hay, shavings and shredded plants help retain moisture, suffocate weeds, and when it breaks down it makes the perfect breeding ground for an army of beneficial garden worms. Some mulching materials can be purchased from local feed stores or garden amendment companies. Lay your mulch about 4-inches deep.
Compost:
If you don’t already have a compost pile, it’s time to start one. It’s the best way to turn kitchen scrapes, coffee grounds, egg shells, weeds, trimmings and manure into a nutrient rich soil additive. When building your compost pile think green and brown, fresh and dried. To set up a compost bin quickly, fasten 3 wooden pallets together and then hinge the 4th for s gate. Nothing fancy is needed.
Natural Amendments:
Inferior garden soil will benefit from a sprinkling of natural amendments like bone or blood meal, worm castings, wood ash (I fill a small trashcan full when I clean out the fireplace), fish emulsion, or Epsom salts.
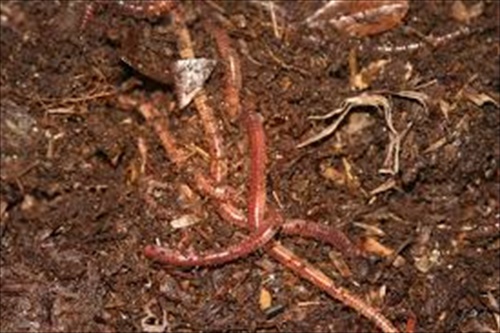
Add Earthworms:
Earthworms are nature’s eager tillers. As they move through the soil they create air pockets, allowing air, nutrients and water to penetrate dead soil. They chew up decomposing matter and shed castings that help improve the soil’s body.
Plant a Winter Cover Crop:
Cover crops are a great way to build up soil and break down hard soils while infusing it with nutrients, improving aeration, killing weeds and weed seeds, and improving water retention. Deep rooted crops like ryegrass are especially good because they’re deep root systems help break up and aerate the soil. Once you’ve built up your soil you can plant nitrogen fixing cover crops, like clover, to improve the nitrogen level of your soil.
When mom made the decision to seriously improve her garden soil we had a lot of work to do. Here are the steps we took beginning in fall and extending into the next growing season.
Season One: Layering the Garden
- Remove all plants and weeds.
- Lightly till soil.
- Add natural amendments, sparingly.
- Layer on manure.
- Top with mulch.
- Pile on compost.
- Plant ryegrass cover crop.
- Drench with manure tea.
- Winter over.
Season Two: Building the Soil
- Deeply till the garden to incorporate all the organic matter from season one.
- Test soil and add needed natural amendments.
- Add earthworms to help speed decomposition and aerate soil.
- Layer on manure, mulch and compost.
- Plant nitrogen fixing cover crop.
- Water generously with manure tea.
Now, here it is…the following fall and my mom’s garden is ready to plant with fall vegetables, bulbs, perennial herbs and flowers.
10 Reasons to Love your Clothesline this Fall

The dog days of summer are not quite over yet, but the soft, sweet, wafting early morning breeze tells me that fall is fighting its way through our hot September days.
Its days like this that I really enjoy seeing my laundry hanging on the clothes line. Vivid colors and bright whites flapping in the breeze is a quintessential farm look and looks so homey. But does that mean I have to give up my clothes line once the cooler days of fall arrive?
No way!
The benefits of a clothes line can be enjoyed year-round. So, if you’ve been on the fence about setting up your own eco-friendly clothes dryer now is the perfect time.
Need a little incentive? Here are my 10 reasons to use a clothesline all year long.
1. A clothesline uses no electricity. Kind of a no-brainer, right? What may not be so evident is the $300 dollars-a-year I save not using my dryer.
2. Clotheslines are more efficient because I can run my clothes through the washer and not have to wait for the dryer to finish. In just a few hours all my laundry is hanging on the line, letting the sun do its part while I do other chores.
3. Clothes last longer. The heat and agitation of a dryer can speed up the breakdown of fibers, while a clothesline helps preserve your clothes, especially those made from delicate fabrics.
4. Hanging clothes on a line is therapeutic. Honestly, it is. The few minutes I spend hanging clothes allows my mind drift away from our hectic world and into one that is calmer and more serene, one where hanging clothes on the line is your only important task.
5. Line dried clothes smell like a fresh outdoor breeze. No need for chemical laden dryer sheets that can cause irritation or allergies.
6. It makes my heart smile to see a line full of clothes. It’s a visual accomplishment.
7. Clothes dry faster outdoors than in a dryer. This is especially true in my area where the wind blows well into October and clouds rarely gather.
8. Folding clothes is faster when they’re not waded up from being in the dryer. I have a trick here, too. I put certain clothes on a hanger before hanging them on the line. When they’re dry, all I have to do is gather up the hangers and put them in the closest.
9. Fresh air and exercise. Moving, stretching, breathing deeply are all health benefits from hanging clothes on a line.
What’s that you say? Winter is on its way.
10. Get yourself a portable drying rack or set up a clothes line indoors. Damp clothes help humidify dry winter air while giving you many of the benefits of outdoor drying.
Recent comments
Aenean nonummy hendrerit mauris. Phasellus porta.