Archive for June, 2016
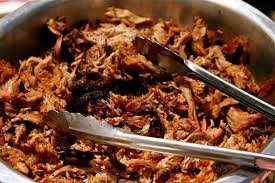
Slow Cooker Pulled Pork Recipe

Independence Day is just around the corner, and like me, I’m sure you are looking for a full-proof recipe that will keep you in on the celebrations and OUT of the kitchen. Am I right?
My “go to” favorite recipe is slow, simmering pulled pork in the Crock-Pot. It’s a full proof recipe that can’t be messed up.
I’m serious, you can’t mess this one up. I dare you to try!
It’s also a recipe you’ll love because you can take advantage of all the great sales on pork shoulder roasts during the summer month, or clean out the freezer while waiting for the coming fall harvest.
The other reason I love pulled pork is its versatility. Check it out…there is Carolina pulled pork with its vinegary based sauce, or the spicy Louisiana version. But, my all-time favorite is a Texas style chock full of thick gooey sauce.
This recipe is simple and economical. It can take a tough cut of meat and turn it into something your family and guests will go crazy over. Plus, using a Crock Pot gives you plenty of time to enjoy the long hectic summer months, what a bonus!
And, remember, you can’t mess this up.
Cooked more than the recommended time…no problem.
Cook it days ahead of a party…no problem.
Cook it and freeze for a great winter time treat…no problem.
Change the seasonings to fit your family’s taste…absolutely no problem.
I wasn’t kidding about being versatile.
Even if you want to toss a frozen hunk of meat into the Crock Pot, it’s no problem.
I can’t rave enough about adding this recipe to your farmhouse arsenal of full proof, quick and easy recipes.
Slow Cooker Pulled Pork Recipe
‘
- 1-1/2 cups ketchup
- 1/2 cup brown sugar
- 1/2 cup broth, beef or chicken
- 3 tablespoons Worcestershire sauce
- 4 cloves garlic, crushed
- 1 onion, diced small
- 2 tablespoons browning sauce
Lay onions on the bottom of pot and place pork roast on top.
Mix all other ingredients and pour over roast.
Cook on low for 8-12 hours, or until the meat is falling off the bone. (Sometimes I cook the pulled pork through the night so it’s ready by morning.)
Remove meat from the slow cooker and cool on a cutting board until you can handle it without getting burned. This is where things get to be “hands-on”.
Pull the meat from the bone and separate the fat. Use two forks, pulling in opposite directions, to shred the meat. NOTE: I have read that some use the paddle attachment on their Kitchen Aid mixer to make this part go faster, but I prefer the fork method because the clean-up is easier.
Drain off the fat from the liquid and put the meat back into the slow cooker. Turn on low and let the meat simmer and absorb more of the sauce until it’s ready to serve. After all, it’s all about the sauce…right?
Now you’re ready to pile up those buns!
Want a few more ideas for your pulled pork?
· Use your own favorite BBQ sauce.
· Cook the pork shoulder ahead of the gathering then reheat in the slow cooker until it’s warmed through.
· Cook up a batch of pulled pork and portion it into freezer containers for quick summer meals.
· Pulled pork is the ultimate when piled on a bun and topped with your favorite coleslaw, but if you have family or friends, like me, who are gluten intolerant, skip the bun, it’s great just by itself.
· Try something new by dotting your bun with yellow mustard and lying on a nice thick pickle. Cool, crisp, sweet, tart. Your mouth won’t know what to do.
· Looking for a pulled pork recipe that’s versatile enough to use in many different dishes? Check out this simple take on an American classic and use it in dishes from salads to nachos; homemade pizzas to southwestern tacos. The possibilities are as endless as the days of summer.
Simple Pulled Pork Recipe
· 1 pork shoulder
· 1 onion, diced
· 1 cup broth (chicken, beef or vegetable)
· 2 teaspoon granulated garlic
· 1 teaspoon dry mustard
· 1 teaspoon salt
· ½ teaspoon black pepper
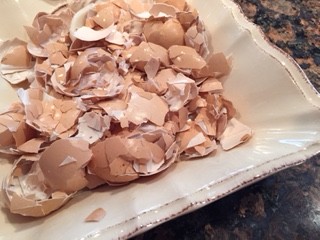
Using Crushed Egg Shells as a Calcium Supplement
Like any good homesteader I am frugal beyond belief, always looking for ways to cut costs, reuse and repurpose. As the cost of chicken feed and supplements continue to go up I began looking for ways to offset that expense.
Of course, kitchen scrapes, spent veggies from the garden and free ranging for bugs and treats are still the main stays in supplementing feed, but what about other supplements, particularly calcium?
Hens need an ample supply of calcium for good health, and because without it their shells are thin and fragile, sometimes breaking when you collect or store eggs.
What I didn’t realize, before my research, was the wide and varying opinions of where to get calcium for your hens. Some people think only commercially available calcium in the form of oyster shells or limestone from a feed store should be used, but those can be pricey. My frugal farm girl brain wanted something cheaper and more sustainable. I didn’t have far to look for a solution as it turned out. In fact, I didn’t have to look any farther than my chicken coop.
What?? Where did you find calcium in your chicken coop, you ask?
Right inside of each nest box, that’s where!
Yep, you got it. Egg shells are high, really high, in calcium and make the perfect renewable source of a supplement your hens need for good health and firm egg shells.
In reality, farmers and homesteaders were feeding egg shells back to their flocks hundreds of years before commercial products ever hit the market.
Many commercial lay rations contain a suitable amount of calcium, but why not let your girls have a free choice of extra calcium whenever they want it? It just makes good sense to feed your hard working girls a little bit extra.
BUT—how do you feed egg shells so they don’t make my hens sick?
Logical question.
Here are a few tips on how I clean and reuse my egg shells.
- Each time I use eggs I rinse and store them in container. As it becomes full I just smash down the shells to make room for more.
- When my container is full, I spread the crushed shells on a cookie sheet and bake in the oven at 350 for about 10-12 minutes. This will make the shells brittle, dry out the inner membrane and kill any bacteria. (I’m not so worried about bacteria when using my own eggs; the hens are use to their own germs. But, store bought eggs will have bacterial strains that your hens are not use to, and that could cause illness.)
- Once the shells have cooled a bit, crush away. You can use a potato masher, put them in a plastic bag and roll with a rolling pin, or just smash them with a wooden spoon, which is how I do it. Some people use a blender or a food processor to get a finer texture, but I’m too lazy to drag those appliances out of the cabinet.
- The goal is to smash the shells small enough that they are unrecognizable to the hens.
- To feed them either mix with their normal rations or offer them “free-choice” in a separate feeder. I use a large rabbit feeder and feed them separately. The hens are perfectly capable of deciding when they need a calcium boost and how much.
I know what you’re thinking.
Won’t feeding eggshells entice my hens to eat eggs?
It might, but not very likely. I’ve never had a problem. In fact, I’ve had more egg eaters when I didn’t feed egg shells, probably because the girls were craving calcium and the eggs were the closest source. But, every flock is different. There’s always one rouge hen that goes crazy and pecks at anything and everything. Once she gets a taste of egg she may become an egg eater, but that’s a whole different problem that I wrote about in “Hens Eating Their Eggs? There is a Reason”.
There you have it…a free source of renewable, calcium rich supplement that will keep your girls happy and you in eggs that you won’t poke a finger through. What more could a farm girl ask for?
Should I Refrigerate my Eggs?
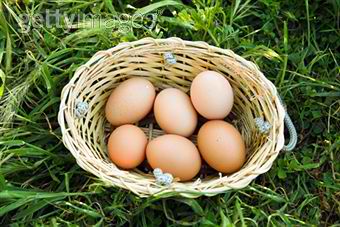
There’s just something about having fresh eggs on a kitchen counter that I love. It speaks to my inner farm girl. It shows me how productive my little farm is, and it reminds me to use eggs often (not that using eggs is a problem around here).
But, when friends and family visit they always ask me, “shouldn’t your eggs be in the fridge”?
The answer to that question is, yes. And, no.
For centuries eggs sat on a counter or table in the kitchen because there was no refrigeration. Just look at any period movie that portrays life in the 1700’s, 1800’s, even the early 1900’s, and I bet if you look closely at the kitchen scenes you’ll see eggs out in the open.
Today’s consumer is so afraid of food and how it can be stored that they think every little bit sitting out is a recipe for food poisoning.
Believe it or not there are several reasons I keep eggs on the counter. For one, when egg laying season hits full force, and I am overwhelmed with eggs, there just isn’t enough room in the fridge to store them all. Second, my favorite baking recipes call for room temperature eggs, and I like having them at the ready instead of delaying while eggs come to room temp. And, thirdly, eggs don’t have to be refrigerated to keep from spoiling.
WHAT???
You heard me right. Eggs DON’T need to be refrigerated, at least not in the short term. I’ll explain when they should in a bit.
So—why don’t eggs have to be refrigerated, you ask?
One simple, yet little know reason.
Hens lay eggs surrounded with a thin, invisible, film called the cuticle or “bloom”. This cuticle film seals the egg, helping to prevent bacteria from entering tiny pores in the shell. The cuticle also helps to prevent the loss of moisture as eggs age. We already knew how wonderful chickens are, but how cool is that? Mother Nature has equipped our hens with a self-sealing mechanism that has enabled eggs to safely stay unrefridgerated for centuries.
BUT—and there’s usually a but, isn’t there? This does not apply to all eggs.
Commercially produced eggs must be washed before they are sold to the public to meet USDA requirements. Washing removes the thin film making eggs more susceptible to contamination. Without the protective cuticle film, eggs must be refrigerated or else they will spoil.
For the home egg producer, however, the question now becomes, to wash or not to wash?
Personally, I don’t wash my eggs and never have, until I am ready to use them. For decades, I have left duck, goose and chicken eggs on the counter to be easily used throughout the week. There is one exception though. If I get an extremely dirty or poopy egg it is washed right away and put in the fridge. Who wants THAT stuff hanging around your kitchen workspace? Also, if I get more eggs than I can use in a week or so they go into the fridge unwashed. Eggs can be stored out of the fridge for about a week and a half. If you don’t think you’ll be using them in that time pop um into the fridge.
So—how do I store eggs on the counter? That’s the fun part.
As I said before, I love having eggs on the counter, those subtle hues of green, blue, tan and almost pink make such an inviting picture. But, what I love even more are eggs in a pretty container. Sometimes I just leave them in my vintage wire collection basket, while other times they are neatly arranged in a colorful ceramic bowl or in a vintage egg crate. I love switching up my containers to create a new look.
For longer term storage, the fridge is still your best bet. But, for everyday use let your imagination run wild and create your own farm girl vignette. You’ll enjoy the view.
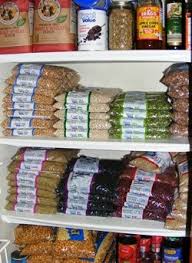
10-Weeks to a Well-Stocked Pantry
A few posts back I wrote about how a well-stocked pantry can save you money and time, while adding to your homestead’s ability to weather situations that may prevent you from getting to town for supplies. You can read “Creating a Well-Stocked Homestead Pantry”, here.
It’s one thing to have a stocked pantry. It’s quite another to “start” creating and paying for a well-stocked pantry. My larger pantry happened over time, but the smaller “starter” pantry took just a few weeks. For many, building a pantry in a few weeks is thought of as an expensive proposition. But it doesn’t have to be. The tips below will help you get started on building a pantry for only a few dollars each week.
Want to build a homestead pantry on a few dollars a week? Here’s how.
Pick a day of the week to be your starter day, like Monday. Beginning on Monday, and every day after that, put away $2.00. Put it in a jar. Put it in an envelope. Put it in a drawer. Just, put it away.
At the end of seven days, take your $14.00 a go shopping for the staple items that will make up the base of your pantry. You’re only going to spend $14.00. Any change remaining after your purchases will be put back into your collection to use the following week.
Remember…these categories are based on those in “Creating a Well-Stocked Homestead Pantry”. You can reread it here to refresh your memory.
A little note: There is no right or wrong way to supply your pantry. In my sample I tried to cover several categories of what I felt were the most important and would be used more often. You could easily concentrate on just one area until it is filled, or create your own. You know your family and what they will eat better than anyone. If you have to, make your own list.
WEEK 1: Starting Amount – $14.00
- All-purpose white flour (10 lbs.) – $5.12 – Wal-Mart
- Sugar (10 lbs.) – $5.74 – Wal-Mart
- Table Salt (4 lbs.) – $2.77 – Wal-Mart
- Amount Remaining: .37
WEEK 2: Starting Amount – $14.37
- Old-Fashioned Oatmeal (5 lbs.) – $3.95 – Smart & Final bulk section
- White Rice (20 lbs.) – $8.92 – Wal-Mart
- Sea Salt (1 lb.) – $1.00 – Big Lots
- Amount Remaining: .50
WEEK 3: Starting Amount – $14.50
- Pearled Barley (5 lbs.) – $3.95 – Smart & Final
- Spaghetti Noodles (4 lbs.) – $3.59 – Smart & Final
- Egg Noodles (2.5 lbs.) – $6.39 – Smart & Final
- Amount Remaining: .57
WEEK 4: Starting Amount — $14.57
- Dried Great Northern Beans (5 lbs.) – $7.99 – Smart & Final
- Corn Meal (5 lbs.) – $3.99 – Smart & Final
- Baking Powder (12 oz.) – $1.89 – Smart & Final
- Amount Remaining: .70
WEEK 5: Starting Amount – $14.70
- Split Peas (5 lbs.) – $4.29 – Smart & Final
- Flour Whole Wheat – (5 lbs.) – $4.59 – Smart & Final
- Yeast (2 lbs.) – $4.79 – Smart & Final
- Baking Soda (1 lb.) – .89 – Smart & Final
- Amount Remaining: .14
WEEK 6: Starting Amount – $14.14
- Brown Rice (5 lbs.) – $4.29 – Smart & Final
- Tube Pasta (4 lbs.) – $4.00 – Smart & Final
- White Vinegar (1 gal.) – $2.04 – Wal-Mart
- Cider Vinegar (1 gal.) – $3.79 – Wal-Mart
- Amount Remaining: .02
WEEK 7: Starting Amount – $14.02
- Bread Flour (10 lbs.) – $7.29 – Smart & Final
- Dried Pinto Beans (10 lbs.) – $5.99 – Smart & Final
- Amount Remaining: .74
WEEK 8: Starting Amount – $14.74
- Olive Oil (1 qt.) – $7.99 – Smart & Final
- Arborio Rice (2 lbs.) – $3.99 – Smart & Final
- Fine Salt (1 lb.) – $1.00 – Big Lots
- Coarse Salt (1 lb.) $1.00 – Big Lots
- Amount Remaining: .76
WEEK 9: Starting Amount: $14.76
- Butter (3 lbs.) – $7.79 – Costco
- Brown Sugar (4 lbs.) – $4.00 – Smart & Final
- Macaroni (2 lbs.) – $1.98 – Smart & Final
- Amount Remaining: .99
WEEK 10: Starting Amount: $14.99
- Vegetable Shortening (3 lbs.) – $4.39 – Wal-Mart
- Walnuts, halves (1/2 lb.) – $4.25 – Smart & Final
- Almonds, slivered or sliced (1/2 lb.) – $3.29 – Smart & Final
- Sunflower Seeds, shelled (1 lb.) – $1.50 – Big Lots
- Cornstarch (16 oz.) – $1.49 – Wal-Mart
- Amount Remaining: .07
In just a few short weeks you’ll be well on your way to stocking a full pantry. If you don’t want to spend 10-weeks gathering up your supplies, save a bit more each week, or save for a longer period of time then go shopping all at once. Be sure to take advantage of sales and coupons to make your hard earned money go even farther.
At the end, you’ll experience the luxury of walking to the pantry and pulling out what you need to make a meal. No more last minute runs to the grocery store. No more frantic trips ahead of winter storms only to find store shelves empty. Now, you can sail right through whatever life, and Mother Nature throws your way.
Recent comments
Aenean nonummy hendrerit mauris. Phasellus porta.