Archive for November, 2013
Frugal Farm Fashion
I am a self avowed thrift store junky. Really. So much of what I have on the farm has been found at thrift and junk stores; from galvanized water troughs to garden fencing to clay pots for vegetable and flower starts, to my newly acquired barn jacket.
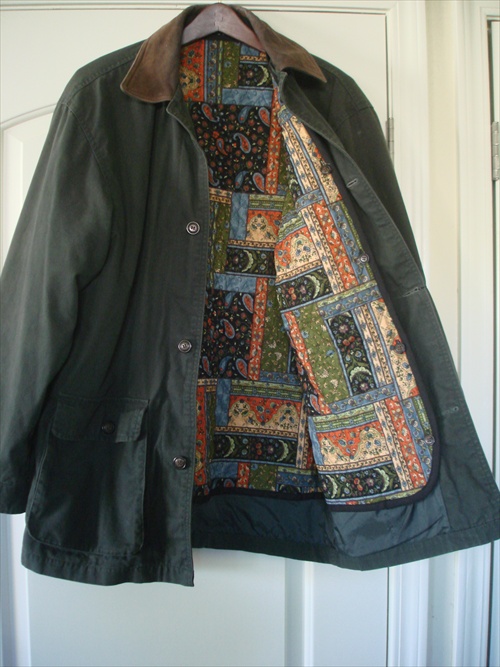
The find was a pure accident. I wasn’t even really on a mission to haunt the many thrift stores that dot our area, but am unexpected trip to the other side of the county found me on the main drag where some of my favorite stores are located, and since I don’t get over that direction very often I decided to make the rounds. Several stores had some interesting items but nothing tempting enough to lay out cash for. It wasn’t until I breezed through the last store that my find was discovered. I wasn’t even really looking after so much defeat, but as I made my way to the door a dark green jacket caught my eye. Turns out it was an aged Eddie Bauer barn coat with real leather accents. Thinking there must be something wrong with it I looked it over carefully for tears or stains or split seams, but none were found. I checked to see if all the buttons were there. They were. I checked to make sure the zippers worked. They did. Nothing seemed to be wrong with it other than the fact that it was an older style.
I couldn’t believe anyone would get rid of such a lovely and useful jacket, but we live in such an over consumptive society now a days that it shouldn’t really surprise me. At any rate their loss of giving away a useful piece of clothing was entirely my gain. As it turned out the thrift store was having a sale that day and the jacket cost me a whopping $2.50!
The only thing wrong with it, at least in my eyes, was the completely hideous blue liner, but that was easily remedied a few days later when I stopped by the fabric store and found a wonderful quilted fabric on the clearance table. I bought two yards, just to be safe, for $4.
When I got home I unbuttoned the liner from the coat and proceeded to rip the seams. I laid each piece out on brown paper bags and traced them to make a pattern. I’m not much of a seamstress, but the idea was simple enough that I thought I could manage. Once the pattern was made and laid out on the new fabric I took a deep breath and began cutting. After I cut all the pieces I hopped on-line to research the steps in assembling the new liner, simple enough. The new quilted fabric is reversible, so I trimmed it in black bias tape left over from one of Brianne’s school projects. Now if I wanted to change the look and feel of the jacket all I have to do is turn the liner around. The final and most daunting step was making the button holes. But, I have to say I didn’t do half bad. Now I have a barn jacket that is not only warm, but also farm fashionable too.
It never ceases to amaze me, or make me happy, that something so simple can be turned into something so beautiful with a few adjustments. Every time I wear the jacket I get complements, even if people do look askance when they learn of the jackets history. It never bothers me though. Let other people spend hundreds of dollars on a jacket like that. I’m thrilled to have my piece of wearable art for just $6.50.
Thanksgiving in the Mountains

After months of planning for a Thanksgiving week that provided a traditional turkey dinner to over 3,000 food insecure people I shut down my computer, turned off the cell phone, walked out of my office, packed up my truck and headed north for a Thanksgiving weekend in the mountains. We’ll have a wonderful dinner at a local lodge and with the winter storms we’ve had lately there maybe plenty of snow for dog sledding, snow mobiling and sleigh rides (here’s hoping). We’ll walk in the crisp evening air, breathing in deeply the scent of pine and wood stoves burning. We’ll wander the village gazing at holiday decorations, talking to shop owners, ducking into small cafes or coffee houses to warm ourselves by the fire with a cup of tea or mug of hot chocolate. At night we’ll sit by the fire and read, play games or just revel in each others company, miles from the demands of the modern world; a world away from the noise, traffic and chaos.
It’s great to be surrounded by family and friends in large boisterous gatherings, but I have to admit our decision to celebrate the holiday away – just Brianne and I, has been a good one. And, we are not really alone. The cafes are full of people escaping to the hills just like us, wanting to spend the day and weekend in the beauty of nature rather than the commercialism that normally surrounds us. I have to say honestly, I don’t miss the commotion, or the endless conversations justifying my life and lifestyle. Momentary twinges of guilt shoot through me, but I don’t care. Life is about living and that’s what we are doing…living life our way. Breakfast is ready, so I’ve gotta fly. But I wanted to check in and wish you all a
Happy Thanksgiving!
From Suburban Homesteading.com
Winterize Garden Tools
Tools are a partner in your farm and deserve to be taken care of rather than neglected. Kept in good working order they will serve you well for years. Abandoned and abused and they will fall short in their usefulness and cost you money in replacements. How well you care for your garden tools will dictate how they will take care of you and your farming experience.
They key to a tool’s longevity is regular maintenance and winterizing. Spend a few minutes during the growing season cleaning your tools so they will be in good working order and easy to use the next time you need it. Then, spend a short amount of time at the end of the season putting your tools to bed for the winter.
To quickly and easily clean tools with teeth, blades or tines place a 5-gallon bucket near your tool shed, greenhouse or where ever you store your tools and it fill with clean sand. Now, mix in enough motor-oil so the sand is damp, about 2/3 of a quart. Periodically and at the end of the growing season scrap off any excess dirt and plunge the tool into the oiled sand several times. The friction of the up and down motion will gently scrub and oil the tool, protecting it from rust and corrosion. Brush off the sand and the tool wipe it down with a cloth dampened with oil and its ready for winter storage.
Before storing tools for the winter, check the handles for cracks and make sure spades, rakes and hoes are fastened securely to the handle. Minor cracks can be wrapped with hockey-stick tape, found at most sporting goods stores. Start a few inches below where the crack begins and wind the tape tightly around the handle, overlapping with each turn, and ending several inches above the crack. Severely cracked or damaged handles should be replaced and loose heads can be bolted in place. This is also a good time to sharpen any dull shovels or axes or bladed tools.
When tools are ready to store, don’t just throw them in a shed or garage, hang them up, off the floor so they don’t get damp during colder winter months.
Cinnamon Raisin Bread with Candied Pecans
Nothing says lazy fall Sunday morning better than waking up to a house filled with the warm aroma of bread baking. And, not just any bread, but spice infused cinnamon raisin bread.
Years ago this was a staple in our house. Every Saturday evening, before we went to bed, we would load up the pan of our bread machine, set the timer and wake to that wonderful smell of warm bread and spices. The recipes we tried were so good that invariably we would eat almost the entire loaf by noon. Needless to say our taste buds and tummies loved this fall ritual, but out waistlines did not, so we suspended the routine until finally other activities took over and we barely remembered ever baking the bread at all.
That was until today’s cloud covered grey sky gave me reason to do more chores indoors than out. One project I’ve been slowing working on is to catalog and organize my library. I got the idea from a book on Thomas Jefferson. He kept meticulous records of a library boosting over 10,000 books from over a dozen different genres. There was art and music; agriculture and horticulture; science and astrology; architecture, history, poems and literature, and, of course a wide array of books from the age of enlightenment and its proponents.
My library isn’t nearly as large as Thomas Jefferson’s, but I did realize a few months ago that I had multiple copies of the same books. I can’t resist a good deal when our local library has its quarterly used book sale. But, taking up space with several copies of the same book leaves little room for new additions. So, in the Jeffersonian fashion I started cataloging my collection. When I got to my food and cook book section I stumbled across a collection of recipes I had strewn throughout the pages of a book on breads. In the stack of papers was hand written notes about our long lost Sunday ritual.
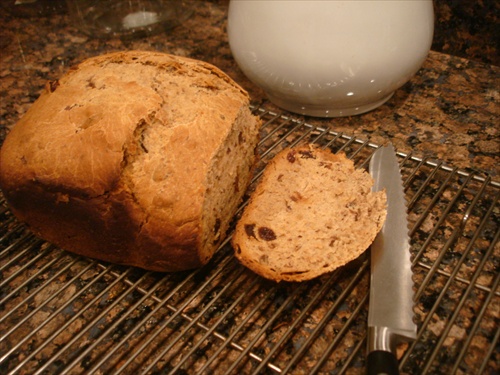
As I flipped through the slips of paper a wave of nostalgia came over me and I just had to bake a loaf of our favorite morning bread. When I pulled out all the ingredients an almost empty package of candied pecans caught my eye. I thought “what the heck”, this is a very forgiving recipe, why not throw them in as well, and I placed them on the counter. I measured and loaded the pan of the bread machine, turned it on and waited for that old familiar aroma to fill the house. When the bread finally finished I set it out on a cooling rack for a few minutes before slathering it with butter. I sank into my chair with a cup of hot tea and relished every bite. Isn’t it wonderfully amazing how a smell can bring all those lovely memories flooding back?
To create your own fall baking tradition try the recipe below, or create your own. But, remember…you’ve been warned how good it is.
Cinnamon Raisin Bread with Candied Pecans
Ingredients:
1 cup water
2 tbsp butter
3 cups flour (you can also use ½ whole wheat flour)
3 tbsp brown sugar (can also use white sugar)
1-1/2 tsp salt
2 tsp cinnamon (can also use pumpkin pie spice for a more spiced bread)
2-1/2 tsp yeast
¾ cup raisins
1/3 cup candied pecan pieces
Soak raisins in water while you load the bread machine pan with the ingredients in the order they are listed. Drain raisins well and add them to the pan. Set bread machine on “sweet bread” and start. That’s all there is to it. Makes about a 1 pound loaf.
RAIN!!!
RAIN
Wet
Sweet
Gentle
Soothing
Falling from the sky
Hydrating the soil
Quenching the thirsty land
Puddles ’round the barn
Ducks splash
Birds bathe
Life renewed
Life is good
Winter Preps Complete!
It’s been a wild few weeks between work speeding up and trying to get my winter preps done before the real craziness begins. But, this past weekend marked the completion of all the big winter prep projects and a few not-so-important ones.
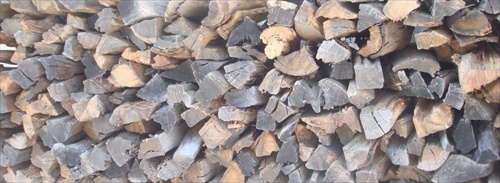
I have 2 cords of seasoned and split firewood stacked outside the farmhouse door, with 2 more waiting in the wings. I just have to pick them up.
The summer garden and pumpkin patch has been pulled up and composted. All the fences and trellises for vining crops have been stored. The hoop house frame has been re-installed. Nights are not cold enough and days are too warm to put the bed cover on, but at least having the frame up will make adding the cover easier and faster. The patio garden, planted with kale, chard, radishes and broccoli raab is already3-inched tall. Cool weather crops will be planted in the small raised bed near the barn. I’ll have to wait for the first rains to amend the fruit trees and berry patch. The grapes have been pruned and the fruit trees lightly trimmed. They’ll get a better pruning in February.
The chicken coop and nesting boxes have been cleaned out and re-bedded. The litter was spread on the old pumpkin/squash patch and will be turned in as soon as my loving family brings my tiller back. 200 pounds of chicken feed should get us through the next several months and the coop wire was checked for needed repairs. I pulled out the heat lamp from its storage box and installed it in the coop, partly for extra light to encourage egg laying and partly for colder weather.
The area outside the barn was raked, buckets and troughs stored, sprinklers were put away and hoses coiled up. We don’t get many freezing nights so there is no need to put hoses away.
The truck has new wiper blades, oil changed, smog check done, and anti-freeze added in preparation for our trip to the mountains over Thanksgiving.
There’s been a lot of shopping also. Furnace filters were replaced. Stocks of rice, beans, grains and a few other staples were added to the pantry just to round out what I already had. We also have a whole lamb, 15 chickens cut in halves, quarters or whole, a few pork loin roasts, 6 ducks and quarts and quarts of various soup bases in the big freezer.
I made a batch of apple butter with the heirloom varieties we bought up north and it turned out great. I’m saving the pumpkin for later.
Summer sheets have been replaced with flannel and quilts and down comforters have been added to each bed.
I keep an arrangement of candles in my fireplace during the warmer months, but it has made way for the firewood grate and fireplace screen. Our late, late nights are dipping into the high 40’s, but not early enough in the evening to warrant a fire.
I even managed to paint my potting bench turned beverage bar and the new barn door I built last month. Hopefully I’ll get it hung this weekend.
All-in-all I think we’re in good shape going into the colder months. It certainly is a lot different than prepping 50 sheep, 30 head of cattle, dozens of chickens and hundreds of acres for winter. I’m not quite sure which I prefer.
A farm at rest is an eerily beautiful thing.
Farmstead Made Yoghurt
 Much of the journey to becoming a homesteader is taking small steps, learning a few skills at a time rather than jumping in full force with both feet, which can be overwhelming or even disastrous. For apartment dwellers it may be potting herbs in a window box garden, turning farmer’s market fruits into jams and jellies or combining wheat and water to make bread. For those living on suburban lots these skills can be expanded to include a garden, rabbits or a small flock of chickens. Small deliberate steps make a homesteader built on a solid foundation, not the fast rush to try everything at once.
One small skill you can learn in a day is making farmstead yoghurt from scratch.
Yoghurt has been a staple food in most of the world since ancient times. Different countries use milk from different animals, from the common cows, sheep and goats to lesser know milk from water buffalos or camels.
I like making homemade yoghurt because it connects me with the farmer and animals that produce the milk. I don’t have to worry about where the milk is coming from or how the animals have been feed or if they have been given a steady diet of antibiotics or milk producing hormones. I know how they were raised because I know the farmer and the animals.
I don’t currently raise milking animals and I’m not sure it will ever be in my homesteading plans. But, with good friends who have dairy goats, and cows milk available through organic co-ops I don’t really need to raise my own.
Yoghurt is one of the simplest skills you can learn because doesn’t take a lot of effort and you don’t need a lot of fancy equipment. A standard glass canning jar, a pot and the cultures are really all you need. That coupled with a few hours of heat and you’ll be savoring your own tangy, spoonable, creamy delight.
Let’s get started…
As with any dairy making process the better the milk the better the outcome. Try to purchase quality organic milk from a local dairy producer. And, if that is not possible, use milk from an organic market that does not have any added ingredients, stabilizers or is ultra-pasteurized. You’ll also need an organic plain yoghurt with no stabilizers or fillers as a culture, just milk and cultures.
Oh, one thing before you start; homemade yoghurt is not like the thick sweet store bought stuff full of fillers and thickeners. It is softer and some think a little more pourable.
Here we go…
Step One: Heat ½ gallon of milk on the stove to 180 degrees F. Remove from heat and let cool to 120 degrees F.
Step Two: Spoon in 4 tablespoons of the plain yoghurt and whisk to fully incorporate.
Step Three: Pour milk into the size jar you want (I use pint jars), then place them together in a warm, draft-free place. The goal is to keep the yoghurt at 100 degrees F so the cultures can do their thing. Covering them with dish towels will help keep them warm. My goat milk supplier, Sandy, uses a heating pad set on low to help keep the right temperature. Leave them covered for several hours while the cultures work.
Step Four: After about 4 to 6 hours the yoghurt should be done and can be stored in the refrigerator when cooled.
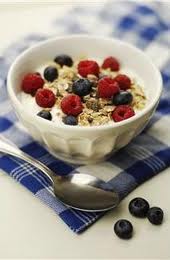
Step Five: Now comes the fun part. When the yoghurt is ready to eat you can mix in cut fruit, smashed berries, granola, honey and spices or any other yummy combination you can think of. Experiment! It’ll be fun.
BUT, be sure to save a small bit of plain homemade yoghurt to be the started for your next batch. It won’t take long before making your own yoghurt will be a cooking staple.
If Greek yoghurt is more your style, as it is mine, simply place a few layers of cheesecloth in a colander and place the colander in a bowl. Let the yoghurt drain until you reach the consistency you like. If you continue to drain most of the liquid out you will have something that resembles cream cheese, which when salted can be used in many savory dishes.
What’s left in the bowl is the whey, a watery, white-ish liquid that can be used in making bread and baking, to thickening soups or even in blended drinks.
From this simple skill you can enhance the connection you have with your food, not to mention providing your family with a nutritious snack or meal. It may even give you the confidence to try simple farmstead cheeses as well.
Pulling Pigs & Small Hands
 Brianne has always been a little snippet of a girl. At 5’3” she barely tops the scale at 105 pounds. I tease her that if it weren’t for her hair (long and thick) she wouldn’t even weigh 100 pounds. But, her size has never stopped her.
In high school she played volleyball. And in 4-H she raised meat rabbits & meat chickens, show chickens and market lambs. The work that goes into all those animals is the same whether you are an adult or a child. Most people thought it was me who did all the work while Brianne waltzed into the show ring having done nothing. But, nothing could be farther from the truth. She was the one up at 6am feeding and watering before getting ready for school and she was the one who cleaned pens, hauled feed, packed the trailer and groomed animals for shows. And, she did it for 15 years.
Now in college, she has become one of the worker-bees of her college Ag Dept. From doing paperwork to mucking out barns she is becoming a solid farm girl. But, what she is really prized for, and we have to laugh, is her thin arms and tiny hands. Why you may ask? Well—when it’s time to pull babies, of any kind, it’s easier if you have small arms and hands.
Think about it…who do you think a sow or a ewe would rather have reaching inside them pulling their baby? A twenty something guy or a petit young lady with small arms.
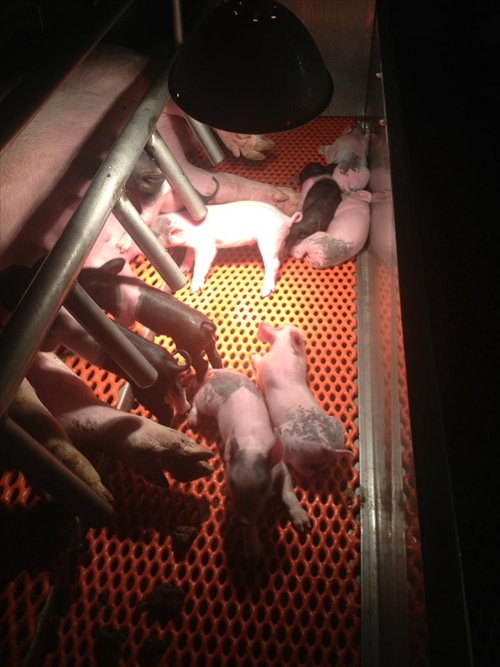
That’s what she did this past weekend…pull baby pigs. The swine unit at her college is in full swing farrowing sows and Brianne was right in the thick of things as several first time gilts had difficulty delivering their piglets. She says it’s sometimes painful because baby pigs nibble on your fingers when you try to pull them where as baby lambs suck on your fingers…if they can get a hold of them.
So while most college students are partying till dawn on the weekends, my kid is successfully pulling babies. All I can say is “you go girl”. What a great way to learn and get experience in preparation for having her own farm one day.
The litter pictured above is one she helped deliver on Saturday night.
Winter Warmth & Winter Preps
This past weekend was two days of endless work; about the turning of a season, the changing of months. There is still much to do before winter sets in and I still have lots of projects to finish, but am on track to accomplish it all. There’s many stories rolling in my head, but I’ll just post a few comments and pictures for now.
Saturday morning was all about fire and warmth for our small farmhouse. I don’t heat exclusively with wood, but the fires that burn warm the house long into the night. That bit of heat keeps the furnace from running until the very early morning hours when the temperatures are the coldest, which helps keep the heating bills manageable
For years I have gotten my firewood free from a local farmer. It’s nice to have a source for seasoned, split wood. If it weren’t for them I’d have to buy wood and that might be an expensive proposition. Firewood in my area is more about aesthetics than function for most people. Bundles of perfectly cut & split logs can be found at almost every store in town. But, I much prefer gathering my own. When I was young we lived near an abandoned walnut orchard and every October we made a day of gathering and splitting branches and trees that had fallen during the year. For some strange reason I always enjoyed the work. It’s a kind of ritual I look forward to. And, this season’s haul of wood was no different. I didn’t have to cut and split it, of course, but between the loading and unloading; hauling and stacking there was plenty of work, along with dirt and sweat to make up for not actually having to split my own.
With every fire I burn this winter a silent prayer of thanks will ride on smoke across our valley.
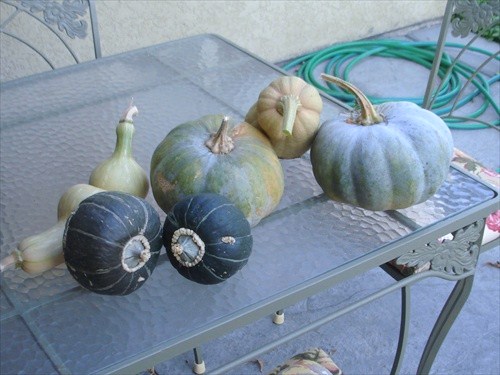
I harvested the last of the winter squash. What few I left on the vine to get a little larger didn’t really grow much at all so it was time to pick them and ready the bed for a planting of cool season crops. The squash crop was not large this year, but there will be plenty for baking with maple syrup, brown sugar and spices or cutting up and adding to savory stews. A few of the varieties I had not grown before and I will enjoy seeing what they taste like. It took about an hour to pull up the vines and make a compost pile before pulling the weeds. Every so often I would come across another squash that had been hidden in the overgrown mass of leaves and vines.
When the pile of weeds was taken away I moved into the chicken coop to clean out the nesting boxes. They were sorely in need of new bedding.
When Brianne was showing sheep we had a routine of cleaning out the trailer at the end of the show season and using the shavings for winter bedding in the coop, then in spring the boxes would be cleaned and that bedding would be added to vegetable beds or the compost pile. It was a strange kind of circle of life. But, with no lambs around I bought a bag of shavings. One-by-one I cleaned each box and spread the litter across the old pumpkin patch. It will be tilled in to feed the soil with good quality nitrogen. When the trees start to drop their leaves they too will be tilled in to add organic matter to the soil.
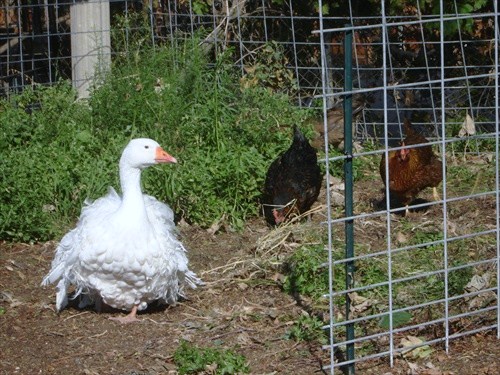
The piles of weeds scattered around made perfect places for the chickens and Sophia scratch and peck looking for tidbits and bugs.
After several hours of straight work I was ready for a rest and a glass of tea. I pulled a chair out to the barn and sat in the shade of the peach tree. I love this time of year. It is so easy to get lost in the work of the day. My favorite CD of instrumental mountain music was playing in the background and with the sun casting an umber hue over the farm I couldn’t help but melt into the scene.
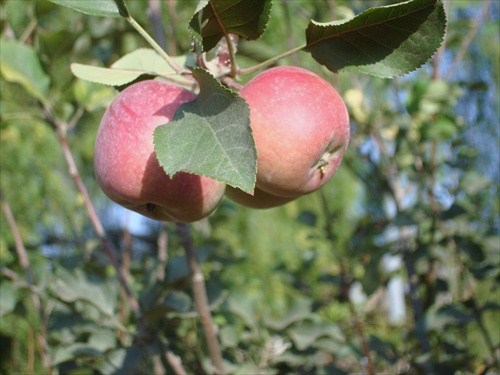
As I sat sipping my cool drink I noticed a few stray apples hanging from the tree. They aren’t very large but they were ripe enough to pick before the birds got to them. And, an apple turnover never cares about the size of an apple, does it?
With my break over I raked in front of the barn, throwing everything into the raised beds. I always find it amazing how much the soil in each bed shrinks over the growing season. Each spring I level off the beds with a good layer of new soil and by the time late fall rolls around it has sunken at least six inches.
My small potted patio garden is up about an inch. I planted two old wash tubs with broccoli raab, kale, chard and radishes. I usually plant salad greens, but decide to try something new. It’s easier to take care of this small garden by patio light rather than trek out to the garden by flashlight, now that it get dark before I get home from work.
The less fun part of my weekend of winter preps involved buying heater filters, paint for the new barn door, outdoor light bulbs, stocking up on cat food and chicken feed, scrubbing the fireplace screen and replacing my fireplace candles with the firewood grate. The more I have to be in town the more I prefer being at home, puttering on the farm.
It was a full weekend of work and dirt and sweat, but I’m feeling better about going into winter. With the busiest season at work approaching it was a relief to get so much done. Now I can look forward to the changing seasons (and weather) with confidence, and few other projects I’ll write about later.
Recent comments
Aenean nonummy hendrerit mauris. Phasellus porta.