Archive for April, 2016
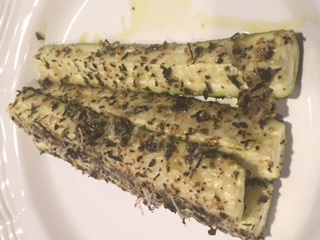
How to Make Baked Parmesan Zucchini Sticks
Zucchini’s can be very plentiful in the garden. In fact, most home gardeners harvest way more than they can consume. One particularly ambitious year found us planting six, yes six, zucchini plants for a family of two.
Talk about a green flood. After a while I couldn’t even give them away. The chickens had a field day, though.
I thought I knew every possible way to cook or prepare zucchini, but I was wrong. I recently came across a recipe that is so easy and so delicious that it has become our “go to” way of cooking the little green gems…no matter how many we have.
Zucks taste best when they are harvested at about 6-8” long and no more than 1-1/2-inches in diameter.
You’re on your own with the monster-sized zucchini’s that hide until they become so big no one knows what to do with them.
This oven baked recipe is not only healthy and addictive; it also makes for a crispy and tender zucchini stick.
Oven Baked Parmesan Zucchini Sticks
INGREDIENTS:
- 4 zucchini, ends removed, cut lengthwise into quarters
- ½ cup grated parmesan cheese
- ¼ teaspoon garlic granules
- 1 tablespoon Herbs de Provence or Italian herbs
- Kosher salt and ground pepper to taste
- 2 tablespoons olive oil
- 2 tablespoons fresh chopped parsley
DIRECTIONS:
- Preheat oven to 350 degrees. Lightly spray a cooling rack with oil and set on top of a baking sheet.
- In a small bowl, combine parmesan cheese, garlic, herbs and salt and pepper, to taste.
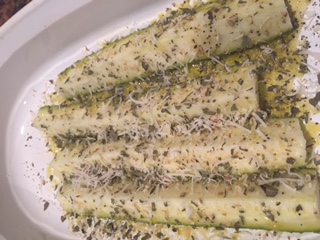
- Place zucchini spears on the cooling rack and drizzle with olive oil. Use your hands to completely coat each spear, and then sprinkle with herb mixture.
- Place baking sheet into oven and bake until tender, about 15 minutes. The turn on broiler and broil for a few minutes until cheese mixture turns golden brown. Watch to make sure the spears don’t burn.
- Plate up, sprinkle with parsley and serve while still warm.
How to Season a Cast Iron Pan
There’s just something about cooking in cast iron that transports me back to days of old.
I’m not sure what it is…the weight, the sizzle, the smell, the feel in my hand. Whatever it is, it makes me feel a bit more comfortable in the kitchen.
I remember my mom cooked in a cast iron skillet, a big, black, deep skillet that turn humble ingredients into warm and filling meals. There were hearty beef stews, thick pork chops and dad’s Sunday fried chicken. Meals just seemed better from that skillet, tasted better.
Over the years I have used many cast iron skillets and pans. Some came from yard sales, some from thrift stores and some were given to me. And, although they were all different they had one thing in common.
They all needed to be seasoned.
Seasoning cast iron means to slowly bake on thin layers of oil to protect the cast iron from rusting and create a non-stick cooking surface. Every time you cook with oil you are actually re-seasoning your pan.
Whether you have a new cast iron piece or one that has been loved for years, seasoning it will protect it so you can continue making memorable family meals.
To season a cast iron pan in good shape…
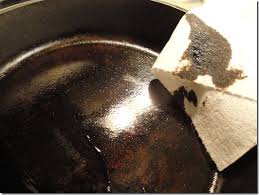
- Wipe it clean with paper towels or a cotton rag, reserved just for cleaning your cast iron. If there are crusty bits stuck on, gently scour the pan with a bit of coarse kosher salt, but NO SOAP. Cast iron is porous and the soap can get into the pores. AND NEVER, EVER PUT CAST IRON IN THE DISHWASHER.
- Once the pan is clean, wipe or brush a thin layer of oil all over the pan, including the outside and the bottom. Thin is best because your next step is to wipe the oil off. It may not look like there is any oil on, but actually it has sunk down into the pores, which is what you want. Any cooking oil is fair game as long as it has smoke point higher than 350 degrees. Oils like canola, olive, vegetable or coconut will do. Even rendered Crisco or lard can be used, as long as it’s clean.
- Now, take your paper towels or rag and wipe off the oil until you think there isn’t anything left.
- Place your pan in a pre-heated 200-250 degree oven for 15 minutes.
- Remove from the oven and let cool completely before storing it.
If you have serious crusty bits or rust on your pan, use a well-worn and well-oiled piece of steel wool to scour off the gunk, then…
- Wipe it down – using paper towels or a cotton rag.
- Oil it up – using any common cooking oil, as mentioned above.
- Bake it on – in a preheated 350 degree oven for one hour. Place the pan upside down on the oven rack with a piece of heavy duty aluminum foil underneath to catch any oil drips. When the hour is up turn the oven off and let the pan cool down inside.
Once it’s cool, you’re ready to start cooking.
Hints & Tips:
- Never put cast iron in the dishwasher.
- Never use soap to clean cast iron.
- Never put cold water into a hot cast iron pan. IT WILL CRACK!
- Season after every use to keep cast iron in good shape.
- Learn to cook with cast iron like ya mean it.
Alpine Bean Casserole
Years ago, we were looking for a new church to attend, friends invited us to there’s on a Sunday in summer because they were having a pot luck after the services. Our friends thought it would be a good chance to meet a lot of the congregation.
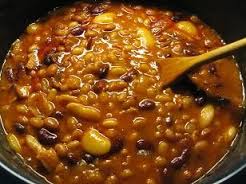
The spread was huge with lots of homemade dishes, but the one that caught my eye, and my taste buds, was bean casserole the pastor’s wife had made. She called it an Alpine Bean Casserole, which confused me, mainly because there’s nothing “alpine” about beans. Beans don’t grow in alpine conditions and most alpine countries don’t eat a lot of beans. But after I tasted them I didn’t care what she called them, they were wonderful!
Over the year’s this has been my “go to” recipe for any event from beach parties to livestock shows. In fact, I get so many requests for this dish that I wonder if people know I can cook other dishes with as much success. In the words of my dear friend Judy, “we don’t care what else you can cook, just bring the beans”. Well—if you’re going to be known for something I guess your cooking isn’t all that bad.
I’m sure once you try them, you too will agree, they’re pretty darn good. Enjoy!
Alpine Bean Casserole
INGREDIENTS:
8 slices bacon, chopped and slightly cooked, but not crispy
4 onions, quartered and sliced thin
1 cup brown sugar
2 Tbsp. dry mustard (can use yellow mustard in a pinch)
½ cup vinegar (white or cider)
14 oz. ketchup
1 14-15 ounce can of each (Do not drain)
Lima beans
Butter beans
Kidney Beans
Garbanzo beans
1 28 ounce can of beans in molasses, like S&W or Bushes. (DO NOT USE beans in tomato sauce, like pork & beans)
DIRECTIONS:
Put all ingredients in a large Dutch oven, stir to combine. Bake at 300 degrees until bubbly and thick, approximately 2-3 hours. Stir occasionally. The longer it cooks the thicker it will become.
You can also use a slow cooker set on low for 8-10 hours or overnight.
NOTES: This is one of those large crowd recipes that always get rave reviews, perfect for potlucks, picnics or BBQ’s. It’s also a recipe that is hard to mess up. I have made it without cooking the bacon, used yellow mustard instead of dry, all kinds of vinegar (except Balsamic) and even added browned ground beef, and it turns out great every time.
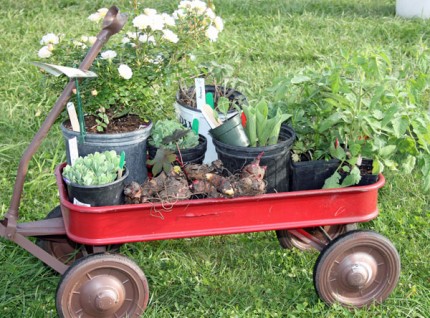
12 Ways to Find FREE Plants
There’s nothing I like better than getting something for free, especially if it’s something I need or really want.
As a suburban homesteader my world revolves around making the most of my little plot of land and that means green things growing; lots and lots of green things. From flowers and shrubs to trees and vegetables I use a variety of ways to get “free” plants to fill out my little farm.
If you need to fill in a garden space or start a brand new garden try these ideas to get you going, while saving a ton of money.
Earth Day – Many Earth Day celebrations give away plants and sometimes soil. Over the years I have gotten shrubs and trees for free, along with a bag of soil or a truck load of compost through City programs. And that’s not all I get. Our Earth Day features several community garden and garden club booths, many of which “give away” plant starts or started vegetables for free or for a small donation.
Local Garden Clubs & Community Gardens – Over the years I have become part of our local garden club and community garden efforts. Through these associations I have been able to get seeds, cutting, plants, divisions of bulbs and irises, and so on. Many of the community garden folks start way more seeds than they have space to plant, so they offer them up at monthly meetings.
Neighbors – Spring is prime landscaping (or, re-landscaping) time. Keep an eye out for neighbors re-doing their yard and ask if you can have some of what they are pulling out. If left up to the landscaper or homeowner, most of those plants will end up in a landfill. Better to have them adorn your yard.
Divide & Conquer – If you already have plants in your yard, see what can be divided, like bulbs or rhizomes. Or, check with friends and offer to help divide some of their plants for a few to take home. More times than not, you’ll end up with a lot more than you can use. Now you can share.
Forage for Seeds & Cuttings – Keep a watchful eye when running errands or traveling locally. Many times you’ll find seed heads ready to burst or plants that grow well from cuttings. It doesn’t have to be so local either. While traveling up north I stopped at a little market to refresh my drink and saw the most gorgeous hollyhocks coming to seed. I asked the cashier if I could have a few seed heads. After looking at me like I was nuts, she said yes. I quickly broke off a few of the dried pods loaded with seeds and wrapped them in a napkin. They became the beginning of a wonderful garden near my greenhouse.
Craigslist – The free section on craigslist is a great place to find free plants. Sometimes the ad requires that you dig up the plant, but most of the time they don’t. Even if you have to pay a few bucks it’s worth keeping track of. When my sister wanted to plant an iris garden she haunted craigslist for weeks before finding a gal who was pulling out her iris bed. Sis got 2 paper grocery bags full of irises for $5.00. When she got ready to plant she realized there were more than 100 rhizomes. Not a bad deal, even if it wasn’t free.
Trade – Gardeners love to share! If you have established plants and would like to add variety to your garden, try trading with other gardeners who have something you want.
Nursery Cast Offs – Not all plants at a nursery or garden center are sold. Some get over grown in their pots, while others get shaded out or covered up by other plants and don’t get enough sun or water. They look too shabby to sell, so they are tossed aside as “not sellable”. Some nurseries or centers, especially locally owned one’s, will gladly give away these sad little cast offs. Think of it as a rescue for plants.
Seed Banks – Some local libraries have begun offering “seed banks”, a place where local gardeners can drop off seeds from their own harvests, and pick up seeds from someone else’s garden. The best part is…no late fees, because the seeds don’t have to be returned. The library just asks that you share what you can.
ASK – This one seems so simple, but in real life it is the least used way of getting free plants. Every time I have admired a plant in someone’s yard and asked for seeds, cuttings, divisions, etc. I have always been told yes. There’s something so gratifying about having one’s yard admired that they just can’t say no.
County Extension Office – Many counties have Cooperative Extension Offices, which are the educational arm of government programs revolving around gardening, farming, and home economic subjects. Sometimes the offices offer free seeds as a way to encourage home gardening and food production. If you don’t find seeds, all is not lost because they have a wealth of information on many interesting topics from beekeeping to livestock production to food preservation, even hunting safety and archery.
Be a Seed Company Volunteer – When seed companies change their displays the company rep often times uses local volunteers to inventory and restock the display rack. As a thank you for helping, the rep usually gives the volunteers a selection of seed packets to show appreciation. For a few hours of my time last year I walked away with dozens of seed packets, and a few new gardening friends, too.
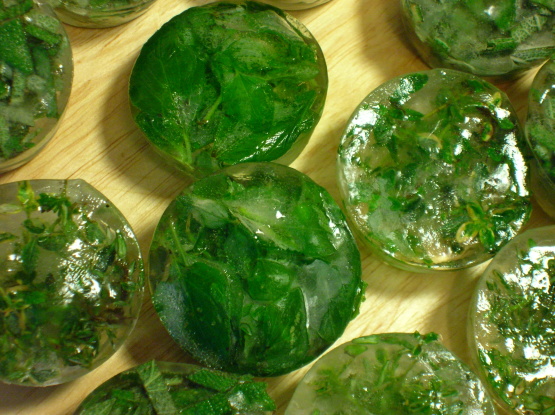
How to Make Herb Ice Cubes
There’s nothing better than herbs fresh picked from the garden and used in a favorite recipe.
I have herbs inter planted with my flower beds and some in the garden to help ward off bugs. And, then there’s my livestock water trough planter that sits on my patio. That one is handy to the kitchen door and is my “go to” herb garden when I get ready to fix a meal.
The warmer months are prime herb growing season, but what is a cook to do during the dark, cold days of winter? How do you get that “just picked” flavor in the dead of winter?
First off…you start long before the cold weather begins. You start with your seed selection and planting of the herb garden, taking into consideration what herbs you use the most and which ones are well suited to being preserved.
There are several ways to preserve herbs; there’s air drying, dehydrating, making herbed vinegars, oils, butter, salt, pesto’s and even herbed sugar, given the right kind of herb.
But, the one I like best for preserving that “just out of the garden” flavor is freezing, herb ice cubes as we call them. They are easy, fast and bring life to ever dish we make all winter long.
Follow these easy steps and you’ll be enjoying the taste of fresh herbs no matter what the weather is outside.
STEP ONE: Choose full bodied, blemish free herbs. Pick herbs just before or at the beginning of their flowering cycle. This is the time when the herb oils are at their peak.
STEP TWO: Wash herbs gently and pat dry, or let air dry.
STEP THREE: This is where you have a few choices. You can either freeze herbs in water or oil. Also, decide what size herb cubes you want; regular ice cube tray size or larger cubes using a muffin tin. The ice cube tray will give you about 2-tablespoons of herbs per cube, while the muffin tin will give you about 1/3-cup. (I like the muffin tin size because it gives me enough herbs for several dishes, when defrosted).
STEP FOUR: Mince your herb, either by hand or in a food processor. Be sure to keep the herbs separate if you’re freezing more than one at a time.
STEP FIVE: Pack minced herb into an ice cube tray, about 3/4 full. (I find it easier to have one ice cube tray for each herb, or use each side of the try for one herb. That way they don’t get mixed up).
STEP SIX: Fill each cube, or muffin tin, with boiling water. This will blanch the herbs, helping them to retain their fresh flavor and natural color. OR, you can fill each cube with neutral oil, like vegetable or canola.
STEP SEVEN: Pop the trays, or tins, into the freezer, making sure they are level, so they don’t spill. Once they are frozen solid take cubes out of the tray, or tin, and store in freezer bags or freezer containers.
To use herb ice cubes, take what you need out of the freezer and drop them into your pot. It’s that simple!
How to Test Your Soil’s pH Level
Soil pH is the backbone of any productive garden. Soil pH is important to know because it influences how easily plants can absorb nutrients from the soil.
But, what is pH?
Simply put, pH shows how acidic or alkaline your garden soil is. And, although some plants like and do well in acidic or alkaline soil, most common vegetables thrive on a balanced pH level.
The ideal pH level for garden soil is 6.0 to 7.0 pH. Levels below 6.0 are considered acidic, while levels above 7.0 are considered alkaline.
Garden soil should be tested before you begin gardening so you can find out how “out of balance” your soil is and make adjustments. There are soil testing kits and companies that test a soil sample you send them, but these are often times expensive and time consuming.
I much prefer a simple “homemade” test that I can do any time before planting or after the last harvest. That way I can start adding amendments to balance out the soil between planting seasons.
To test your soil at home, use this simple process.
NOTE: Soil pH can vary from garden spot to garden spot. Each growing area should be tested.
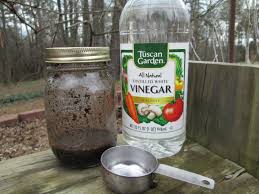
- Find 2 glass jars (for each growing area to be tested) and label them “Alkaline” and “Acidity” (include the garden area they came from). Example: “Raised Bed Garden – Acidity” or “Berry Patch – Alkaline”. Quart-sized canning jars work great.
- Dig down a few inches and add a handful of soil to each jar.
- To the Alkaline jars add ½ cup of white vinegar.
- To the Acidity jars add ½ cup of water and ½ cup of baking soda.
Now wait a few minutes.
Reading the results…
If the Alkaline jars, with the vinegar, start to bubble your soil is too Alkaline and you need to lower the soil’s pH by adding pine needles or sulphur.
If the Acidity jars, with the baking soda mixture, start to bubble your soil is too acidic and you need to add lime or wood ash (which we have lots of coming out of winter).
Each time you test your soil you can readjust the additives to help level out the pH so your veggies and plants will grow strong and healthy. It is also a great tool to measure the soil for alkaline and acid loving plants, that don’t like a balanced soil.
A few acid loving herbs and veggies
Garlic
Parsley
Spinach
Peas
A few alkaline loving plants
Sage
Oregano
Asparagus
Artichoke
To find out what pH level your favorite plants will like, check out this list from The Farmer’s Almanac
Recent comments
Aenean nonummy hendrerit mauris. Phasellus porta.