Archive for October, 2009
Home Churned Butter

When I started moving toward a simpler, more self-reliant homesteading life one of the first projects I tried was making homemade butter. Now, it’s the first recommendation I make to anyone moving in the same direction. It’s so easy and the results are immediate – and delicious.
You don’t need any fancy equipment to get started, a quart-size mason jar or mayonnaise jar will do fine. To learn how truly easy making butter is check out this article here.
Fresh homemade butter is nothing like you’ve tasted before. So, buy some cream folks and start churning.
![]() photo credit: redwinegums
photo credit: redwinegums
The Science of Stacking Firewood

To some, laying in firewood is one of those seasonal jobs that takes hold of you as soon as the leaves start to change and doesn’t let go until enough has been stored to get you through the winter. Other’s say there is spirituality to the task, knowing that there is something more to a tree than wood and bark and leaves.
There is also an art and science to building a firewood pile. To learn more about how to best stack and store firewood for optimum use all winter, check it out at Mother Earth News here.
.
![]() photo credit: Leonard John Matthews
photo credit: Leonard John Matthews
Gadzucks!! Charlie Brown

I heard on the news this week that a pumpkin weighing over 1,600 pounds won the Morro Bay Pumpkin Festival, and had to check it out for myself.
I was really intrigued because earlier this year a very kind pumpkin grower from Pennsylvania gave our 4-H club seeds from HIS award winning pumpkin, along with instructions on how to grow those whopp’ng big ones.
Although our gourds didn’t get any where near that big, a few did weigh-in over 150 pounds. Boy – if I had only known about the prize money!
To read more about the Iowa man who won first prize and took home $10,000 for his efforts click here .
To learn more about the festival, or to attend if you’re in the area, check out their website.
Homesteading – Gets Under Your Skin

As you walk your path to a simpler more self-reliant life, homesteading can easily intrude into every corner of one’s life, even if it’s not exactly welcome or invited. It becomes the stray that adopts you, the guest that won’t leave, or the rain that won’t subside.
During the most unusual times, where the homestead has no business being, it finds its way in and distracts you. It comes on softly, sometimes without warning. In the middle of a meeting you realize you haven’t cleaned your shoes and the smell of chickens wafts through the office. Or people stop you to ask if you have suffered an injury because your jacket is covered with hay or straw. Or while sitting at your desk, going about your daily job, the phone rings suddenly, announcing your order of baby chicks has arrived at the post office and must be picked up right away. Or a co-worker, out of the blue, invites you on a field trip to a much admired quilting show.
There was a time, in the not-so-distant past that you might have gotten out of these situations if you wanted to.
You thought you could quit this homesteading life anytime you wanted. But, that train has left the station. You’re hooked. You’re in this life and it’s in you. The lines between your former life and your homesteading life have blurred, even grown dim. You know this to be true because even in your world of business or bio-tech, commerce or computer science new friends beckon you deeper into the world of self-sufficiency.
Come on now folks! How can you turn it down? The invitation to bake bread, make jam or set in a load of firewood with new found friends. Spending a weekend with people that think and live the way you are now trying to live is both welcoming and satisfying. It’s comforting to be with people that are willing to share their knowledge, their experiences. To make you part of a group that are the lucky recipients of closely held recipe secrets. You get to watch and learn; take notes and pictures; all the while laughing in the process.
This isn’t light stuff friends. To be amongst those who understand what you’re trying to accomplish. The way you’re trying to live. They offer an ear, answer questions, and lend a hand.
It’s a fine way to live – amongst friends.
![]() photo credit: Travis Seitler
photo credit: Travis Seitler
In Defense of Leftovers

Everything these days seems to be disposable. From appliances to electronics to clothes, even the food we eat. Each year thousand of pounds of perfectly usable food is thrown into the garbage, while thousands of dollars go down the drain. And, the restaurant industry hasn’t helped much, with larger portions that most people can’t consume in one sitting. Oh, some restaurants compost the waste and some donate leftovers to shelters or soup kitchens. But, the reality is we prepare way more than we consume.
Have you sat in a restaurant and noticed how much food goes back to the kitchen? Or been to a party or family gathering and watched the buffet plates being piled higher and higher. Ever thought about the number of meals that could be made from those leftovers? Most people find leftovers distasteful, but for the more self-sufficient homesteading crowd leftovers are just the ingredients for another meal.
Food waste can be a challenge for many households, but it doesn’t need to be. Even small bits of leftovers can be transformed into luscious, satisfying meals or snacks. With a few tricks and some simple recipes you’ll soon be turning last nights’ leftovers into tonight’s hearty dinner. Of course, the number of servings will vary with the amount of leftovers you have.
Take a simple chicken dinner – it can be turned into several additional meals using any remaining meat and the carcass for broth. Use breast meat to make chicken salad; chicken, broccoli and rice casserole or chicken and broccoli Alfredo. Leg and thigh meat can be used to make chicken soup. Simmering wings, skin and remaining carcass makes a wonderfully rich chicken broth for use in other dishes. Read the rest of the story »
Expanding the Way We Reduce, Reuse & Recycle
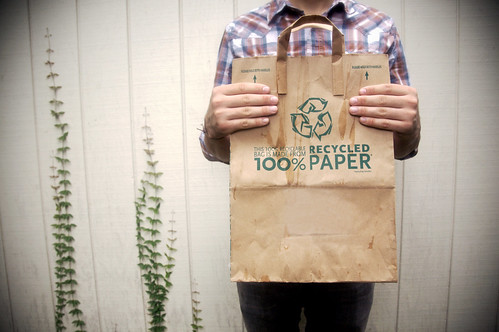
We’ve all tried to live by the Reduce, Reuse, Recycle motto in one way or another. But, with these helpful tips you can extend your efforts even farther. You might even come up with a few tips of your own.
Use unwanted fish tanks or plastic storage containers as brooders for baby chicks. Simple line with newspaper or shavings, hang a heat lamp overhead and your chicks will be toasty warm until they’re big enough to go out into the world.
Cut the bottom off of ½-gallon or 1-gallon plastic milk jugs and use as cloches in the garden to protect tender young plants from cold nights. When not in use they can be easily stacked and stored.
Egg cartons filled with soil make wonderful seed trays, or pots to start small cuttings. And, the cardboard cartons will eventually decompose in the soil, while the Styrofoam cartons can be saved for further use.
The cardboard tubes on toilet paper rolls also make great little pots for larger seeds like squash, melons and tomatoes. Simply cut the tube in half, make half inch slits around one end and fold the tabs towards the middle to close the bottom. Fill with soil and you’re ready to plant.
Clear plastic, lidded “to-go” containers are perfect as mini greenhouses.
Yoghurt, cottage cheese and sour cream containers make great plant labels when cut into strips. Use water-proof markers and you’ll always know what you’ve planted.
Buying mulch in bags can be expensive and creates waste for landfills. To save money and reduce waste, buy mulch in bulk from local dealers. An added benefit is the exercise you’ll get when distributing the mulch.
Instead of buying plant stakes or tomato cages use branches, twigs and tree trimmings to make your own. If your pruning doesn’t produce what you need, ask neighbors for their trimmings. Even broken tool handles can be used to stake large plants.
Old pantyhose can be used to tie up plants like tomatoes and cucumbers and will last for several seasons before having to be thrown out.
Save plastic utensils, from take-out orders, to mark seed rows and keep your garden well organized.
Newspapers and cardboard make great weed guards on garden paths and walkways between vegetable beds. Hide by covering with leaves or grass clippings, and then rototill everything in next season for added mulch to garden soil.
By thinking creatively you’ll soon be transforming previously useless items into useful garden and homesteading tools.
![]() photo credit: Raychel Mendez
photo credit: Raychel Mendez
Say Cheese!
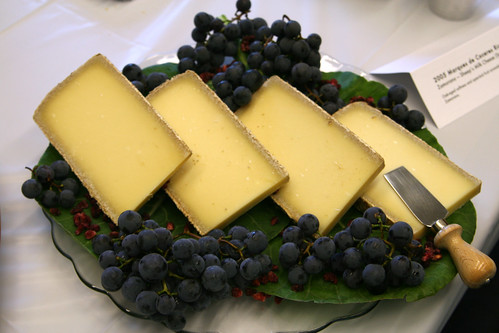
Have you ever walked through a cheese shop and marveled at the intoxicating smells, the creamy textures and robust flavors of all those varieties of cheese? From creamy, spreadable farmstead cheeses to wonderfully sharp cheddar’s to pungent crumbly blues and feta’s? It’s enough to make your taste buds euphoric.
Cheese making may seem like a daunting task. But, if you’ve never tried it, you’ll be amazed at how fast and easy it can be. The only equipment cheese making requires is a stainless steel pot (at least 10-quart), measuring spoons, cheesecloth (not gauze), colander, and a dairy thermometer.
Before you start, you’ll want to learn more about the ingredients used to make cheese and how each one will help you make your own wonderful end product.
The Main Attraction – MILK. Using fresh, whole milk from grass-fed cows or dairy goats will produce the best results. Try purchasing from a local producer or farmers’ market. (to find local producers contact your local Farm Bureau office)
Low-fat milk can also be used, but it will produce less cheese in the end. Store-bought milk will work fine also. Just be sure to avoid any brands marked “ultra-pasteurized” because the pasteurization process damages the milks ability to coagulate. Ultra-pasteurized milk may be able to sit around for many weeks without spoiling, but it can’t be made into cheese.
Get Some Culture. Cheese cultures and starters are bacteria’s, molds and acids that help the coagulation process which develops each cheeses unique flavor. Cultures can be found at natural foods stores or through specialty suppliers like New England Cheesemaking Supply or Leeners.
Rennet. Rennet, which comes in liquid, tablet or powder form, contains enzymes that cause milk solids to separate from the whey and form curds. Traditionally, rennet is made from the stomach lining of an infant ruminant or grazing animal. (The enzymes help the animal digest its mother’s milk.)
Most store-bought cheeses rely on animal-based rennet, but vegetable rennet is also widely available. Vegetable rennet is made from plants, like figs and thistle that have the coagulating properties needed to make cheese.
Salt. Salt is used as a flavor enhancer and preservative. It also draws out excess moisture in the cheese. You can use specialty cheese salt, which is coarser than table salt, or non-iodized salt, but do not use iodized salt because it stops the active starter bacteria.
Clean water. Filtered water is best when making cheese because some municipal water supplies contain additives that compromise milk’s ability to be made into cheese.
Now you’re ready to make cheese!
30-minute Mozzarella
1 gallon milk
1 1⁄2 tsp powdered citric acid dissolved in 1/4 cup cool water
1/4 tsp liquid rennet diluted in 1/4 cup cool water (if using rennet tablets, follow conversion instructions on the package)
1 to 2 tsp cheese salt
Slowly heat the milk to 55 degrees Fahrenheit in a stainless steel pot. While stirring, slowly add the citric acid solution to the milk and mix thoroughly but gently.
Heat the milk to 88 degrees over medium-low heat. The milk will begin to thicken like yogurt.
Gently stir in the diluted rennet for 30 seconds. Then don’t disturb the milk while you let it heat to between 100 and 105 degrees. In about 5 to 8 minutes, the curds should begin to break up and pull away from the sides of the pot. Turn off the heat.
The curds will look like thick yogurt and become a bit shiny, and the whey will be clear. If the whey is still milky white, wait a few more minutes before turning off the heat.
Scoop out the curds with a slotted spoon and put in a bowl. Reserve the whey. Press the curds gently with your hands, squeezing out as much whey as possible.
Heat the reserved whey to 175 degrees. Shape the curds into several small balls, rolling them between your palms. Put them, one at a time, into a ladle, and dip them in the hot whey for several seconds. Then gently fold the cheese over and over (as in kneading bread) with a spoon or your hand. (You’ll want to wear rubber gloves at this point, as the cheese will be extremely hot.) This distributes the heat evenly throughout the cheese, which will not stretch until it is too hot to touch (145 degrees inside the curd).
Repeat this process several times until the curd is smooth and pliable; mix in salt after the second time. When the cheese stretches like taffy, it’s done. If the curds break instead of stretch, they are too cool and need to be reheated.
When the cheese is smooth and shiny, roll it into balls and eat while warm. Although best eaten fresh, it can be stored in the refrigerator for a week or so.
Makes: About 1 pound
Simple Cream Cheese
2 quarts cream or half-and-half, at room temperature (about 72 degrees)
1 packet direct-set mesophilic starter or 4 ounces prepared mesophilic starter
Cheese salt (optional)
Add the starter to the cream, and mix thoroughly. Cover and let sit for 12 hours; a solid curd will form.
Pour the curd into a colander lined with cheesecloth. Tie the cheesecloth into a bag, and hang from a hook until the bag stops dripping, about 12 hours. Changing the bag once or twice can speed up the process.
Place cheese in a bowl and mix in the desired amount of salt. You can leave the cheese in this container, or pack it into molds of any size. You can also add any desired herbs and spices at this stage. Your cream cheese will store in the refrigerator for up to 2 weeks. Makes: About 1 pound
Super Simple Ricotta
Ricotta is traditionally made by recooking the whey from a previous batch of hard cheese, such as Parmesan, but this recipe is a simpler version. Use fresh ricotta in Italian classics like lasagna, or serve with honey and Italian breads.
1 gallon milk
1 tsp citric acid dissolved in 1/4 cup cool water
1 tsp cheese salt (optional)
Add the milk and the citric acid solution to a stainless steel pot. Stirring occasionally to prevent scorching, slowly heat the mixture to between 185 and 195 degrees. As soon as the curds and whey separate (there should be no milky whey, only clear whey), turn off the heat and let sit undisturbed for 10 minutes.
Line a colander with cheesecloth, and ladle the curds into the colander. Mix in the salt with a spoon. Let the cheese drain for 30 to 45 minutes. For firmer cheese, tie the cheesecloth into a bag and hang it from a hook to drain. Serve immediately or refrigerate. Makes: 1 1⁄2 to 2 pounds
Home Cheese Making by Ricki Carroll is a great resource for any new cheesemaker. Ricki has taught thousands of people to make cheese; and to her devotees she is known as “The Cheese Queen.” You can order the special ingredients from her company, New England Cheesemaking Supply or call 413-628-3808. Be sure to check out the site’s step-by-step photographic instructions for making many kinds of cheese.
Goat’s Milk Feta Cheese
Making feta goat milk cheese at great way to use up excess goats milk and can be used in almost any dish that calls for cheese. Its best use, though, is replacing ricotta and cottage cheese.
1 gallon goat milk
½ cup distilled vinegar
Any spices or herbs you would like to add
Pour milk into pot; turn heat on low. While milk is warming, set colander in sink and line with cheesecloth.
Before milk comes to a boil, the surface of the milk will look like it has a “skin,” and the skin will begin to dance. When this happens, turn heat off immediately. Slowly stir in ½ cup of distilled vinegar. This is the acid that will create curds and whey.
Let the milk sit for 1-hour while the curds form and separate from the whey.
After an hour, carefully pour the mixture into the cheesecloth-lined colander. Be very careful because the mixture is hot and will splatter.
Drain the curds to the consistency you desire. For moister cheese, drain for less time; drain longer for a drier cheese. Drier cheese crumbles better on salads.
Next, pour cheese back into the pot and add any herbs or seasonings you like. Horseradish, salt, onion mixes, garlic and chives are traditional favorites. Or, pat into rounds and roll in herbs or seasonings.
Makes: about 1 pound
![]() photo credit: quinn.anya
photo credit: quinn.anya
Recent comments
Aenean nonummy hendrerit mauris. Phasellus porta.