Archive for July, 2015
Frugal Friday – Keeping Kitchen Sponges Fresh

Warm summer weather can make kitchen sponges smell worse than a locker room full of old socks. To keep them fresh and bacteria free put kitchen sponges in the dishwasher each time you run it. It will sanitize the sponge, extend the life of the sponge and save you a bunch in replacing them more often than needed.
INTRODUCING — Frugal Friday
That’s right, folks! Suburban Homesteading is launching a NEW section!
Frugal Friday will be jam packed with useful and cost saving tips, tricks and tidbits on how to make your homestead more frugal, saving your precious financial resources.
From kitchen to garden and into the barn these tips will help make your home, and life, more cost effective and a lot simpler. But, not to worry, our suggestions will enhance your life rather than confine your spirit, trust me.
So let’s start this off right by changing our thinking about what it means to be frugal. Stop thinking of how deprived you are going to be, or how much you’ll have to cut back or sacrifice because frugality is not about deprivation. It’s all about re-directing your financial resources into YOUR pocket rather than the pocket of someone else.
Check in this Friday for the launch of Frugal Friday. Check back each Friday for the latest in frugal living tips and reap the rewards.
Raising Meat Chickens in Suburbia

From Day Old to Dinner Entrée – If you want to make sure the chicken in your oven is raised well and processed humanely –Raise them yourself!
Most of my friends cringe when I tell them that we raise our own meat chickens and my daughter NEVER tells her friends for fear they will avoid eating over. But, this relatively simple process has become an integral part of our suburban homestead and food storage plan.
I’ve always had laying hens to provide us with eggs for the table and manure for the garden. And, when the girls were too old to lay they got to live out their life scratching around for bugs, churning up the soil and adding manure where ever they went; a mutually beneficial relationship I think.
It wasn’t until my friend Sandy bought and raised her first batch of meat birds that I really started to get interested in raising our own chickens for meat. But, raising 50 chicks seemed a bit too ambitious for a beginner, not to mention someone who lived in suburbia. So, several years ago I began by raising 8 Cornish/White Rock crosses, usually referred to as Cornish Rocks. These fast growing birds are the same breed raised commercially and sold to restaurants and supermarkets either as whole birds or in cut-up parts.
My test project was a huge success! All 8 chicks lived to their 8-week maturity, were healthy and seemingly happy, and the processing of the birds was nothing like I had imagined. When the project was over and we were feasting on own homegrown chicken, juicy and full of flavor I was determined that meat chickens would be an annual crop raised on our little suburban homestead. Read the rest of the story »
How to Save Garden Seeds
Want to keep the garden going year-after-year without having to spend a lot of money on seeds?
Well—I do, too. That’s why seed saving is an essential garden skill.
This time of year the garden is bursting to overflowing. Veggies are producing at such a rapid rate it’s almost impossible to keep up with the harvesting, canning, freezing or consuming, much less think about the next year’s garden season. But, this is exactly the time to think about your next garden, when you have so many plants to collect seeds from.
For centuries gardeners and farmers alike have selected the best plants from their crops and collected seeds for the next planting, essentially creating their own personal seed bank, and you can too!
Following these few simple steps will start you on your way to harvesting not only today’s fresh vegetables, fruits and flowers, but tomorrows as well.
There are two types of seed categories—dry and wet, and while some seed saving steps are similar for both types, seed harvesting starts with one common and important step.
START WITH HEALTHY HEIRLOOM PLANTS!
Healthy plants produce healthy seeds, which in turn produce healthy plants. Choosing unhealthy plants produces just the opposite, so select robust, healthy plants to save seeds from. Planting a garden using heirloom seeds will give you a much better chance of producing viable seeds for saving versus their hybridized and highly modified counterparts. In fact, some plants are developed so they can’t reproduce seeds that can be saved, forcing you to buy new seeds every year.
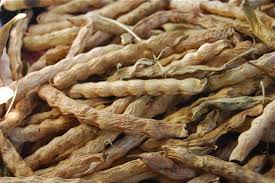
Dry Seeds—come from plants like sunflowers, beans and peas.
Select a few good plants and allow them to flower and dry-out on the stem. With beans, peas or any other “pod” type vegetable let the pods hang on the vine until they are dry. When the seeds are completely dry, cut them from the stem before they scatter, or before the birds get to them and gently remove them from the head or pod.
Plants that produce a flower head like onions or delphiniums can be cut with a length of stem and dried on a tray or stored up-side down in a paper bag to dry. Punch a few air holes into the side of the bag for ventilation. This paper bag method is also a good place to “catch” smaller seeds.
To clean heavier seeds of chaff pass them between two cups in front of a gentle fan or outside on a breezy day. Lightweight seeds like lettuce or carrot can be clean using a fine sieve. Place seeds in the sieve and gently toss them while blowing out the chaff.
To “cure” the seeds before storing, place them in a single layer on a fine window screen elevated on a few inches and store in a non-windy area for a week. After the seeds have cured completely they can be stored in envelopes or small lidded jars in a cool dark place until ready to use.
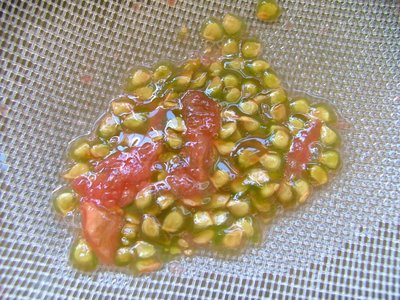
Wet seeds—come from plants like tomatoes, cucumbers and squash.
Wet seed fruit should be picked a few weeks past its prime, but before the fruit begins to rot. This will give seeds time to mature completely.
Gently scoop out seeds and place them in a large bowl. Fill the bowl, not quite to the top, with room temperature water and let the seeds stand for about four days. This soaking helps remove the film coating on the seeds and gives the “dud” seeds a chance to float to the top so they can be removed easily. No sense in storing bad seeds.
Drain the seeds through a sieve and rinse well with running water. Rub them gently to remove and residue.
To “cure” wet seeds use the same window screen treatment as before. Be sure to “cure” seeds completely as damp seeds will mold and rot, ruining your hard work and next season’s garden.
Be sure to store all saved seeds in a cool dry place so they don’t lose their viability.
Oh…and don’t forget to label each seed during the cleaning and saving process so you can properly label the storage envelope or jar. You don’t want your next garden to be a guessing game!
There you have it, an easy way to keep your garden going year-after-year for little or no money.
How to sanitize garden tools
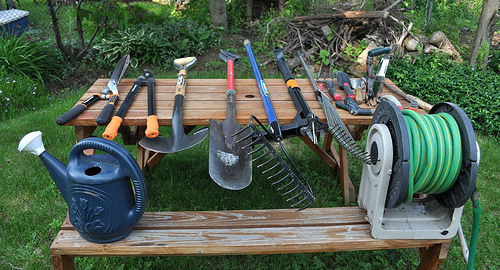
Garden tools get quite a workout during the growing season. Digging new garden beds, planting new vegetable starts and pruning all use a variety of hand and long handled tools that help make the garden a success.
With all this activity and contact with different plants dirty tools can spread disease from plant-to-plant. Not a good idea for keeping a healthy garden. To prevent disease from effecting other plants clean tools of dirt and grime after each use. Use a stiff brush to remove dirt and sanitize tools with a solution of 1 part bleach to 10 parts water. Swirl tools around in the bleach solution for a bit, then let them air dry in the sun.
Recent comments
Aenean nonummy hendrerit mauris. Phasellus porta.