Archive for August, 2012
Figuring Out Fall
Daylight peers over the horizon on a breeze of hot August air as I lay in bed contemplating the coming fall. The plans I had for getting ready for fall have been put on hold, at least while the temps push towards triple digits. With Brianne moving to college and the loss of an extra pair of hands I’m nervous that all I need to accomplish won’t get done in time. Even though we often have Indian Summers that last into October I’m still scared. But, if I know one thing it is that you reap what you sow. If I concentrate on the negative instead of the positive only negativity will enter my world, so I stay upbeat about what I have done and what I can do to get ready for winter.
So, here’s where we are. The greenhouse has a floor and windows; a door and framed sides, but no roof, at least not yet. Every day, from the break of dawn until the temperature drives me inside I work on enclosing the greenhouse using clap board I found on Craigslist. Once finished I will have all my gardening supplies in one place and will start seeds for a fall garden.
A new batch of meat birds are scheduled for early September. A replacement for the ill fated early summer batch that went to the opossums or were put down for safety’s sake.
And, if all goes well this time I’ll have a freezer full of chicken before we celebrate Halloween and eating homemade pot pies when the weather changes.
On the firewood front—I have about ½ cord laid in, but need 3 more to keep my house warm and homey during the winter months. With Brianne taking her truck with her to school the process of getting firewood and transporting it will be slow, but like the tortoise, it will get done, eventually. Labor for heat, not a bad trade-off.
I am taking stock of my pantry and supplies laid by and plan to bring in more staples before prices increase. Staples are at the top of my list and I’m hoping to trade avocados and lemons for some pork raised by a friend.
Good news! looks like my hard fought for refi will go through, finally, decreasing my mortgage by several hundred dollars. I’m also reevaluating other expenses and crunching down where I can. We’re not hard up, never really have been, but I have future plans to move to a less populated place in the country (more on that as it unfolds). Anything I can save is money that stays in the bank, to pay off my house and work towards my own freedom. It may seem like dog paddling, but my head is above water and that’s success in its own right.
All these projects are slow to progress, but they do progress. It’s all figured out in my logical head in the bright light of day, but come the darkness of night emotions and uncertainty seep in, shaking my confidence. I try not to go there. As long as I put one foot in front of the other I feel in control. Everything will be done. I know it. I have family and friends to help with the big stuff and gladly they are willing to do so. I was feeling unsure last night, but I’m not going there tonight. I have me list, my plan and a nice cup of chamomile tea to carry me through.
I’m staying the course, folks. Nothing will slow me down.
Greenhouse Going Up
My long awaited greenhouse is in full progress. When it is completed I’ll have a dedicated space for all my gardening tools and supplies, and a place to start vegetable and flower seeds.
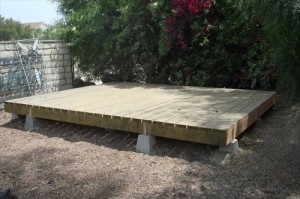
Building on a sound foundation for a lifetime of growing and gardening. I can’t believe it only took two days to build the floor.
Old wood frame windows and an antique Victorian style door gives the greenhouse loads of light and the vintage charm I’m looking for.
Aged tin roofing will cover the outside walls below the windows and rough sawed pine clapboards covering the outside walls around the windows and all the interior walls will complete its shabby chic look.A recent hot spell and Brianne’s pending move to college has slowed us down a bit, but not for long. We should be back at it when I return from helping her move next week.
Planting shelves will be added, along with a sink and faucet for watering new seedlings, a soil mixing bin for seed starter mixtures, storage areas for small items, hooks for gardening tools and my collection of old sprinklers, and containers for seeds and other supplies. No more running from one place to another to find what I need.
The greenhouse looks west, out over the garden that is currently in transition. An added seating area will be draped in plush cushions and a table for evening respites. The flickering light from lanterns and candelabras will bath the area in a soft glow.
Outbuildings such as this are as much about pleasure and serenity as they are about functionality. In a few weeks I’ll be kicking my feet up with a cold drink in my hand after planting flower seeds and my new fall garden, mark my words.
Recycling Gray Water for Home Gardens
In every homestead’s attempt to become more self-sustaining water is a crucial and sometimes elusive commodity. But, using simple rainwater collection systems and reusing gray water from the washing machine on flowers, shrubs and trees, can go a long way to help offset what comes from municipalities.
Southern California is technically a desert. Our annual rainfall hovers around 10 to 15-inches per year. Sometimes we get more, but more times than not it’s less. Sometimes plants in a vegetable garden or flowerbed need more water than is provided through normal rainfall. Or, maybe your area is not known for frequent or steady rainfall throughout the growing season. In those situations most gardeners just turn on an outside faucet to water the garden, drawing on community water supplies, or from a private well.
But, what if you had another way to not only water the garden, berry patch or orchard, but save money as well? With below normal rainfall and droughts in some parts of the country people are looking for other ways to provide gardens with the moisture they need without using what may become a precious supply of fresh water.
One method is to use the wastewater, usually referred to as gray water, produced in the home. But, what is gray water?
Gray water is all the non-toilet wastewater produced in the average household including the water from bathtubs, showers, sinks, washing machines, and dishwashers. Although gray water does not need extensive chemical or biological treatment before it can be used in the garden as irrigation water, it still must be used carefully because it usually contains grease, hair, detergent, cosmetics, dead skin, food particles and small amounts of fecal matter.
How much gray water can be used in the home garden?
First, collect only as much waste water as you will need to meet the water requirements of your garden. The rest should go into your sewer or septic system.
A good rule-of-thumb for deciding how much gray water to use on your garden is that a square foot of well-drained, loamy soil can handle about a half gallon of gray water per week. In other words, if your garden area is 500 square feet, then you can put up to 250 gallons of gray water on your garden each week.
If you can be choosy about the gray water you recycle on your garden, then use shower and bathtub water first, followed in decreasing order of desirability by water from the bathroom sink, utility sink, washing machine, kitchen sink and dishwasher. Water from the kitchen sink and dishwasher is the least desirable because of the larger proportion of grease, food particles and other materials it will contain. If there is no way you can avoid using water from the kitchen sink and dishwasher, try to limit the amount of grease and solid food particles that go down the drain (non-meat food scraps should be composted rather then put down the garbage disposal). NEVER recycle water from a washing machine that has been used to wash baby diapers because it may contain fecal matter.
What about soaps and detergents? Will they harm the soil and plants?
Soaps and detergents are biodegradable, but they can cause problems when gray water is used over a long period. The main problem with most laundry detergents is that they contain sodium salts which, if present in large amounts, can damage the soil structure, can create an alkaline condition, and can also damage plants.
Avoid detergents that advertise “softening power,” because they will have a large amount of sodium-based compounds. The phosphates in detergents can be good for plant growth, but unfortunately, the detergents highest in phosphates usually contain the greatest amount of sodium. If you re-use washing machine water, cut down or eliminate the amount of bleach you use and do not use detergents or additives that contain boron, which is especially toxic to plants.
When doing your household cleaning, use ammonia, or products that contain ammonia, instead of chlorine as the cleaning agent.
What precautions should I take to protect the soil from damage when I use gray water over a long period of time?
A big danger in using gray water is the build-up of sodium in the soil. You can find out if the sodium levels are high by testing the pH of your soil. A pH of 7.5 or above indicates that your soil has become loaded with sodium. You can correct or avoid this problem by spreading gypsum on the soil at a rate of two pounds per 100 square feet about once a month. Rainfall, or alternating gray water applications with fresh water, will help leach sodium and excess salts out of the soil.
The best solution though is to use detergents that are sodium free or low in sodium.
Is there any danger of spreading disease by using gray water in the garden?
Recycled water from the bath, shower, or washing machine can contain organisms causing diseases in humans. However, when gray water is poured onto soil that has an abundance of organic matter, the potentially harmful bacteria and viruses die quickly. If any should survive, it is unlikely that they would be taken up by the roots of garden plants and transferred to the edible portion of food plants. Nevertheless, for safety, you could use gray water primarily to irrigate lawns and ornamental plants, and sparingly on fruits and vegetables.
How should I apply gray water to the soil?
Whether you carry your gray water to the garden by hand in buckets or modify your household plumbing for direct delivery of water to the area where it is needed, a number of guidelines should be followed in applying the water. They include:
If possible, use gray water for your ornamental plants and shrubs and use what fresh water is available for your vegetable garden. If you need to use gray water for irrigating food plants, restrict its application to the soil around plants such as corn, tomatoes, broccoli, or other vegetables of which only the above ground part is eaten. Do not apply gray water to leafy vegetables or root crops.
Apply gray water directly to the soil surface. Do not use an overhead sprinkler, or allow the recycled water to splash off the soil and contact the above-ground portion of the plants. If you have a drip irrigation system, do not use gray water in it since any solid matter it might contain could clog the emitters in the pipe.
Pour gray water on flat garden areas; avoid steep slopes where runoff could be a problem.
Apply wastewater over a broad area; avoid concentrating it on one particular site.
When possible, rotate applications of gray water with fresh water. The fresh water will help leach out any soil contaminants that might be building up.
Apply thick compost mulches to areas where you use gray water. They will speed the natural decomposition of waste residues.
Use gray water on well-established plants only. Seedlings can not withstand the impurities of the waste water.
Do not use gray water, which is alkaline, on acid-loving plants such as rhododendrons and azaleas. Be sure to rotate your use of gray water with fresh water on lawns and fruit trees.
How can I get gray water from the house to the garden?
Gray water can be transported to the garden several ways, the most basic being to bucket the water from the sinks and bathtub into pails and hand carry it to the garden. More sophisticated systems involve siphoning or pumping water from the bathtub or other deep basins (sumps) to the yard through a garden hose, or removing the trap from the bathroom sink drain pipe and putting a five-gallon, or larger, bucket beneath the sink.
When using gray water from the washing machine first drain it into a large bucket (at least 35 gallon) or trashcan fitted with a hose bib so you can attach a hose to carry water to planted areas. Do not attach a hose directly to the washing machine drain. The potential backflow can cause damage to your washer.
For more information on waste water recycling and supplies check out this website http://www.oasisdesign.net/index.htm.
Going For Greens
There is a wide array of vegetable seeds available to the home gardener; we all know that from looking through seed catalogs. But, how many of us spend much time in the “greens” section of those catalogs? I know I didn’t get much past the lettuce section. That is until last season when I discovered a wonderful winter soup made with kale. I had seen kale and collards and chard and such in some of the markets, but really did pay much attention to them. But, now I had a reason to learn more about what an ingredient I was using in a new recipe.
In my research I discovered that much like bread, the darker the green the more nutritious they are. Mixing greens, in a salad or slaw, sautéed or in a soup will give you a variety of nutrients adding greatly to the healthiness of your dishes.
I think where the timidity comes in is how to properly cook different greens and finding tasty recipes the family will enjoy, at least it was with me. Cooking greens range from the very tender and quick-cooking spinach to the hearty fibrous varieties of kale. Beet greens and chard can be eaten raw, but take only a few minutes to sauté. Denser greens like kale and collard take a bit longer; you may also want to trim out the stems or ribs before cooking.
When you buy greens at the market or farm stand, be sure to wash them thoroughly. An easy way to do this is to swirl them around in a bowl filled with cold water; then dry them and refrigerate in an airtight container. They will keep for up to 10 days.
The hearty leaves of collard greens give more texture and flavor than spinach, making a great substitute in lasagna. Mustard greens, when added raw to a salad will pack a mustard radish kick. Chard is a colorful green with a mild flavor and works great sautéed in a pasta sauce. For a simple side dish though, quickly sauté in olive oil and garlic.
Beet greens make a good start if you are not accustomed to cooking or eating greens. Beets with their greens attached are one of the great produce deals (two for one!). Beet greens don’t stay fresh for long, so you’ll need to use them within a day or two. Use them as you would chard leaves but note that the greens from red beets will stain anything (including lighter vegetables) a lovely shade of pink. Or use them with the beets they helped grow in this Beet Greens Salad.
I make this salad when I have a bunch of freshly picked beets with vibrant greens. You can serve the salad simply dressed with a bit of olive oil and salt, or add lemon zest, chopped hazelnuts, or feta or goat cheese to dress it up a bit.
Note: Use a high-quality olive oil for drizzling at the end. If you happen to have some orange- or lemon-infused olive oil, this is an excellent time to break it out.
Ingredients:
1 bunch spring beets with greens attached
1 tsp. olive oil
1 clove garlic
1 Tbsp. high-quality extra-virgin olive oil for drizzling (or more to taste)
Kosher or sea salt
Optional Garnishes:
Lemon zest or orange zest
Chopped hazelnuts
Crumbled feta cheese
Goat cheese
Preparation:
Cut off greens from beets. Trim beets. Very young and tender beets can be scrubbed clean, but you will want to peel most beets. Cut beets in half lengthwise, lay cut-side flat and cut into 1/4-inch-thick slices.
Heat a large frying pan over medium heat. Add 1 tsp. olive oil, 1/4 cup water, and beets. Cover and cook until beets are just barely tender, 5 to 10 minutes.
Meanwhile, chop leaves and set aside. Peel and thinly slice garlic
Add garlic to pan, stir until fragrant, about 1 minute. Add beet greens, cover, and cook until wilted, about 1 minute.
Divide warm salad between 4 plates. Spoon any pan liquids evenly over each serving.
Drizzle each salad with olive oil and sprinkle with salt. Add any optional garnishes (lemon zest, orange zest, hazelnuts, feta, goat cheese) that you like.






Recent comments
Aenean nonummy hendrerit mauris. Phasellus porta.