7 Steps to Improve Garden Soil Through the Winter Months
Last fall I was about to pull my hair out!!!
Seriously.
Have you ever had a conversation with someone…the same conversation you’ve had with them for years? Well, that was me this past summer, and I’m still recovering.
For the umpteen millionth time my mom asked me what is wrong with her garden. And—for the umpteen millionth time I have responded…STOP ADDING SAND AND GYPSUM!!!
Mom thinks that if a little is good a whole lot more is better.
Let me explain…
Years ago someone, somewhere convinced my mom that adding sand and gypsum to her soil would help break up the clay and make the soil more plant friendly. But, somehow I don’t think they meant she should make those additions every year for 50 years.
Yep…you got it. For the past 50 years my mom has been dumping buckets of sand and bags of gypsum onto her garden beds. Rather than creating the dark rich workable soil that is deep with organic material and teaming with life all she has managed to do is make CEMENT!
Ya know what grows in cement? Not much of anything.
This is a conversation we’ve had every year since I became an avid gardener and suburban homesteader. Every year I tell her how to improve her soil, and every year she tells me I have no idea what she deals with because my soil is so wonderful.
Well…I have a news flash…my soil wasn’t always wonderful. Great soil is created more often than it just exists. Soil can be good, but great soil is constant work and somewhat of an art form, albeit not fine art.
I think I’ve made a breakthrough, though. Mom has finally decided to take my advice on how to improve her soil so she can finally have the garden she has always wanted.
So how does one go from dead and barren soil to dark, rich, friable soil that plants actually want to live and thrive in? One step at a time, that’s how.
7 Steps to Improve Your Garden Soil During the Winter Months
Grass Clipping & Yard Trimmings:
If you still have a lawn to mow, layer the clippings in the garden instead of dumping them in the yard waste barrel. Alternate with trimmings from flowering plants, vegetables, and non-woody shrubs. Any soft plant material can be laid right on ground, like our forefathers use to do.
Pile on the Manure:
Manure is one thing most farms have in abundance. I consider my chicken, rabbit and sheep manure to be “gold” for my garden. Although chicken manure can be a bit “hot” to spread directly on plants, it is perfect for building up your soil before the planting begins. Cow manure is a great all-round addition, but may be hard to find in suburban areas. Check with local 4-H Clubs or FFA programs for possible sources. Horse is usually very plentiful, but it can contain more salt from the urine than is good for your garden. Apply it sparingly or mix with other less “salty” manures from sheep or goats. I’ve had success finding large qualities of cow and horse manure on CraigsList, but a word of caution here…you may get weed or grain seeds in the bargin, so be sure to mulch heavily so the heat of decomposition will kill them.
Add Mulch:
I’m a hug fan of mulch as the primary source to build up your soil. Straw, hay, shavings and shredded plants help retain moisture, suffocate weeds, and when it breaks down it makes the perfect breeding ground for an army of beneficial garden worms. Some mulching materials can be purchased from local feed stores or garden amendment companies. Lay your mulch about 4-inches deep.
Compost:
If you don’t already have a compost pile, it’s time to start one. It’s the best way to turn kitchen scrapes, coffee grounds, egg shells, weeds, trimmings and manure into a nutrient rich soil additive. When building your compost pile think green and brown, fresh and dried. To set up a compost bin quickly, fasten 3 wooden pallets together and then hinge the 4th for s gate. Nothing fancy is needed.
Natural Amendments:
Inferior garden soil will benefit from a sprinkling of natural amendments like bone or blood meal, worm castings, wood ash (I fill a small trashcan full when I clean out the fireplace), fish emulsion, or Epsom salts.
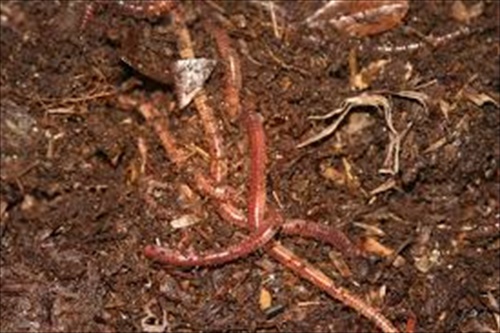
Add Earthworms:
Earthworms are nature’s eager tillers. As they move through the soil they create air pockets, allowing air, nutrients and water to penetrate dead soil. They chew up decomposing matter and shed castings that help improve the soil’s body.
Plant a Winter Cover Crop:
Cover crops are a great way to build up soil and break down hard soils while infusing it with nutrients, improving aeration, killing weeds and weed seeds, and improving water retention. Deep rooted crops like ryegrass are especially good because they’re deep root systems help break up and aerate the soil. Once you’ve built up your soil you can plant nitrogen fixing cover crops, like clover, to improve the nitrogen level of your soil.
When mom made the decision to seriously improve her garden soil we had a lot of work to do. Here are the steps we took beginning in fall and extending into the next growing season.
Season One: Layering the Garden
- Remove all plants and weeds.
- Lightly till soil.
- Add natural amendments, sparingly.
- Layer on manure.
- Top with mulch.
- Pile on compost.
- Plant ryegrass cover crop.
- Drench with manure tea.
- Winter over.
Season Two: Building the Soil
- Deeply till the garden to incorporate all the organic matter from season one.
- Test soil and add needed natural amendments.
- Add earthworms to help speed decomposition and aerate soil.
- Layer on manure, mulch and compost.
- Plant nitrogen fixing cover crop.
- Water generously with manure tea.
Now, here it is…the following fall and my mom’s garden is ready to plant with fall vegetables, bulbs, perennial herbs and flowers.
Recent comments
Aenean nonummy hendrerit mauris. Phasellus porta.