Archive for January, 2016
How to Create a Deep Mulch Garden
It may be the beginning of a new year for us all and the dead of winter for some, but I, like many other die hard homesteaders can’t help but think about spring and a garden bursting with fresh grown produce.
But, before we sink seeds into the soil and sprouts rise to the sky there is much work and planning to be done. My favorite winter break project is to lay out my spring garden. Long stormy days just cry out for gardeners to put pen to paper. Sheets and sheets of graph paper lay strewn across my kitchen table, colorful felt pens stand in an old mason jar and the ideas of how I want my garden to look swirl in my head. It’s a creative time, but also an important time that takes thought.
My garden planning starts long before spring temperatures warm the soil enough to plant. The work of preparing the soil is just as important as which seeds to order and should be given as much care. The nutrients derived from mulch and compost are the basis of a productive garden and should not be overlooked.
How we Converted a Traditional Garden into a Productive Deep Mulch Garden
The steps below will work for first-time gardeners and seasoned gardeners trying to resurrect an unproductive garden.
1. We start in the fall. Bedding from the sheep trailer, that had been pooped on and peed on and stomped on, fluffed and turned all during show season is the first layer tilled into the garden beds, followed by a layer of rich compost.
2. After garden beds are cleared in the fall and any beds not in use for fall vegetables, each bed is spread with a very thick layer of a hay, straw, shavings, leaf and grass clipping mixture, about 6 to 8 inches. The thickness is important because the heat generated during decomposing helps kill weed seeds. If you are able, a 10-12 inch thick layer would be great. I get my spent hay from local horse farms because it is readily available. Straw can be purchased from local feed stores, and leaves or grass clippings can be gathered from the yard or from neighbors.
The amount of mulch you need depends on the size of your garden plot. I use 32-gallon trash cans to transport mulch and calculate 6-8 cans per 4’x12′ bed. A good rule of thumb is about a ½-ton minimum of loose matter for a 50’x50’ garden plot.
3. In early spring, all the layers are tilled in along with a broad spectrum fertilizer. This is allowed to sit for a few weeks while the soil warms enough to plant.
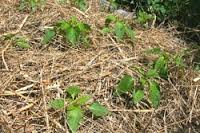
4. When it’s time to plant, I spread another thick layer of mulch over the beds. Using my garden diagram as a guide I decide where to put the rows and separate the mulch to expose a strip of soil.
5. I plant direct-sow seeds directly in the soil, like normal. When the seedlings are about 2 inches tall, I pull the mulch back around the sprouts to block weeds and conserve water. Veggies that were started inside are transplanted in the same way—pull the mulch away to expose a row of soil, plant and pull mulch back around each transplant. I check the garden often to see if more mulch is needed or bare spots have developed. This is where grass clippings come in handy. I keep a pile near the garden beds so I can spread it on any time.
6. When the growing season is over and everything has been harvested, I lightly till again and cover all the beds with a fresh layer of mulch. This will sit all winter until we start again in the spring with a new layer of mulch.
7. I rotate the beds used for fall/winter veggies so each bed has a chance to get mulched and composted every few years.
At this point I should offer a word of warning.
With the deep mulch method you will be spending a lot less time weeding and maintaining your garden. Don’t feel guilty! Just enjoy!
So…what do my garden chores look like now?
• I check small seedlings often to make sure the mulch hasn’t covered tender sprouts. When veggies are bigger this won’t be an issue.
• Water as needed. Of course, this will vary depending on your area and amount of rainfall. I end up watering only twice a week, except during really hot weather. The mulch will help retain moisture in the soil.
• If any weeds pop through the mulch simply pull them and add more mulch to the area, but there won’t be many if the mulch layer is thick enough.
• Lastly, I often breath a deep sigh of relief, grab a chair, a glass of tea and enjoy my garden!
Once you’ve tried deep mulching you’ll never want to go back to your old way of gardening. But, don’t get too caught up in the details of variety or quantity of mulch. Just mulch!! It’s really hard to mess this up as long as you use a pretty thick layer. Now, you’ll have fresh grown produce from a garden that doesn’t take over your life. How great is that!
Running Against the Storm

There is a storm on its way. Not a big one, but you never know how storms will change, weaken or become stronger. We need it desperately and I am thankful for it. I am also worried. Wildfires that burned and charred the hillsides just a few weeks ago left the ground barren of any vegetation. If the rain comes too hard that will mean mudslides and road closures. Not ideal for the first week back to work after a long Christmas holiday. I will pray for a gentle, steady rain as much as I send prayers of thanks for a break in the drought.
The news of the storm got us scurrying around the farm to batten things down before it hits.
Chicken feeders were topped off, as was the water trough, and more bedding was layered in the coop to provide warmth and give the hens something to do if the storm keeps them indoors.
Plants were fed and fertilized, and a few seeds were planted in the water trough garden to provide a salad greens in a month or so. A sprouted sweet potato I had been saving was planted in the potato tub as an experiment for an early crop. We’ll see how it does.
Citrus trees were covered to protect the crop from winds and losing fruit.
Rain barrels line the edge of the house, waiting to capture as much free water as they can, which will then be used to water in between future storms.
A load of firewood was picked up, hauled and stacked behind the garage, close enough to the back door to replenish the inside stack without getting drenched.
Lamps are strategically placed on night stands, on kitchen counters and in the living room in case we lose power. The generator has been pulled out and tested as back-up power for the freezer and fridge.
I think we are ready. We will know soon enough.
How to Make Baked Oatmeal

Oatmeal in winter time is a favorite at our house. There’s nothing like coming in from a morning of chores to a piping hot, creamy bowl of oats and milk, sprinkled with brown sugar and topped with nuts and dried fruit. It’s a stick to your ribs kind of meal that keeps you going well into midday.
I have always enjoyed my oatmeal the old fashioned way. Cooked in a saucepan on the stove then spooned into a bowl and dressed with a variety of toppings. Never had I eaten it any other way. Well – not until a fellow blog friend introduced me to “baked oatmeal” that is.
If you’ve never heard of baked oatmeal before, think of it as a cross between an oatmeal fruit bar and traditional creamy oatmeal, in casserole form. It’s an Amish favorite because there are an endless number of ways to make it your own; there’s apple, raisin, walnut; banana, huckleberry, walnut; or our house favorite…pecan, blueberry. The recipe can be easily adapted to whatever you have on hand. And, the other good thing? It can be made ahead of time and reheated, perfect for a busy farmstead or a busy family. If there are any leftovers simply score them with a knife and put them in the fridge for a nutrient packed grab-and-go snack.
INGREDIENTS
- 2 cups regular rolled oats (not quick oats)
- 1/2 cup pecan pieces, chopped
- 1/3 cup brown sugar plus more for serving
- 1 tsp. baking powder
- 1-1/2 tsp. ground cinnamon
- 1/4 tsp. fine sea salt
- 2 cups whole milk
- 1 large farm fresh egg
- 3 tbsp. unsalted butter, melted and cooled slightly
- 2 tsp. pure vanilla extract
- 1-1/2 cups dried blueberries, cranberries or mixed berries
DIRECTIONS:
1. Preheat the oven to 375. Liberally butter an 8×8-inch square baking dish.
2. In a bowl, mix together the oats, all the dry ingredients, the ¼ cup pecans and 1 cup of fruit.
3. In another bowl, make the custard by whisking together the milk, egg, half the butter, the vanilla, and the maple syrup, if using it instead of brown sugar.
4. Mix wet mixture into dry and spoon into prepared baking dish. Slowly drizzle the custard mixture over the oats. Gently thwack the pan on the counter top a few times to make sure the milk penetrates the oats. Scatter the remaining berries and pecans over the top.
5. Bake for 35 to 45 minutes, until the top is nicely golden and the oat mixture has set. Remove from the oven and let cool for a few minutes. Drizzle the remaining melted butter on the top, spoon into bowls and eat as is or pour a bit of milk over the top. Sprinkle with a bit more sugar or drizzle with maple syrup if you want it a bit sweeter.
Although we love the pecan, blueberry version you may want to experiment to find your family favorite. For a bit of an upscale version try plump, amaretto-soaked golden raisins in place of the berries and sliced almonds in place of the pecans, or diced apples and walnuts for a truly seasonal flare.
Frugal Friday – Preparing for Christmas

I know. I know. You’ve barely recovered from this Christmas and I want you to think about next year! What’s up with that?
You may even have kids out of school or spouses off work and are still enjoying the time together. But, if you want to have an enjoyable Christmas next year now is the time to think about it, even if you don’t want to. And, we have a few tips to help lay the groundwork for a jolly holiday season.
1. While the family is still together find out what holiday activities they enjoyed the most and what they didn’t. This will help you keep meaningful holiday activities; building traditions and memories, and get rid of those that drained time and energy.
Remember, not everything at holiday time has to involve spending money. Walking the neighborhood with a thermos of hot cocoa admiring the decorated houses can be just as fun as money draining plays and concerts.
2. Recap your gift giving list. As much as we don’t want to think about what we spent, now is the time to do just that. Make a list of every person you gave a gift to, listing the gift and the corresponding cost. Decide now if there is anyone you could remove from the list in order to manage the holiday spending better.
Teachers and school staff are a perfect example of people who could be removed from your shopping list. It’s not that you don’t appreciate what they do, but do they really need a Christmas gift? Or, will a heartfelt card be sufficient?
3. Inventory your gift wrapping supplies and replace with sale items. Prices are slashed drastically so stores can get rid of the excess. Replace what you need, but don’t go overboard. Be realistic.
Commit to using up what you already have, too. No sense in buying rolls and rolls of paper or dozens of gift bags if you already have enough.
4. Watch for sales on holiday meal items, like turkey’s or hams, and canned goods as well. Stock up now and beat the rush (shortages or price increases) next season.
5. Start saving NOW! Calculate the money you spent and divide that by 40. This will be the amount to save each week to buy gifts in October, well before the spending frenzy. Pay for gifts in cash and there will be no surprise credit card bills to start the New Year. As an example: if you spent a total of $300 this year you would save $7.50 per week to have that same amount next year.
If you need to, cut something simple from your expenses, like eating out less, to help you save.
6. When packing up your decorations toss out old shabby decorations; donate or sell one’s you don’t use anymore. Check the lights to make sure they are still working. If not, take advantage of the sales to replace. And, organize your boxes of decorations. There’s nothing more stressful than plowing through boxes of decorations only to find out they don’t work or they are broken.
7. Start paying attention. Carry a small notebook to jot down gift ideas throughout the year. Listen to family and friends when they mention something they would like to have or something they have been enjoying. They will appreciate your remembering and thoughtfulness maybe even more than the gift itself.
My sister is building out a very large perennial bulb garden, so guess what she gets for Christmas?
By all means enjoy the holiday. Enjoy time with family before you rush out and plan for next year. That’s what they joy of the season is all about. But, to take the stress out of next year take a few moments and do some planning. It may seem like a lot of work now, but by next October you’ll be enjoying the beginning of the holiday season a whole lot more when you’re not stressing about money or burned out lights.
Recent comments
Aenean nonummy hendrerit mauris. Phasellus porta.