How to Make Homemade Suet Cakes
There’s nothing a chicken likes better than a little bit of fat during the long cold winter months to keep it healthy, happy and full of energy. Suet cakes provide all this and a few treats as well. But, commercially purchased suet cakes can be expensive and contain other chemical ingredients that you may not want your girls to have.
Making your own, homemade, suet cakes is easy. It’s even easier if you get in the habit of saving your fat or grease from cooking. I keep a container in the freezer to store grease from cooking bacon, sausage, meatloaf and hamburger (anything that produces fat, really). I don’t worry too much about using bacon fat because I don’t use a lot of it and it is mixed with the other kinds of fat. I store my fat in the freezer because our hot summer and early fall weather makes me nervous about the fat spoiling, and I’d rather be safe than sorry.
When I’m ready to make suet I can make several at one time, saving me time. The spent grease, tallow or suet is a great binder to hold everything together, and it will only take a few minutes.
Ready to make your own suet cakes?
Here’s what you’ll need:
- A container to store fat in (remember…store all year long)
- A plastic lidded freezer container
- ½ cup chicken scratch or bird seed
- ¼ cup chopped nuts (I use the flat side of a meat mallet and just give the nuts a few whacks)
- ¼ cup dried fruit like raisins, apples, apricots, anything)
- ¼ cup cracked corn (for energy and heat while they digest it)
Here’s how I did it:
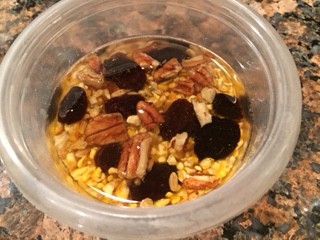
- Gather all ingredients
- Layer dried sliced apples in the bottom of the freezer container
- Pour the scratch or bird seed over the apples
- Layer raisins on top of scratch
- Sprinkle with chopped nuts
- Slowly heat fat until it is liquefied, let cool, but not solidify
- Pour fat over to cover everything by about ¼-inch
- Gently poke a fork around or stir to make sure fat reaches the bottom (remember, the fat holds the whole thing together)
- Cover and place in the freezer to harden.
When you’re ready to use, run a knife around the edge of the container to loosen the cake, then turn it upside down and whack it on the counter until the cake falls out. At this point you can cut it to fit a purchased suet cage or you can do like I did and make a hole in the middle, thread some twine through and hang the cake where the chickens can play and peck at it.
This is a basic recipe for making suet. You can change it up with any combination of seeds, nuts and dried fruit you want. Try oatmeal, squash seeds, or dried meal worms (yum) and send your girls wild. You can also use any type of container you have—from decorative molds to cupcake liners. When the cakes have set just remove them from the freezer container and store in a zipper bag until ready to use.
One more note: Suet blocks are best used when the weather is cold, otherwise the grease will liquefy and your cake will fall to pieces.
Recent comments
Aenean nonummy hendrerit mauris. Phasellus porta.