Well—I’ve gone and done it this time!
I really have.
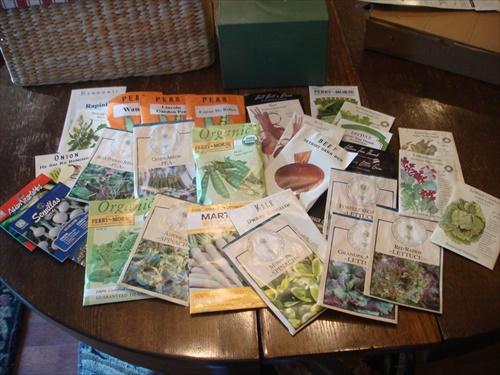
In my eagerness to reclaim my suburban homestead and get green things growing again, I started a bunch..and I mean a bunch of seeds in the greenhouse. I prowled through my seed box and found the flower seeds I wanted. I straightened up the greenhouse and prepared my workspace (can we say cobwebs?). I cleaned and sanitized the pots I would use. I even ran to town to buy…yes…buy…seed starting soil so I didn’t have to spend time mixing my own.
Sounds okay so far, right?
Then I filled the pots, planted the seeds, watered them in and set them on trays in the sunny windows of my greenhouse, and then I impatiently waited.
And, waited.
And, waited.
Nothing.
Still nothing.
Have you ever experienced that…
…you prep the soil, carefully draw out the planting rows, gingerly plant the seeds, water everything in, wait for the proper amount of time for germination…then nothing happen??
If you have, then you know what I’m talking about.
What started off as a great idea unfortunately turned into a dismal failure. I broke a cardinal rule of gardeners, and that is to test a small sample of seeds if the package date is older than THIS growing season, to make sure the seeds are still viable.
And, that’s where it all went off the rails.
I didn’t test my seeds! Can you see me gritting my teeth with an annoyed look on my face? Yeah, not Pretty!
Seeds are tough little guys and they can have a decent shelf life, if you store them properly. But, seeds that are a few years old may have a reduced germination rate so you’ll want to find that out before you start shoving them in the ground.
I know…”do as I say and not as I do” is running through my head right now.
So what am I doing, now? You guessed it. I’m taking the time to test a sampling of my vegetable and herb seeds to make sure that I don’t waste any more time, energy or supplies planting dead seeds.
Steps for Testing Seed Viability
Supplies:
Old seeds you want to test
A few sheets of paper towel
Spray bottle with water (make sure it wasn’t used for anything that could kill your seeds)
Plastic bag
Marker
STEP 1: Fold a paper towel in quarters and mark off the quadrants with a marker.
STEP 2: Label each quarter with the seed you want to test.
STEP 3: Lightly spray the whole towel with water. You want it damp, but not sopping wet.
STEP 4: Place 5 seeds on the paper towel. (I use 5, so I can calculate the germination rate, but not waste seeds)
STEP 5: Spray a second paper towel and place it on top of the first. This will make sure there is dampness all around the seeds, and help hold the seeds in place while you roll up the paper towel.
STEP 6: Place rolled, damp paper towel in a plastic bag and seal it. Place the bag in a warm place.
Germination times will vary depending on seed variety. (Beans and peas are fairly fast, while pumpkins and squash will take longer, but a general rule of thumb is 7 to 14 days for most garden seeds, unless you’re a radish seed, then they’re ridiculously fast to germinate).
Check the dampness of the paper towels daily. You don’t want them to dry out or your seeds will stop germinating. Re-spritz if necessary.
A few days after your seeds begin to sprout count how many have sprouted vs. how many have not. You’ll need this information to calculate the germination rate. At this point, you can plant the sprouted seeds either in pots or in the garden, depending on the type.
Calculating Seed Germination Rate
To calculate the germination rate: divide the number of germinated seeds by the total number of seeds in the test sample then multiply by 100.
Example:
5 seeds germinated/5 seeds in sample x 100 = 100% germination
2 seeds germinated/5 seeds in sample x 100 = 40% germination
3 seeds germinated/5 seeds in sample x 100 = 60% germination
The higher the germination rate, the higher success you’ll have in the garden. A low germination rate does not always mean disaster in the garden. Low germinated seeds can be double planted to make up for the low rate.
Seeds that were packaged for “THIS” growing season do not need to be tested, only older seeds.
Seed Storage & Viability Chart
| Seed Type | Longevity of Properly Stored Seeds |
| Artichokes | 5 years |
| Arugula | 3 years |
| Beans | 3 years |
| Beets | 4 years |
| Broccoli | 3 years |
| Brussels Sprouts | 4 years |
| Cabbage | 4 years |
| Carrots | 3 years |
| Cauliflower | 4 years |
| Celery/Celeriac | 5 years |
| Chard | 4 years |
| Collards | 5 years |
| Corn | 2 years |
| Cress | 5 years |
| Cucumbers | 5 years |
| Eggplant | 4 years |
| Endive/Escarole | 5 years |
| Fennel | 4 years |
| Kale | 4 years |
| Kohlrabi | 4 years |
| Leeks | 1 year |
| Lettuce | 5 years |
| Melons | 5 years |
| Mustard | 4 years |
| Okra | 2 years |
| Onions | 1 year |
| Peas | 3 years |
| Peppers | 2 years |
| Pumpkins | 4 years |
| Radish | 5 years |
| Rutabagas | 4 years |
| Spinach | 2-3 years |
| Summer Squash | 4 years |
| Tomatoes | 4 years |
| Turnips | 5 years |
| Watermelon | 4 years |
| Winter Squash | 4 years |
I came home the other night to find one of my hens dead. She had hidden herself in the corner of the coop, near the feed bin.
It was sad, because I love watching my girls cluck and scratch around the yard, and I will miss the eggs, but losing livestock on a homestead is not uncommon, it’s part of the farm life. That doesn’t mean it’s easy or something we get use to. A farmer NEVER likes to lose livestock because it’s lost income or food. But, aside from the financial considerations, farmers are the most animal loving people you will ever meet. They will go out of their way to protect and care for their animals. So, if we lose one, we take it personally.
Livestock loses are, however, something we must accept as part of living this life. Illness, disease, predators, even accidents are a fact of life on a homestead. We do our best to prevent such events, but sometimes life is beyond our control.
Ok…I’m gonna say something you may think is completely horrible, but completely true…livestock are not pets.
There…I said it.
Sure we can get attached to a friendly milk cow, a playful goat or a wonderfully productive breeding ewe, but at the end of the day a vet bill may add up to more than the animal is worth, in terms of monetary value. The emotional value is a different matter altogether.
Trust me, after decades of raising livestock I have lost my fair share of animals—sometimes to illness, sometimes to lambing difficulties, sometimes to predators, and sometimes in horrific circumstances, like a dog attack.
Raising livestock is certainly NOT for the faint of heart!
After checking the hen over, I determined she died because she was egg bound, which is the inability of a hen to fully expel an egg. Basically, the egg got stuck in the oviduct.
Causes of egg bound:
- A lack of calcium or other nutrients needed for good health
- An overweight hen
- A young hen
- An unusually large egg
- A misshapen egg
What was really puzzling is that my hens are fed a balanced layer mash with added calcium, they have free range of the garden, so they get plenty of exercise and are not overweight, and they are not young. So, most of the causes of egg bound were not present.
Hens also usually show signs of being egg bound, which she did not, at least not that I saw the day or so before she passed.
Signs a hen is egg bound:
- She lays around looking sick, lethargic, fluffing herself
- She has a decreased appetite and isn’t drinking much
- If she is walking, she walks like a penguin, stopping and trying to squat
- She may appear to be straining, like she’s trying to expel something, which she is
- She may pump her tail up and down, trying to expel the egg
- She may also be panting
What can you do if your hen is egg bound?
There are a few things you can do to help the hen release the egg, once you’ve determined she really is egg bound. The above signs can be an indicator of several other conditions, so you’ll have to be sure.
First, wash your hands in warm soapy water and apply a lubricant, like vegetable oil. Very gently insert a finger into the vent, pushing straight back an inch or two. You should be able to feel the egg. If you don’t, she’s not egg bound.
If you do feel an egg, prepare a shallow tub or wash pan with warm water and Epsom salts at a ratio of 1-gallon water to 1-cup salts. The water should be deep enough so that the hen’s belly is submerged about 3 to 4 inches.
Gently put her into the water bath and let her relax there for 15 to 20-minutes. The moist heat will help her relax so she can pass the egg. After 20-minutes remove her from the water and gently towel her off. Apply some of the vegetable oil around and just inside her vent, then set her in a warm, dim, quiet place where she can rest. A dog crate works great for this because you can keep an eye on her.
Once you get her settled in, give her 1cc of calcium and some Nutri-Drench (according to package directions), then leave her alone to pass the egg. This may take a bit of time, so be patient. Be especially gentle during the entire process because the hen will be uncomfortable.
Despite your best efforts, though, she may not expel the egg, at which point you can seek a vet’s advice.
So—here’s my second horrible statement.
Does a hen warrant the expense of a vet?
For me personally, the answer is no.
There, I said it, again.
This particular hen was 3 years old. She was at the end of her productive life, and for the cost of a visit to the vet’s office, I could buy a whole new flock. So, no, if I had discovered her in time, and was not able to help her expel the egg I would not have sought vet services. It’s part of the life I’ve signed up for–the good and the bad.
What can you do to prevent a hen from becoming egg bound?
- Feed a high quality layer mix
- Provide oyster shells or crushed egg shells free choice
- Limit treats
- Make sure hens have room to roam for exercise

Ever since I was young I have had a love affair with flowers…
…all kinds of flowers.
Sure, I have my favorites, but there are few that I don’t like. I love the colorful blooms, the bright green foliage and the scents of different flowers as it drifts over my suburban homestead on a sultry summer breeze.
When I was young I use to help my mom at garden club plant giveaway days, and hound her to bring home anything that was left over…no matter how many there were.
This was never really a problem. We lived in the suburbs on a ¼-acre lot that we treated like a mini farm and flower garden. And, a ¼-acre is a lot of ground to cover. I guess this is partly where, or why, I became what I call “a child of the earth”, someone who enjoys getting down in the dirt, digging, planting, nurturing and watching green things grow. I have never lost that childlike enthusiasm.
Although I’m no longer a child I still get a childlike giddiness every time spring comes around, or when I visit a beautiful garden or potager, the endless possibilities for what I can incorporate into my own garden are always exciting. A potager is a fancy French word for kitchen/flower garden. I say that in all loving jest because I love visiting gardens, finding new plants or techniques I can bring into my own garden. Over the years I have seen dozens of flower and vegetable gardens in America, France, England and Ireland. It is a huge dream of mine to create a quintessential English garden on my own property. But, with California’s arid weather, not to mention the ongoing drought, this dream will only take place if I move to an area that gets more rainfall than we do (or, I win the lottery and can afford the water bill). A girl can dream though, can’t she?
All is not lost, though.
No need to feel sorry for me.
I do have a flower garden, one that is on the verge of bursting with blooms this time of year. And the flowers I am most looking forward to seeing in bloom is my collection of bearded irises. I say collection because I have acquired about 50 different varieties (colors) that I’ve gathered through the years. Some came from those early garden club giveaways, some were given as gifts, some I brought from my previous home, and some were purchased from iris growers here and abroad. I have to say, it’s a tricky thing to get iris bulbs through customs:)
But, most of my collection has been acquired from other iris gardeners when they divide their bulbs.
And, in turn, I have supplied new iris enthusiasts with divisions from my own garden. Garden people are like livestock people…we are always willing to help a new member of our “unofficial” club.
To help new gardeners, or to maintain my own beds of irises, I divide my iris rhizomes every 2 to 3 years so they don’t become overcrowded, affecting their ability to bloom. Dividing, separating and transplanting helps to rejuvenate the clump and to give the gardener a way to enlarge the iris bed. Always a huge plus in my book.
Dividing irises isn’t a difficult thing to do, but it is important that the irises be divided during the right season so the bulbs have time to reestablish after being divided and transplanted.
The steps below will help you make the most of your iris bed, so that you will be ensured of lots of future blooms.
8 Steps to Dividing Bearded Irises
Step 1: Timing is Everything — For best results, divide irises after they have bloomed. This can be done from late spring through early fall, depending on the weather. (I usually divide in the fall when it’s not so hot) If winter lingers in your area, wait for warmer days. Also, irises should not be divided in winter when they go dormant and use their stored energy to survive.
Step 2: Digging the Clump — Use a sharp spade or fork to dig deep below the roots and gently lift the clump up. Remove excess dirt by shaking or hosing it off.
Step 3: Divide the Fans — Bearded iris leaves look like a multi-pointed fan. Break off larger fans, or cut with a knife, at a joint, making sure that they are firm and not squishy. Limp or squishy divisions can be diseased and should be thrown away. Do not compost them, as they can spread disease.
Step 4: Prepare Divisions for Transplanting — Remove dead and older, limp leaves. Trim remaining healthy leaves to about 8-inches above the rhizome. This will help keep the plant from toppling over while it establishes new roots.
Step 5: Prepare New Planting Area — Dig and sprinkle the new planting area with lime, irises like a bit of lime. For group plantings, create a triangle with 18 to 24-inch sides. For all plantings, form a mound and set the rhizome on top of the mound, spreading the roots out in the hole. For group plantings, make sure the “toe” or bulb part faces in towards the triangle.
Step 6: Settle in the Rhizome — Firm soil around to the top of the bulb and pack it down. It is alright if part of the bulb is showing.
Step 7: Spacing your Irises — Whether planting in a triangle, square or line, plant bulbs at least 12-inches apart and make sure the fans all point in the same direction. Closer spacing is fine, but you will be dividing your clump more often. This is not a problem, it’s just that irises are perennials that may not bloom the first year after dividing.
Step 8: Water in your Transplants — Give your transplants a good soak to settle in the soil, then deep watering a few times a week to establish your new patch. Less frequent watering is better as irises are fairly drought tolerant. Too much water, though, can rot the bulbs.
Once your patch is established you’ll have beautiful blooms all season long.

Have you ever noticed how heavy and out of sorts your life feels when your house is groaning under the weight of “too much stuff”?
Well—I have, and it can be crushing, almost debilitating.
Our body feels what our brain sees. So when a house, or homestead, has too much unnecessary stuff it can weigh heavy on our heart and our psyche.
One of the very best ways to lift your heart and your outlook on life is to consume less stuff. By doing this you spend less money, consume fewer natural resources and have fewer “things” swirling around in your universe. You may think owning stuff is really cool, but how much of it really owns you? Think about it, “the stuff” takes your money, your time, your attention, and all too often, your emotions.
Imagine what would happen if you used those spent resources on things that really matter to you?
Imagine how much better, lighter, freer your life could be without all that stuff!
In my own quest to simplify my life, and move into the next stage of my life, preparing for a future move, I have been taking a cold hard look at what I really love about my “things”, and what I really hate.
I love the special pieces that bring back great memories, or give me a warm and fuzzy feeling—the great antique that I would never part with or the statue I bought on a wonderful trip. My special pieces run the gamut from expensive antiques to thrift store finds. There’s really no rhyme or reason for why they’re meaningful, they just bring joy into my life.
But, then there are the less meaningful things. The one’s we feel obligated to keep because someone made them for us or gave them to us. They are the pieces that have outlived their joyfulness, and have now become a burden to our living space. These are the things that must go in order for us to feel lighter, happier and freer to move forward in our life.
I’ve acquired a lot of stuff raising a child, running a suburban homestead, showing livestock, and just living in general. So over that past years I have begun really looking at what I want to keep and what I can “let go”.
Case in point…I’m not really one to turn down an offer of free stuff, so over the years I have been given several garden carts, long handled tools, kitchenware, and clothing that was “too good to give away”. But, how many garden carts does one gardener need, really? Or, how many shovels, rabbit feeders or water troughs does one suburban homestead need when you’re only homesteading for one person?
Part of gleaning was incentivized by my desire to move out of CA and how much it will cost to move everyday items to another state versus buying new on the other end. For me, moving will be a new adventure, one that will enable me to change my style, rethink my life and the way I live. (Don’t panic, though, I’m not moving for a few years)
Why burden down the new adventure with old baggage?
So—with the cost of moving floating in my mind I set about gleaning what I don’t want or haven’t used in a very long time, and in the process I have made hundreds of dollars on the items I’ve sold. YAY! It will be the seed money for replacing the items I really need and want.
If your belongings are cluttering your life and your mind, consider these 8 ways to lighten your load.
You won’t regret it—I promise!
8 Ways to Declutter your Home & Life
Sell stuff you don’t use. Take a cold hard look at what you don’t use, and then list it on Craigslist or Facebook Neighborhood Market, take it to a consignment store, or sell it at Buffalo Exchange or Plato’s Closet, if you have one nearby. This may take some time, so be patient. If you don’t think it’s worth your time, donate it, someone else will love it.
Don’t feel guilty. Ok…you paid for something, so what. It has taken your money, your time and your attention, but if it no longer serves you then there’s no reason to keep it around. Let it go! Your heart will feel lighter for it.
Dump the duplicates. We all have them, those doubles we got with a buy one get one special, the same gift from a friend or family member, or the multiples we bought because we forget we already had one. Maybe you feared not having enough. From bake ware to garden trowels, one is usually enough.
Adopt a one in, one out habit. To keep the clutter at bay and really scrutinize your purchases commit to getting rid an item every time you bring one in. As an example, if you buy a new sweater, commit to getting rid of an old one. If you really want to keep the clutter at bay, try getting rid of two items for every one item you bring in.
Play hide and seek. If you’re not sure you really want to get of something, tuck it away where you can’t see it. If you haven’t used it, or even thought about it in several months it is not one of your beloved items and won’t be missed, get rid of it.
Challenge yourself. Experiment with living with or dressing with a smaller number of items. The number of items isn’t important, but learning to live with less is. You will gain valuable information about how much you really need, use and what is truly important to you.
Did you know that the average woman usually wears the same 20 items?
Lighten up. It can seem like “things” have a grip on you, but in reality it’s YOU that has a grip on your things. You can let things go until you lighten up and loosen up your grip.
Borrow or trade. Be selective about what comes into your home. Do you need that new gardening book, or can you borrow it form the library? Do you need a new seasonal wardrobe for the kids, or can you host a clothing swap? Do you have something that a neighbor borrows often? Try trading for something they have that you need.
The key to simplifying your life is to own what you love. But, remember it will own you right back, so make sure it’s worth it. Really think about how much value “stuff” brings to your life and what serves no purpose at all. When you own less you have a greater appreciation for what you do have, which frees you up to do what is truly important to you.
![]()
A garden is just not a garden without the ramblings of tomato plants.
The warmer weather of our somewhat early spring took me into the garden to begin the reclamation of my much neglected suburban homestead. Between pulling weeds, mulching beds and turning over the soil I was eager to get some plants in the ground.
A few weeks before I had potted up a bunch of seeds in my greenhouse, but I wanted more instant gratification than those little seeds could provide. I wanted growing things! Badly.
The timing was perfect because the annual Tomatomania event was taking place at a local nursery that very weekend. It’s a celebration of sorts, all things tomato, for the serious tomato lover. The three day event touts over 300 different varieties of heirloom and hybrid tomato plants, from green to pink to orange to yellow, you can find anything you want, tomato wise. Some plants come in 4-inch pots and some in 1-gallon pots…for people who need more instant gratification than me I suppose.
To be honest, I’m not much of a fresh tomato person. Oh…I do enjoy sliced tomatoes and mozzarella with balsamic and basil, and a slice now and again on a burger, but that’s about it.
My favorite varieties are the fleshier roma or plum types rather than the juicy slicing varieties like Better Boy or Beefsteak.
After combing the racks I settled on 3 heirloom varieties – San Marzano, Orange Strawberry and Bleeding Heart.
The San Marzano is an indeterminate long-season red plum type variety with lots of thick flesh and a strong, sweeter and less acidic flavor that matures in about 90-days.
The Orange Strawberry is an indeterminate mid-season German variety, shaped like a strawberry with a deep orange color and a crisp sweet flavor that matures in about 80-days.
Bleeding Heart is an indeterminate mid-season multi-colored heart-shaped tomato with a mild sweet taste that matures in about 70-days.
My choices had more to do with color and interest than production or canning ability. I wanted something new, something I had never grown before for my new garden. But, that doesn’t mean I don’t want them to produce well.
So—what do all these terms mean? Read on!
Tomato Terms
Determinate tomato plants reach a certain height and produce most of their fruits in a short period of time, which makes them perfect for homesteads that want to can sauces or paste. Determinate types also make great choices for container or patio growing.
Indeterminate tomato plants continue to set fruit all along its stems throughout their growing season. These are also more rambling plants that need extra support to keep the fruit off the ground.
Early Variety are tomatoes that ripen fruit in 50 to 60 days. These are prized for bringing fruit off long before most other varieties, or being planted in the late summer for an early fall crop.
Mid-season varieties are those that can be harvested in the middle of the growing season, typically ripening fruit in 70 to 80 days.
Late-season varieties are those that take 90 or more days to ripen fruit. These are traditionally varieties that won’t be picked until late summer.
Most suburban homesteaders like the mid-season varieties with a goal (or challenge) of getting tomatoes by July 4th.
Tips for Growing Better Tomatoes
1.) Make Your Choice. Choose a variety that is best for you and your area. Choose early, mid- or late-season tomatoes, letting the “days to maturity” guide you. Choose seedlings with sturdy stems and bright green foliage.
2.) Find a sunny spot. Tomatoes love sun and heat. 6 hours is the minimum and 8 hours is preferable. If your area is unusually hot during the day you may need to rig up some shade during the hottest part.
3.) Amend the soil. Be generous with soil amendments and compost and remember to feed your plants with organic fertilizer. Tomatoes love a good rich soil. Layering over the top of the soil will protect the roots from being disturbed by tilling.
4.) Plant seedlings deep. Remove the lower sets of leaves and plant up to the remaining leaves, leaving about 3 to 4-inches of plant above the surface. The little leaf nodes will send out roots, making you plants sturdy and better able to carry the weight of the crop.
5.) Be water wise. Watering correctly means soaking the root ball every 3 to 4 days for the first few weeks after planting. Proper watering can affect the taste as the tomatoes grow, so once the plant starts growing, water deeply and less frequently, giving them just what they need.
6.) Fertilize. Feed plants around the root zone once they are established and again when they flower. If your soil is depleted you may need to fertilize more often or with a particular fertilizer to address the deficiency.
7.) Provide support! Especially with indeterminate varieties, since some of these can get to be 10-feet tall. Stakes or bamboo are good and sturdy. Cages also work well.
8.) Be patient! Just because a tomato is red (or yellow or pink or orange) doesn’t mean it is at its peak of flavor. Look for a deep true color of the variety and some give when touched before devouring your harvest.
These steps will help you get the most out of your tomato season!

Now that the days are becoming longer my girls are ramping up the egg production. It’s a blessing and a curse (of sorts) with my unpredictable work schedule. I get to have fresh free range eggs for all my recipes, but in some weeks I have way more eggs than I can use. Nice problem, right!
There are many ways to use excess eggs. There are quiches or frittatas; custards and curds; or breakfast for dinner. Some people even swear by freezing eggs for omelets or baking. That’s a tad unappealing to me, though.
Our favorite way of using up excess eggs has always been good old fashioned egg salad.
Whether it was used for sandwiches or served heaped on top of crackers, it was the “go-to” take along for volleyball tournaments, weekend sheep shows, or just day tripping up the coast on a beautiful weekend. I remember my DD’s volleyball team “always” requested egg salad sandwiches for their away games and we never left for a livestock show without a pack of finger sandwiches for road trip snacks. Good thing I had 20 hens, and two large stock pots for boiling all those eggs!
Not only is egg salad a nutritious, protein packed alternative to other options, it’s also super easy to make and easy to pack in a small ice chest.
I’ve heard people say they don’t like egg salad because the eggs always taste a bit rubbery. This would be true if the eggs were boiled too long, becoming overcooked. But—I have covered on that.
A Foolproof Way to Boil Eggs
1.) Place eggs in the bottom of a large stock pot. The eggs go in first because they can break if you drop them in. They can also crack if you drop them in hot water.
2.) Fill pot with water to cover eggs by an inch or two.
3.) Place pot on the stove over high heat.
4.) Bring water to a rolling boil.
5.) Remove pan from the stove and put a lid on the pot.
6.) Let stand for 15 to 18 minutes.
7.) Drain eggs and immediately plunge them into a bowl of ice water to stop the cooking process. (This is why eggs get rubbery. They are over cooked)
Once the eggs are completely cooled they can be peeled.
Now you’re ready to make the best egg salad you’ve ever tasted!
The Best Ever Egg Salad Recipe
12 hardboiled eggs, peeled and chopped
1/3 cup mayonnaise (I prefer mayo over salad dressing)
2 Tbsp. yellow mustard
2 Tbsp. sweet pickle relish
Pepper to taste
DIRECTIONS:
Mix all ingredients thoroughly until well combined.
The finished salad can be spooned over bread to make a sandwich, or topped on crackers.
BTW—this same recipe can be used for making deviled eggs, too. Simply cut the hardboiled eggs in half length-wise. Scoop out the yolks and mix with the mayo, mustard, relish and pepper, adjusting the amounts to fit the number of yolks you have. Spoon the mixture into the hollow and lightly sprinkle with sweet paprika.
INGREDIENTS:
- 12 hardboiled eggs, peeled and chopped
- 1/3 cup mayonnaise (I prefer mayo over salad dressing)
- 2 Tbsp. yellow mustard
- 2 Tbsp. sweet pickle relish
- Pepper to taste
DIRECTIONS:
- Mix all ingredients thoroughly until well combined.
- The finished salad can be spooned over bread to make a sandwich, or topped on crackers.
For decades I’ve been a huge fan of pots; like my love of galvanized watering cans, it borders on a slight obsession.
Old mossy green pots that look like they have been used in a garden shed for a hundred years. The one’s covered in a lovely patina that harken you back to Victorian era gardens, or at least Victorian era garden shows.
With my yearlong funk over and the weather finally turning warm I have been antsy to get some seeds started, to feel the soil between my fingers and inhale the sweet smell of warm, damp earth so fragrant in spring.
I literally haven’t touched a plant in almost a year. Saying I’m eager to get back to gardening is actually a huge understatement. So I dug out my box of seeds to see what I had in the way of flower seeds and found Hollyhocks, Poppies, Bachelor Buttons and Nasturtiums. Then it was off to the greenhouse to gather my pots. That’s when I discovered…I have no seed starting soil. Great!
I also realized that my collection of seed starting pots had also been sitting collecting dust and God knows what else for the past year. This was not good.
When you go through a funk many things fall by the wayside.
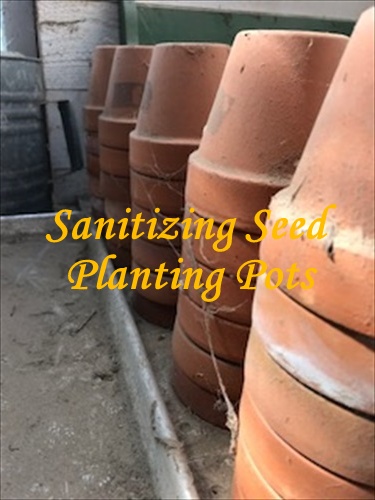
I was determined not to be thwarted in my newfound vigor to get my hands in the garden. So, I decided to clean and sanitize the pots and let them dry while I went to town to buy the supplies I needed to make my seed starting soil.
I set up my cleaning station in the sink of my greenhouse, along with a few scrub brushes for scrubbing mystery gunk.
Sanitizing your seed starting pots
There’s really no magic trick to doing this, honestly, but I do have a few words from years of experience—Don’t Use Bleach! It’s hard on your hands and fingernails, stinks like the devil and it makes your hands slimy—yuck. The better alternative is good old fashioned, common as hell, cheap3% hydrogen peroxide. Yep, you got it. Don’t fuss around and over think this, just buy the cheapest stuff you can find. I get mine from Big Lots for less than $1.00 per bottle and have several bottles on hand for wounds (human and animal), household cleaning solutions, detoxing baths and you got it…sanitizing garden pots.
Here’s how I cleaned and sanitized my pots.
One: I filled my tub with water and a bit of anti-bacterial liquid soap.
Two: I brushed off all residual soil and grime, and, in my case, cobwebs and dead bugs.
Three: I then scrubbed the pots in the soapy water to remove any crusted on soil, and to clean and disinfect them.
Four: Lastly, I poured a bottle of hydrogen peroxide into a shallow wash pan and added about a quart of water. Then I bathed each pot in the peroxide solution before setting them on the rack to dry.
Why do I use hydrogen peroxide instead of bleach?
Simple. Bleach can soak into the clay pots and be leached out when the planted pots are watered, killing the seedling. Because the peroxide has beneficial properties, is diluted, but still strong enough to sanitize, it won’t hurt the plants.
You can also use this process on plastic pots, pony packs and seed trays. Just soak them and let them air dry.
If you’re in a hurry you can also spray each pot with regular white vinegar. If you’re really concerned about fungus or bacteria, give your cleaning process the one-two punch by soaking the pots in the peroxide solution before spraying them with vinegar. That combo will kill just about anything.
This process took a bit longer than I had hoped because I was cleaning dozens of pots. By the time I got to town to buy my seed starter ingredients I was in no mood to spend the afternoon mixing soils. It was time for some instant gratification, meaning I purchased premixed seed starter soil.
I know, I know.
But, I can be a lazy homesteader for a day, can’t I?

This is no joke. Just wait til you try them!
In the small town of Franklin, just south of Nashville, sits a small locally owned bakery and café that will rival any grandmother’s kitchen! Their baked goods–pies, cakes, scones, muffins and cookies will put even the best baker to shame. I stop by for lunch, tea or just to grab a sweet treat each time I visit my sister, and often times this includes a few of Merridee’s giant molasses cookies. I know what you’re thinking…but, the calories! Calorie’s be damned when cookies taste this good.
I spent last Christmas in Franklin and of course we stopped by many times for tea and treats. I was fortunate enough to get the recipe a few days before I left. When I got home I just had to make a batch for myself. They turned out fantastic and the recipe is super easy. The cookies bake up crispy on the outside and chewy on the inside, just the way a cookie should be.
Try them for yourself. You won’t be disappointed, I promise.
Best Ever Molasses Cookies
¾ cup shortening (half butter)
1 cup granulated sugar
¼ cup molasses
1 egg
2 teaspoons baking soda
½ teaspoon ground cloves
2 cups all-purpose flour
½ teaspoon ground ginger
1 teaspoon ground cinnamon
½ teaspoon salt
Melt shortening in a 3 or 4 quart saucepan over low heat. Remove from heat; let cool. Add sugar, molasses and egg. Beat well. Sift together dry ingredients and add, all at once, to the sugar, molasses mixture. Mix until well blended (the dough will be stiff, so don’t panic). Chill at least one hour.
Form dough into 1-inch balls, roll in granulated sugar and place on greased cookie sheet 1-inch apart. Bake at 375°F for 8-10 minutes; just until set and lightly browned. They should be crunchy and chewy when cool. Makes about 2 dozen. Store in a lidded container, so they don’t dry out.
The only change I made to the recipe was rolling them in vanilla sugar, because I had some on hand and I wanted to try it out. YUM!
I also used a small ice cream or sorbet scope to form the balls, which made forming the balls easier and the cookies all came out the same size.
INGREDIENTS:
- ¾ cup shortening (half butter)
- 1 cup granulated sugar
- ¼ cup molasses
- 1 egg
- 2 teaspoons baking soda
- ½ teaspoon ground cloves
- 2 cups all-purpose flour
- ½ teaspoon ground ginger
- 1 teaspoon ground cinnamon
- ½ teaspoon salt
DIRECTIONS:
- Melt shortening in a 3 or 4 quart saucepan over low heat. Remove from heat; let cool. Add sugar, molasses and egg. Beat well. Sift together dry ingredients and add, all at once, to the sugar, molasses mixture. Mix until well blended (the dough will be stiff, so don’t panic). Chill at least one hour.
- Form dough into 1-inch balls, roll in granulated sugar and place on greased cookie sheet 1-inch apart. Bake at 375°F for 8-10 minutes; just until set and lightly browned. They should be crunchy and chewy when cool. Makes about 2 dozen. Store in a lidded container, so they don’t dry out.

This story was told at my church a week ago, and I wanted to share it with you all.
A man was walking down the street when he came upon a penny lying on the ground. As he bent over to pick it up he said a little prayer of gratitude for the beautiful day; the bright blue sky and the warm sun in which to take his walk. He stood still looking at the penny in the palm of his hand and reflecting on his prayer. He decided that from then on he would say a little prayer every time he found a penny or took one out of his pocket.
So—for the next 45-years, whenever he took pennies out of his pocket at the end of the day, or found one on the ground he said a little prayer; sometimes a grateful prayer, sometimes a thankful prayer, and sometime praying for a friend or family member.
Each night when he came home he would put his pennies a dish on his dresser. As the dish filled up he switched a jar, which turned into a jug before the penny collection made its way to 5-gallon buckets. As the years went by he collected more than five buckets full of pennies until one day he decided to take them to the bank. It took the Tellers over 5 hours to run the pennies through the counting machine.
When they were finished counting, the man had more than $5,000 dollars’ worth of pennies. The Teller was amazed, exclaiming “that’s a lot of money”!
The older man just looked at the Teller and smiled before saying “no dear, that’s a lot of prayers”, “many of which have been answered”.
Who said there is no value in a penny?
Like most farm girls I’m a sucker for baby livestock,
especially chicks—seriously.
There’s no hope for it.
Even when I’m not looking to add to my flock I find it hard to pass up those chirping, fuzzy puffballs.
So—I was totally impressed with myself when, in a moment of total self-control, a few weeks ago I oohed and aahed over the dozens of livestock tanks at my local Tractor Supply filled with, you guessed it, chicks, and was able to walk away without buying a single one.
Be still my heart.
I must admit, though, I will miss those sweet little chirps that greet you anytime you’re near the brooder, but with the layers I have and the number of eggs I’m getting, I DON’T NEED ANY MORE HENS.
Sad to say, but there it is.
If baby chicks are in your future, good for you! I’m jealous.
If you are new to raising baby chicks keep reading…the basics are below.
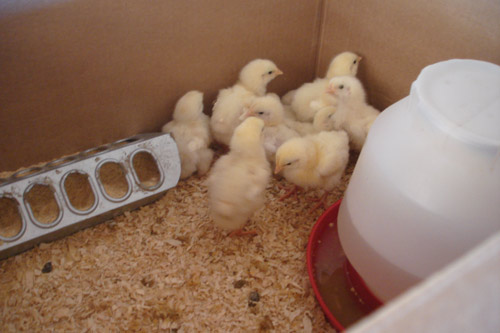
Basics of Brooding Chicks
Brooding chicks is fairly simple. The most important things to remember are to keep them warm (at least 95-degrees), dry, fed and away from animals that like to eat them as snacks, like dogs and cats.
A brooder is simply a container where the chicks can be confined in a warm environment after the hen has hatched them. Brooded chicks are not going to be raised by the hen. I have hatched many batches of chicks over the years and let the hen raise them, so I have not always been dependent on purchased chicks. However, with DD off on her own, I don’t need as many layers as before, so when I need to replace aged hens I purchase chicks locally.
I brood my chicks until they are “fully feathered out”, meaning they look more like adult hens than gangly teenagers. This will take about 6 weeks or so, so placing your brooder in an area where you can check on the chicks often, but where it won’t be in your way is important. We used to set up our brooder just off the kitchen so we could peek in every time we passed by.
Brooder Supplies:
Bedding – I use pine shavings because the chicks don’t slip on the bottom of the brooder, splaying their legs. The shavings also help absorb the dampness of the droppings and spilled water.
Heat Lamp – This is a must as the lamp keeps the chicks warm. I use the clip-on kind with an infrared, non-flammable bulb.
Thermometer – Chicks need heat to survive and thrive. 95-degrees is the minimum. Having an outdoor thermometer will help you monitor the temp inside the brooder and make adjustments when needed.
Feed – Chicks need a high level of protein for proper growth, so choose a pre-mixed “Chick Starter”. It will have all the necessary nutrients already mixed in. It comes medicated and unmedicated depending on your preference.
Water – Chicks drink a lot of water, and need a constant supply for good health. A gallon sized self-waterer is a good choice.
I’m not really good at the last minute thrown together brooder, so I’ve developed a system over the years that makes life much simpler. For one, I keep all my brooder supplies in a large plastic lidded container, which just so happens to be my brooder box. At the end of brooding one batch of chicks all the equipment is cleaned and sterilized, and placed in the box, so the next time I get a batch of chicks everything is clean, contained in one place and easy to find. No more hunting down stuff in the barn or garage. The brooder can be set up in just a few minutes. Easy!
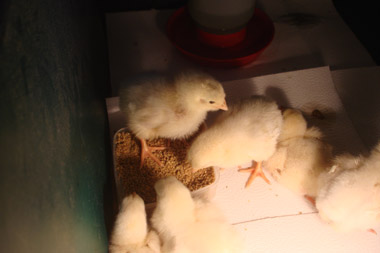
There are many ways to brood chicks, and I will touch on what I think are the easiest and my favorites.
#1 — The Plastic Lidded Storage Container: This is my favorite brooder container. It’s inexpensive to buy, about $10, easy to set up and can be used to store all your brooder equipment when you’re done. If you have dogs or cats you may want to put a window screen over the top of the box so they can’t poke their noses in. If pets aren’t a concern, just off-set the lid a bit to make room for the heat lamp and to help keep the heat in. A word of caution: use a heat lamp that has a cage over the bulb. If the bulb touches the plastic it will melt a hole in your box. Been there, done that!
#2 — The Brooder Box: This is a wooden box that can be purchased at feed stores or on-line. They are usually made of thin plywood. Some have hinged sides so the box can be folded down for storage. This is not one of my favorites simply because they can be expensive, can warp out of shape, are hard to sterilize, and after a few uses the wood absorbs the smells of pooping chicks.
#3 — Livestock Water Tank: These are traditionally used by feed stores to house ALL their baby chicks. Although they look really cool and are sturdy, and all that, they are expensive (about $100 depending on size) and hard to store when not in use. But, if you have the space, go for it!
#4 — Cardboard Box: This is another favorite of mine. I get large, thick octagonal potato boxes from our local Big Box store and set up the brooder in the garage. The heat lamp can be hung by the rafters with a chain or rope. This is especially good if you are buying a large quantity of chicks. (I even raised our first batch of Cornish Game Hens in a box like this, albeit there were only 6. Worked like a dream.) When you’re finished using it, the box can be cut down and used as weed guard in garden pathways or put in the trash; nothing to store.
So—there you have it folks, a few simple ways to brood chicks that are easy, fast to setup and inexpensive to buy. Now you have no excuses to pass up chicks when you see um.
Let spring begin!
Recent comments
Aenean nonummy hendrerit mauris. Phasellus porta.