

Well—hello, folks.
If anyone is still out there, I’m back.
And, if you are still out there I applaud your perseverance for sticking around through this very long hiatus.
I have started and stopped, rewritten and reworked several versions of this post to explain the absence, but I decided to just cut to the chase—as it were.
There’s only one word for the absence.
FUNK.
That’s it.
Honestly.
I was in a big ole fat funk and feeling like I had to write blog posts multiple times a week was just adding to the stress of an already heavy life load—so I stopped—cold turkey.
It was almost 15-months ago I decided to take a break. I thought it would only last a few weeks and then I’d be right back at it. But, that wasn’t the case. A few weeks turned into several weeks, which turned into a whole lot more weeks, and a lot more weeks turned into months, until next thing I knew almost a whole year had gone by.
But, in retrospect, the break gave me the time I needed to rethink life and my place in it. I came to a lot of conclusions, made a lot of decisions, changed directions and have implemented some new personal practices as I move forward. That all sounds so ominous I know, but it has all been good, really.
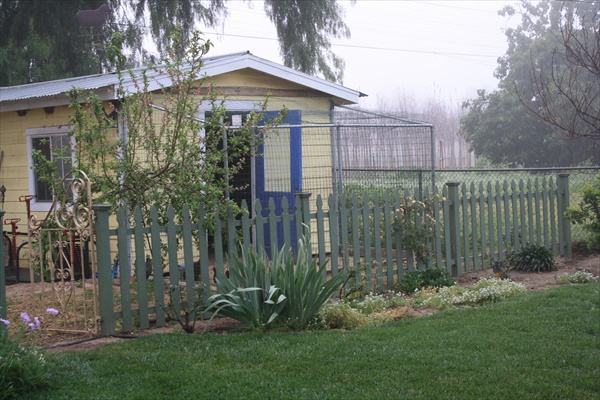
The one thing I did realize is that I really missed writing about my suburban homestead, my time living on a larger farm, raising animals, gardening for food and pleasure, and generally sharing it all with you.
I’m not quite sure what form this new blogging will take, but one thing I do know for sure is that it won’t be crazy making. The pressure to create the perfect post with the perfect photos was just so overwhelming. There may be fewer posts, farther apart, with fewer pictures, because all of that takes time and is a lot of work. This blog isn’t a business for me. It’s a creative outlet; one that I enjoyed very much and one that “I” let get out of hand, so I’m reining it in.
Now that DD is off on her own I also don’t have as many animals as I once did. In fact, I only have 6 layers, so many posts drawing on my 40+ years of experience raising livestock, farming, 4-H, and suburban homesteading, rather than “real time” activities, because while I may not be doing certain things at this moment, I have done them many times in the past.
After a year away from almost everything, my suburban homestead is a wreck, seriously. After months of not working in it, coupled with massive wind storms and wildfires last fall, there is much to be done, which I will begin to do right after it stops raining.
I am looking forward to jumping back in and sharing bits and pieces of my suburban homestead with you, sans the daily posts and beautiful “real time” photosJ
So—sit tight. I already have a few posts in the works.
If you have stuck around, thank you, I mean that sincerely. And if you want, drop a comment to let me know you’re there.
That’s it, folks. You’ll be hearing from me soon.
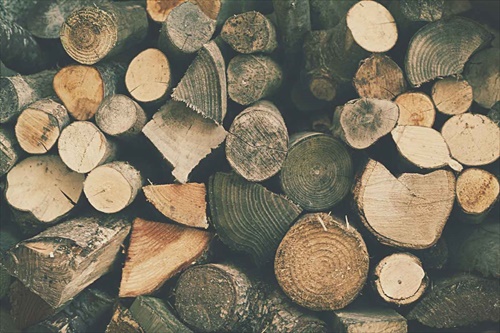
It’s rare that on a cold winter’s day while sitting by a roaring fire we think about firewood…its life or its lifecycle. But, we should.
Whether we heat our homes with gas or electric or propane or heating oil, the cost is going up, not soon to come down again. For many, the rise in cost is pushing them toward less expensive, renewable ways to heat their homes. They are turning to firewood as an alternative to turning down the thermostat, they are rejecting being cold and uncomfortable.
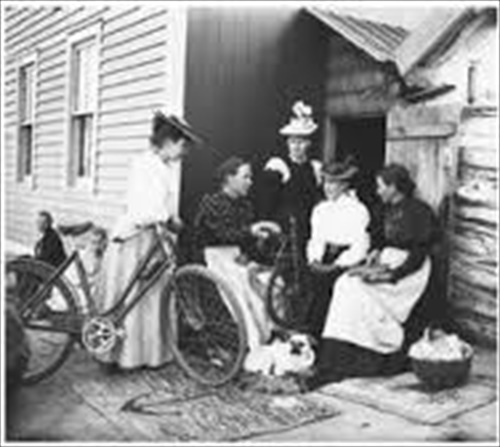
Fire has been used for thousands of years as a way to ward off the cold, firewood was the mainstay of keeping hearth and home together by our ancestors. Not only did they use it for heat, but they also cooked by wood burning stoves well into the 1900’s. Even now, many have grown to appreciate the warmth and beauty (if not the economy) of a blazing wood fire.
It was during one such relaxing moment in front of the fire that I began thinking about the whole cycle of what brought that stack of firewood to my house and into my firebox. I thought about the saplings I had seen on a recent hiking trip and the newly planted orchards that are plentiful in my county. I thought about the young growing trees that made up the reforested mountain areas; their lanky spires reaching for the sun above while rain and undergrowth combined with animal droppings to nourish the young fledglings as they grew tall and strong. It made me think about the part that birds play in spreading seeds to places where trees can take root. I reflected on the massive wind storm that hit our farm years ago, sending hundreds of eucalyptus trees crashing to the ground, and of the lone pine tree that fell on my truck crushing it. I thought about the men who stopped by the side of the road to cut and steal the downed trees. And, I remembered the very kind man who drove hours each day to reach our farm so he could spend the next several months cutting up those trees to sell as firewood to city dwellers, campers and BBQ joints.
My memory wandered back to a time when my family gathered firewood from open spaces and private lands in our sparsely populated area to warm our own home; and to the times when DD and I would walk the farm, picking up small rounds and branches to be cut into smaller pieces. I thought about the day trips she and I have taken in recent years to pick up truckloads of firewood from a local rancher to bring home and stack for our own use.
Lying there, in front of my own fire, I couldn’t help but think about the life of those trees with appreciation for the time of nature; of sun and wind and manure and all the good things that help grow trees big and strong; of the sweat and hard work of men who cut and split and stack, of determination and appreciation for a renewable source of heat that has basically stayed the same price from year to year for a decade. The lifecycle of trees is one of nature then nurture, as it brings warmth on a cold day.
After 15 years, I still enjoy my warm comfortable home with a blazing fire on a cold winter’s day, but I enjoy it even more now that I look upon trees with renewed awe, and think…wow, that would make some nice firewood, and in turn a nice blaze!
To learn about stacking firewood and building a heat producing fire check out these articles.
Taking some of the Bad and Ugly out of my Homestead
A few weeks ago I wrote about feeling like a complete and total failure at this homesteading thing. Work and life over the past several months had gotten so much in the way of my farm life that my little homestead was showing the despair of it all.
In that piece I talked about picking myself up, brushing myself off and starting fresh. Little-by-little I have been working on it, taking at least one project each weekend and completing it. One foot in front of the other has been my motto, each baby step getting closer and closer to getting back on track.
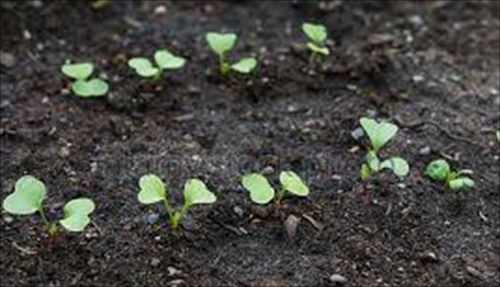
The first weekend of reining back my homesteading life was actually really fun. It had been months since I spent much time outside and on this unusually warm Saturday I spent most of the daylight hours out in the fresh air and sun, just puttering, as I call it. I refilled my patio water trough planters with new soil, breaking up the clumps and smoothing out the soil for planting. I sowed seeds for a few cool weather veggies I use often, like carrots, beets, spinach, radishes, and a variety of lettuces. Our mild winters make it possible to garden year-round.
My next project was a bit harder. I hung a few long-handled tool holders on the wall of the barn so I could get my tools out of their old metal trashcan and someplace where they could be organized. The project wasn’t hard in itself, but harder because I am beginning to really feel my age. It seems I can’t run around doing 15 different projects in a day like I use to. And, of course, I don’t want to hurt myself, so my motto has become “slow and steady wins the day”. Projects may take me a bit longer, I may take a few more breaks than I use to, but projects do eventually get finished—that’s the important part.
I was feeling so energized after getting my tools hung that I began brushing down the inside of the chicken coop in preparation for the arrival of my new hens. I knocked down cobwebs, brushed the windowsills and cleaned and repacked the nesting boxes. One thing led to another and soon I was raking the outside coop area and moving the dirt and straw and shavings to the sad, unused squash patch. Before I knew it I was digging out the door, which was piled up with so much dirt it wouldn’t close.
By the time the afternoon sun began to dip below the horizon I had raked and dug out the entire barn floor! More than 10 wheelbarrows full of aged manure, straw, shavings, and dirt went into the squash patch that day. Not bad for a middle-aged woman who hasn’t done much physical labor in recent months:)
Small steps often, right?
My most fun accomplishment of all, though, was replacing my laying hens. A rogue attack by an opossum had left me with just one older hen. ONE hen does not make a flock, or a very big omelet for that matter. We have a local farm stand that brings in day old chicks in the spring to use for educational purposes with the public and then sells off most of them in October so they don’t have to winter them over. I had been on the list for weeks before I got the call. November 1st was my pick-up date. Not ideal since the first was a Tuesday and a work day, but I was determined to get there and pick out my new hens, so I took the morning off work.
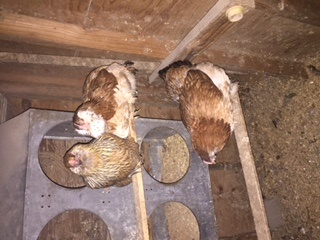
By 10:00 am I had my carrier cleaned up, in the back of my truck, and was heading down the road to the farm stand. When I got there the young ladies who run the farm took me over to the coop where all the hens were penned up. There were about 40 or so hens, mostly Rhode Island Reds and Barred Rocks. I wanted 4 or 5 hens of the same breed, but I really wasn’t interested in either Reds or Rocks. I looked around and spotted two plump Americana’s, which I immediate claimed. Now to find some pen mates. More searching and I spied what looked like the lone Wyandotte. I claimed her, too. Her companion is a greyish/silver hen with tan cape feathers, but I have no idea what breed she is. I looked in my poultry standards book and still can’t tell. It doesn’t make any difference, though. I have 5 new hens to add to my one other hen—3 Americana’s, 1 Wyandotte, 1 Cochin, and 1 mystery hen. My little flock is renewed.
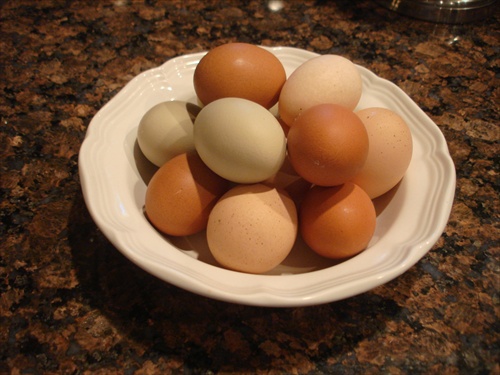
But, best of all…I HAVE EGGS!!
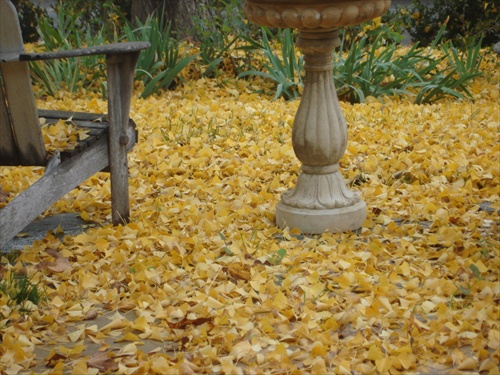
For many people, the release of fall leaves onto the yard is an unwelcome sight, fraught with raking, and bagging and disposing of mounds and mounds of debris. But, for me it is just the opposite. I welcome a yard full of fall leaves because I have always thought of them as a valuable crop (in a manner of speaking) to be harvested, shredded or composted and used as mulch in my garden.
I learned, long ago, that when you shred or compost leaves you end up with nitrogen and nutrient rich garden mulch that is totally free and readily available. When you layer the confetti like leaves in garden beds it settles down with each watering or rainfall and new application of leave to knit together creating a felted like carpet that doesn’t blow away in the wind, but stays loose and porous enough to let water penetrate.
My deciduous trees like the Sycamore and Gingko are in the front yard, which isn’t very big, so I don’t get tons of leaves, but what I do get is stored in an unused compost bin until I have good amount to shred. Throughout the fall they are collected and shredded and will mulch several garden beds.
When life gets busy and doesn’t leave time for raking or shredding all those leaves they get mowed over with the lawn mower and used as mulch, as is, or piled into the compost bin to break down into nutrient rich soil. If I’m feeling really energetic and need more leaves than my trees can provide I ask neighbors if I can have their’s. You can always find someone willing to let you clean their yard of leaves, so they don’t have to.
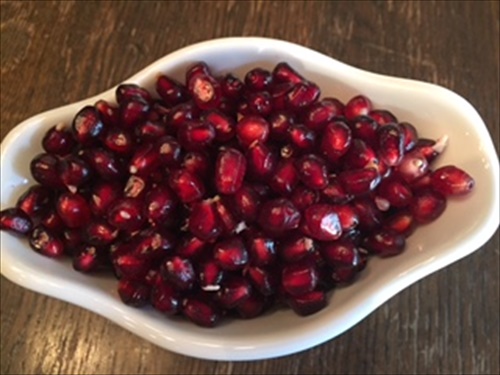
Pomegranates are the jewel of the fall fruit season. The ruby red seeds and tantalizing juice pair perfectly with dishes from salads to desserts to cocktails. But, they are notorious for being one of the messiest fruits to break into.
As a child we would sit under an afternoon fall sky, peeling back the skin to expose the thin membrane before separating each quadrant to get to the seeds. We’d pop them into our mouths and crunch down to release the vibrant juice. I can’t tell you how many shirts were ruined or the number of times we had to scrub our hands to get the staining off. But, that was then.
Now we have become much more adept at extracting the hundreds of tiny gem-like seeds that lie inside while keeping the greatest number intact. Follow the steps below, which I found in a local farm bureau magazine, and you will quickly be using fresh pom seeds, making juice or boiling it down to a thick sticky molasses that is perfect in a wide range of dishes.
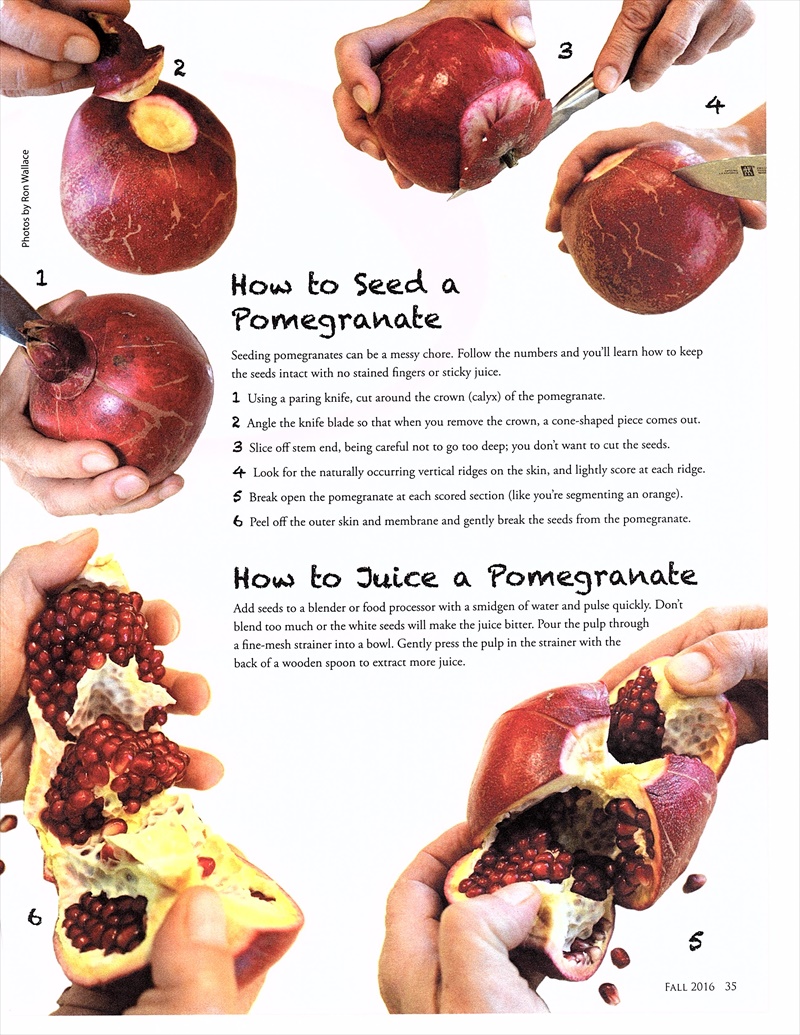 Pomegranates are not a primary crop in most areas of the U.S., they grow in small-acreage pockets across the warmer zones 8-10. Although there are hundreds of cultivars world-wide only about 14 grow in the States. They are very easy to grow and are quite productive once established in the right region. They can be grown like a dense shrub, trained as a tree, or heavily pruned in an espaliered form to fit into small gardens. Seeds range from a very dark ruby red to a lighter pinkish color depending on the variety. If interested in growing pomegranates, check with your local nurseryman for the best cultivar for your area.
More Tips on Pomegranates
- To freeze seeds: dry seeds with a paper towel before placing on cookie sheet covered with wax paper. Place in freezer for a few hours. Once frozen thay can be stored in a freezer container.
- To freeze juice: pour juice into a freezer container leaving about a ½-inch of head space.
- To make pomegranate molasses: pour juice into a heavy bottomed pot. Bring to a low boil over medium heat. Adjust to maintain boiling. In about 30-35 minutes the juice will take on a syrupy consistency and become bubblier. This is the point when the syrup begins to turn into molasses. Watch closely because the transition happens quickly. Use a spoon to test. Syrup will coat the spoon, while molasses will have a heavier coating. The whole process will take between 30 to 40 minutes, but closer to 40. Store finished molasses in an airtight container in a cool, dry place.
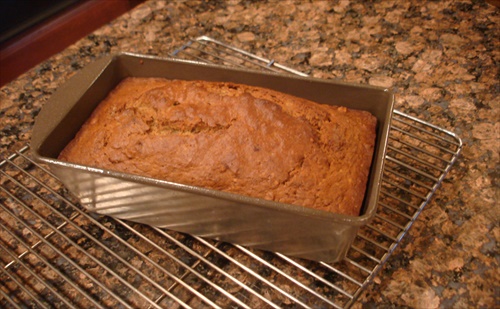
I know, I know. We all have grandma’s best ever this or that, the tried and true family favorite, but this is seriously the best banana bread you’ll ever taste.
And, it came about by shear accident. Let me explain.
It was years ago. DD was still in grade school and bananas were a staple in our house. We used them in lunches, on oatmeal, dipped in chocolate as a sweet treat. Every week I would buy them and every week they were eaten in some fashion or another.
Then, they fell out of favor as many foods do when you eat them insesately for weeks or months. They are no longer special, just part of the daily grind that is putting together meals or packing school lunches.
When bananas were too soft for fresh eating I would make banana pancakes on the weekend to use them up, so they didn’t go to waste. Single moms can get very creative when they live on a budget and don’t want to waste food.
But, this day was different. We had tired of banana pancakes, and not being a fan of banana cream pie I had to come up with another way to use the now spotted yellow and brown skinned tropical fruit. When no ideas came to mind I threw the now very ripe bananas in the freezer until I could come up with a plan.
Then it happened. That ah ha moment when you find what you’re looking for without really even looking. I was flipping through a cookbook, looking for something completely different, and there it was, bold as day…a banana bread recipe for a holiday breakfast. I read over the recipe and mentally checked off the ingredients one at a time (it’s so nice having a well-stocked pantry). The recipe called for slightly softened fresh bananas, but I only had the one’s I had thrown in the freezer a few weeks earlier.
What the heck, I’ll give it a try.
I thawed the banana’s, reread the recipe, making a few adjustments, and the end result was a soft, moist, dark-colored nutty bread with the most intense banana flavor I had ever tasted.
It was, in fact, the best banana bread I had ever tasted.
So what makes this banana bread so different?
My gastronomically uneducated opinion is…the sticky, sweet, intensely flavored syrup that is given off when the bananas defrost; that and the combination of brown sugar, applesauce instead of oil and the addition of pecans rather than walnuts.
This recipe has become a fall favorite and is great toasted and slathered with butter, or even made into grilled French toast.
Frozen Banana Bread
INGREDIENTS:
½ cup butter, room temperature
2 eggs
1 cup brown sugar
1-1/2 cups all-purpose flour
1 teaspoon baking soda
1 teaspoon salt
½ teaspoon cinnamon
1 cup mashed very ripe bananas
½ cup applesauce
1 teaspoon vanilla
½ cup chopped pecans
DIRECTIONS:
Preheat oven to 350 degrees.
Cream together butter, sugar, and eggs.
Sift dry ingredients and combine with the butter mixture. Blend well.
Add the bananas, applesauce, and vanilla; stir well, but don’t overwork the mixture.
Stir in the nuts and pour into a well-buttered 9x5x3-inch loaf.
Bake one hour, or until a knife inserted in the middle comes out clean. Turn out onto a rack to cool. Makes: 1 large loaf.
TIPS: This is one of those full proof recipes. It’s had to screw it up, so be a little adventurous with it. I have used different kinds of applesauce from plain to chunky homemade to cinnamon. If you do try it with cinnamon applesauce, reduce the cinnamon in the recipe by half.
You can also use this recipe as a base for other quick breads like apple spice, apple butter, pumpkin or pumpkin butter.
So many people romanticize farm life. They show pictures of fluffy day old chicks, frolicking lambs in lush green pastures, gallons of frothy milk warm fresh from the udder or homemade baked goods that would make even Julia Child jealous. What they rarely talk about is the other side of farm life, the side that is not always pretty and sometimes downright depressing and ugly. That part of farm life that bespeaks of failure or sadness or a job not so well done.
I have farmed for many years, and have lived on my suburban homestead for many more, but it wasn’t until last night that I thought of myself as a failure, of someone who couldn’t get it all or keep it all together.
It was late, as usual, and I was just getting home from work and making my evening rounds. I was standing out near the barn looking out over my little farm; assessing the orchard, the garden, the barn and the chicken coop, when a rather profound thought came to my mind…”I am not very good at this anymore”, “I have become the worst homesteader ever”.
As I stood there looking out over my little plot of land, I took a mental survey that went something like this:
- I have a wonderful barn, one that has housed sheep for shows, rabbits & chickens for meat, and laying hens for eggs, but one that is in desperate need of cleaning and painting.
- I have a chicken coop with one hen. ONE! The others were picked off by a marauding opossum over the past few weeks. The one I have left is not even laying, so we are eggless to boot. I can’t stomach the idea of eating store bought eggs so we have gone without.
- My attempt at growing sweet potatoes in an unused water trough was an epic failure, and the weeds in my garden are more prolific than the vegetables. I did get a few spindly cabbages (that I fed to the chicken). I guess that’s something.
- My fruit trees have produced very little. A huge windstorm that followed the spring bloom blew off most of the blossoms and small fruit. I got two Fugi apples, barely enough for a rustic apple tart.
- My most productive haul was from an espaliered pear tree that I planted last year. I got about three dozen Asian pears that were absolutely divine.
Overall, the year has not been good, which made me feel like the worst homesteader ever. I blog about homesteading on a suburban lot, but it’s pretty uninspiring when a homestead blogger has no chickens, no garden, and no produce.
After 15 years on my homestead (and another 15 on a larger farm) one thing is for sure—farming is unpredictable—it has its ups and downs, it ebbs and flows with good years and bad. It helps if you’re not work 60-70 hour weeks at an off-farm job, but that is my life right now
There have been years when our little farm has produced more than we can use…making me feel like I should get an award for small plot farming…And other years? Well, it’s all we could do to keep the animals alive, get to our shows, manage school and work, and put a few greens on the table.
Thank God I’m not dependent on my farm for survival, or some years we’d be doomed.
But here’s the thing…I couldn’t care less. I’m fine with good days and bad days; productive years and not so productive years because modern homesteading is more about the journey than the destination. Sure, I’d love spending ALL day tending my farm, digging in the garden or preserving the harvest, making quilts or cooking homemade meals, but that’s not realistic. Neither is spending every weekend working on the farm rather than living. We all have a life outside of our farm life, or at least we should.
But, in reality, more times than not I have something to celebrate and that’s precisely what I intend to do—celebrate my accomplishments, regardless of how small they seem to be. Accomplishments like:
- Enjoying a light lunch of fresh made chevre and home baked bread on a glorious fall day. The milk came from a friend’s dairy goats and was mixed with herbs from an herb garden planted just this summer. The bread makings are part of my well-stocked pantry.
- Transforming a paltry apple harvest into a delicious (and easy to make) rustic apple tart that was enjoyed following a roasted lamb dinner. The lamb was raised here and put in the freezer last year and the carrots for a Woodcutter’s Carrot side dish came from a local farmers market.
- Raising a farm kid who just graduated college and is pursuing her own independence while planning for a farm life of her own.
- Growing a friendship that not only provides a wonderful supportive relationship, but goat’s milk as well. My schedule doesn’t allow time for dairy animals (as much as I would like it to) so this is the next best thing.
- A fully stocked pantry that allows me to spend more of my free days homesteading and less time shopping in town.
Over the years I’ve learned that not everything is sunshine and roses, not everything attempted is a success. Failure is a fact of life and you can either embrace it or be so afraid of it that you shy away from trying anything new or different. I don’t ever intend on being like that. I’m too curious a person to be daunted by the possibility of failing.
Someone once said that, “you learn more by failing than by succeeding”. I think that’s true because when I fail I have the chance to pick myself up, dust myself off and try again. And, that’s exactly what I intend to do with my homestead—start again—like any good farmer would.
So, here’s what I’m going to do after brushing myself off:
- I’m going to my local farm stand and buy myself some new hens. They order day old chicks in the spring, use them for educational purposes at the farm before selling them off in the fall so they don’t have to be cared for during the winter. It’s a great deal. I don’t have to brood them or grow them out until they are old enough to lay. They are laying already!
- I’m going to enlist some help and do a major garden clean-up; clearing weeds, fixing the raised beds, and installing a better watering system that won’t require me to spend hours each day with a hose in my hand. I’m already excited because there is nothing better than spending time in the greenhouse starting seeds, planting them out and watching the garden grow lush and green. I’m also going to renew my pumpkin patch because I truly miss those wonderful orange orbs peeking through their giant green leaves.
- I’ve always wanted a small flower bed outside my chicken coop and a load of free bricks I got a while back will be perfect for the edging. It will make a wonderful “bee friendly” flower bed near the fruit trees.
- The barn is getting a complete cleaning, top to bottom, well, top to dirt floor. The nesting boxes will be cleaned out, refilled and waiting for the arrival of the new hens, and I’ll make space to store all my long-handled gardening tools.
My lists can sound daunting, but I’m excited about the opportunity to start afresh, shaking off the bad year and looking forward to all the possibilities of new successes.
We’re not perfect, here. It’s nothing like a television show. Some years are wonderful and everything hums along beautifully, while other years are messy and epic failures.
But, like I said, homesteading is a journey and not a destination. As long as I’m enjoying the journey and excited about renewed possibilities, my enthusiasm for living a farm life in the ‘burbs will not be dampened. So, not to worry folks, I’m not going anywhere. Rest assured you’ll be hearing about the whole beautiful, dirty, glorious, messy thing—the good, the bad, and the ugly.
I stumbled across this, can’t remember where, but it spoke to my inner farm girl.
“I used to admire fashionably dressed and impeccably groomed women. Now, when I see homely dressed women at the wheat and produce pick-up spots, I wonder what they could teach me about food preservation and living a more frugal life”.

When I was in grade school (a million years ago) we would read books about the Pilgrims and the Indians this time of year. What always struck me as odd was the part of the stories that talked about how the Indians buried a fish in the hole where they planted corn or pumpkin or squash seeds. Little did I know at the time that the decomposing fish provided food and nutrients to the germinating seeds and growing plants, much the same way topical fertilizers do today.
But, unlike in the Pilgrim days, if you search for fish fertilizer, sometimes called fish emulsion, in garden or farm stores you’ll quickly discover that they are quite expensive, too expensive for a frugal farm girl, like me. So years ago I set out to learn how to make my own. What I found out was if you have access to fish parts the process is fairly easy. Fortunately, I had a father-in-law who was an avid fisherman, and not just the catch and release type. He only believed in catching and eating. I also live fairly close to the coast with a small, but vibrant fishing industry, so my supply of fish guts was pretty steady.
Once I had the supply part figured out, it was easy going from there on.
To make your own Homemade Fish Emulsion, follow these 5 simple steps and you’ll be well on your way to creating your own nutrient packed, Pilgrim era fertilizer that your plants will love.
STEP 1: Find yourself a fairly large barrel with a lid, like a 33-gallon plastic trashcan or one of those blue water collection barrels, and label it FISH FERTILIZER, ‘cause you won’t want to mistakenly use it for anything else. A lid is important to keep the critters out, so make sure it fits securely.
STEP 2: Gather up your fish guts and bones and skins and toss them into the barrel. Crab and shrimp parts also work well because they are loaded with calcium. They take a bit to break down, but they’re worth it. You want to fill the barrel about 1/3 of the way, so if you don’t want to make very much or you don’t have access to a lot of fish parts use a 5-gallon bucket and stick with the 1/3 ratio. You’ll see why in a second.
STEP 3: Layer in some brown stuff, just like you would with a compost pile, so you have a nice carbon/nitrogen mix. Leaves work great. Layering the fish then leaves and so on will help the materials break down. You want the barrel to be about 2/3’s full.
STEP 4: Pour on a bit of sugar for the bacteria and micro-organisms to feed on and to help lessen the fishy smell. It also adds a bit more carbon to the mix. I use a livestock molasses that can be purchased in a gallon jug from a farm supply or feed store. Use ¼ to ½ cup for smaller buckets and about a cup for the larger barrels. This isn’t a fine science so don’t get obsessed with it. The sugar helps with the fermenting process.
STEP 5: Fill the bucket with water to a few inches from the top. Now stir you’re gunky, sloppy mess until everything is well incorporated. Looks great, doesn’t it? Yep — it’s supposed to look that gross. Now place the lid on, but not too tight, the pressure that builds up from the fermenting will blow the lid off. You’ve been warned.
NOTE: Try not to let flies in the barrel or you’ll have a stellar breeding ground for maggots, and that’s not what we want. One solution is to drill a few holes in the lid and then line the underneath side with a fine mesh. This will let the gases release, but won’t let the flies in.
Now comes the hard part.
Let it sit for a few weeks, a month is better, so everything can ferment. Give it a good stir every few days to keep things well mixed and decomposing. It will ferment faster in warmer weather than in cooler weather, but it smells worse in warmer weather. You’ve been warned, again. After about a month your brew is ready to use!
Using Fish Emulsion
There are several different ways you can use your fish emulsion. One is to stir it well and then scoop out what you want to use, drizzling it around your plants. This gives plants bio-available nutrients in a soluble form. You can also strain off the solids and use just the liquid in a watering can like you would a manure tea, using the solids to start another batch. Or, you can use it as a drench, diluting 2-3 tablespoons in a gallon of water, and then applying it around the base of your plants. Some people use it as a foliar spray, but there’s something so unappealing about rotting fish guts coming in contact with my salad greens that I personally refrain. But, if you’re braver than me, mix 1 tablespoon of emulsion per gallon of water and use a foliar sprayer, applying it in the cooler part of the day rather than in the heat of the day.
Other Tips for Using Fish Emulsion:
- Kick start your compost pile by using ½-cup in a gallon of water and layering it in.
- Your brew will keep for a year if you make it in large batches. Smaller batches can be made seasonally.
- This stuff smells! Store it in an out-of-the-way place so the odor won’t knock you off your feet.
- Did I mention this stuff smells? EVERYTHING it comes in contact with will smell like dead fish. Choose your buckets, stirs and sprayers or water cans with this in mind, and be careful not to get it on your clothes or shoes when using it, the deodorizers don’t work very well.
- Solids can be used up to three times before they lose their potency. After that you can add them to your compost pile.
Sources for Fish Parts:
- Your own fishing trips
- Fisheries
- Local fishermen
- Farmer’s Markets
- Grocery store fish counter or fish market
I have a confession to make.
Wait for it…here it comes.
I am NOT a huge baker!
There — I said it.
I’m not a huge baker.
Don’t get me wrong, I do enjoy my desserts and toasted sweet breads now and then, but you won’t find a jar full of cookies or a plate of brownies, or even a pie on a cooling rack in my kitchen every day of the week.
That’s just not me, at all.
I do enjoy making my much requested (frozen) banana bread, and I love making my pumpkin spice bread during the fall. And, summer wouldn’t be summer without a juicy berry cobbler with its sweet, crunchy oatmeal topping. But cakes and pies or pastries and muffins have never held much fascination for me, other than occasionally eating them, of course.
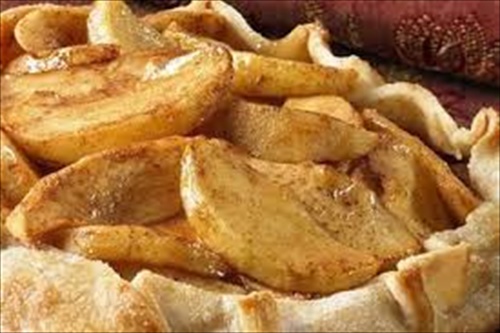
The one thing I do enjoy making, especially this time of year, is a fresh gooey apple pie. Not just any apple pie, ‘cause remember I’m not into baking, but a quick and easy apple creation that can be thrown together in a matter of minutes, popped in the oven and ready to eat by the time dinner is finished.
That kind of apple pie.
So—how do I pull off this feat of culinary genius?
Simple…I use a pre-made pie crust.
Yep, you heard that right. The suburban homesteader uses pre-made pie crusts, sometimes. And, I don’t feel the least bit diminished.
I have to say they are a God send after a long day at work and even longer hours tending to the farm. There is nothing like throwing together sliced apples, spices, and butter, piling it all in the middle of a thawed pie crust and folding over the edges to encase all that yummy juiciness before popping it in the oven to bake.
I know I would be more of an authentic homesteader if I ground my own flour, sifted together the dry ingredients and folded in the wet before rolling it out and cutting it in the perfect circle, but sometimes life just gets away from us, and I’m okay with that. For me, homesteading is more a frame of mind and lifestyle that I work to achieve. It’s also a life that I’m successful at some weeks and not so much in other weeks, and I have to be okay with that too.
So, if you have a busy schedule, that prevents you from being the true to life farmer you’d like to be, take a deep breath, get yourself a pre-made pie crust, and bake a pie that is worthy of any farm girl. Don’t forget to smother it in vanilla ice cream:)
Rustic Apple Tart
INGREDIENTS:
2 tbsp unsalted butter
1/4 cup packed brown sugar
2 tbsp granulated sugar
8 cups sliced peeled tart baking apple, like Granny Smith (about 3 pounds)
2 tsp fresh lemon juice
1 tsp ground cinnamon
1/4 tsp ground nutmeg
1/2 package refrigerated pie dough (such as Pillsbury)
2 tsp ice water
2 tsp granulated sugar
2 tbsp apricot preserves
DIRECTIONS:
1. Melt butter in a large skillet over medium-high heat. Add brown sugar and 1 tablespoon granulated sugar; cook 2 minutes or until sugars dissolve. Stir in apples and next 3 ingredients (through nutmeg). Cover, reduce heat, and cook 10 minutes or until apples are tender, stirring occasionally. Remove from heat; cool to room temperature.
2. Preheat oven to 400°. Set oven rack to lowest third of oven.
3. Roll out dough and place on a piece of parchment paper. Place dough and parchment paper on a baking sheet. Arrange cooled apples in center of dough, leaving a 2-inch border. Fold the edges of dough toward center; pressing gently to seal (dough will only partially cover the apple mixture). Brush dough with 1 teaspoon ice water, and sprinkle evenly with 1 teaspoon granulated sugar. Bake at 400° for 45 minutes or until golden brown.
4. Place the preserves and 1 teaspoon water in a small microwave-safe bowl. Microwave on HIGH for 30 seconds or until bubbly. Brush the mixture over warm tart. Cut into wedges, and serve warm or at room temperature…with vanilla ice cream, of course.
INGREDIENTS:
- 2 tbsp unsalted butter
- 1/4 cup packed brown sugar
- 2 tbsp granulated sugar
- 8 cups sliced peeled tart baking apple, like Granny Smith (about 3 pounds)
- 2 tsp fresh lemon juice
- 1 tsp ground cinnamon
- 1/4 tsp ground nutmeg
- 1/2 package refrigerated pie dough (such as Pillsbury)
- 2 tsp ice water
- 2 tsp granulated sugar
- 2 tbsp apricot preserves
DIRECTIONS:
- 1. Melt butter in a large skillet over medium-high heat. Add brown sugar and 1 tablespoon granulated sugar; cook 2 minutes or until sugars dissolve. Stir in apples and next 3 ingredients (through nutmeg). Cover, reduce heat, and cook 10 minutes or until apples are tender, stirring occasionally. Remove from heat; cool to room temperature.
- 2. Preheat oven to 400°. Set oven rack to lowest third of oven.
- 3. Roll out dough and place on a piece of parchment paper. Place dough and parchment paper on a baking sheet. Arrange cooled apples in center of dough, leaving a 2-inch border. Fold the edges of dough toward center; pressing gently to seal (dough will only partially cover the apple mixture). Brush dough with 1 teaspoon ice water, and sprinkle evenly with 1 teaspoon granulated sugar. Bake at 400° for 45 minutes or until golden brown.
- 4. Place the preserves and 1 teaspoon water in a small microwave-safe bowl. Microwave on HIGH for 30 seconds or until bubbly. Brush the mixture over warm tart. Cut into wedges, and serve warm or at room temperature…with vanilla ice cream, of course.
Recent comments
Aenean nonummy hendrerit mauris. Phasellus porta.