
Looking for a great way to start your next fire?
Boy, do I have a dandy one that not only reuses, recycles and repurposes items that have outlived their usefulness; it’s a fun afternoon project as well.
Fire starters are small wax bundles filled with various flammable materials and threaded with a wick. The bundles are used to start a small pile of wood, kindling or pinecones that in turn creates a larger fire.
They can be made from candle scrapes, bites of wax crayons, pine needles or small cones, wood shavings, even old potpourri or dried flowers.
Life on my farm is all about the senses—the looks, the smells, the sounds all play a role in making our farm a place that we love to hunker down in, so I use scrapes of scented candles and old potpourri for my mixture.
Have fun making your own homemade potpourri fire starters, or use your own materials to create new ones.
What You’ll Need:
- Paper cupcake wrappers and an old muffin tin. (I bought mine from a yard sale for a dime.)
- Wax candles scrapes, wax crayon pieces, old paraffin wax or used wax tarts. (Keep a box or bucket handy and toss all these leftovers into it.)
- Old potpourri.
- A large pot for water and smaller one for the wax. (Think of a double boiler set-up.)
- Old spoon and old ladle.
Directions:
Fill the large pan about half full of water and bring to a steady simmer.
While the water is coming to a simmer, line the muffin tin with the cupcake papers.
Place wax pieces into the smaller pan and set in the simmering water. Melt the wax slowly. Use caution when melting wax, it is very flammable.
Once the wax is completely melted, add the potpourri into the wax and stir until all the material is completely coated. The consistency should be fairly thick. If you need more material, try adding shaving, dried pine needles or small cones and seed pods, like mulberry cones. Keep the heat on so the wax won’t solidify.
Using a ladle, fill each cupcake paper. Use the old spoon to pack down the wax mixture.
When the cupcake papers are full, place the muffin tin in a safe place to cool.
When the starters have cooled, but have not solidified, run the wick through the bottom using a large needle.
Starting Your Fire
Place your kindling material in a small pile with the fire starter nestled in the middle. Light the wick, which in turn will set the fire starter on fire. The fire starter will create a flame that will last for about 5 minutes, giving time for the kindling to catch, and for you to add larger pieces of kindling. You should have a well started fire by then, and can add larger logs.
WARNING: Use great caution any time you use flammable materials or work with fire.

I wrote this post over a year ago, but it still holds true today; we gather and store burned down remnants of candles all year long, and we turn them into new candles in the fall. The box we store the bits and pieces in may be larger than when we first started, and the collection of fire safe containers has definitely grown, but the process of making light for winter remains the same–melt, pour, set, light.
I love the glow of candle light. It casts a warm comfortable feeling over the entire room. From the first hint of fall’s chill until buds burst in the warm spring air there are candles burning in my little farmhouse.
They are on my mantel, set in a collection of thrift store candle holders on my hearth, on the window sill of my kitchen, in my bedroom and even along side my bath tub. It’s amazing how much that little flickering flame of light can calm and restore and bring peace at the end of a busy day.
But, what once was a necessity for lighting a room, reading a newspaper, or illuminating a path has become almost a luxury. Years ago I could buy candles for a few dollars, but now they cost more than I spend on a bag of chicken feed. Being the frugal farmer that I am however, I have found a few tricks to keep my love affair with candles without breaking the bank.
One is to use the department store gift cards I receive in the mail. You know the ones I’m talking about…where they give you $10 off of a purchase to entice you into the store, hoping you’ll spend more. I’m too savvy for their ploys, though. I am usually able to find 3” pillars, or jarred candles or 6 votives for just under the minimum $10 (which I am still able to use my card to purchase). More times than not I walk out of the store with beautiful scented candles for no money at all. How’s that for farm girl frugality?
My second method to keeping the candle flames flickering is to save all the little bits and pieces of burned down candle wax. I keep them in a ziplock bag. When I have gathered enough pieces of the same color (or similar color) I melt them down to make new candles. I save all the old jars from any jarred candles because they are made of tempered glass and safe for pouring hot wax into.
For just a few dollars in a package of wick and a $2.00 pot I bought at the thrift store I can make a new candle in less than 30-minutes and enjoy the glow of my recycled wax for hours. How great is that!
To make your own candles out of bits and pieces all you need is a stainless steel pot (one you don’t mind getting covered with wax), a larger pot, an old jarred candle jar and a package of wicks.
Now—fill the larger pot half way with water and set it on a medium flame. Cut the wick 1-inch taller than the jar, tie a knot at one end, wrap it around a pencil or chop stick a few times so it sets nicely on the bottom of the jar.

Place the wax bits in the smaller pot and set it inside the larger pot–like a double boiler. Let the wax melt, stirring occasionally at first, then constantly as the wax gets hotter. When all the wax has melted, gently pour it into the prepared jar. (if your wax has bits of wick or debris in it, pour it through a small hand-held sieve). Let it set overnight. When you’re ready to burn the new candle, cut the wick to 1/2-inch and light it.

Voila! That’s all it takes to keep the candle glow burning all the way through to spring.
Can you feel it? It’s coming. Pushing out the warm sultry days of late summer and replacing it with crisp cool days that glow like gold. It’s creeping closer…softly…silently…like little cat feet.
It’s October!!!
October is my soul month, truly. And, if you’ve read this blog for long you’ve read lots of stories about my love of October. It’s the time of year that I feel the most alive, while at the same time feeling the most at home. I love everything about it—the way the afternoon sun turns golden and bathes the world in soft hues of amber, while the leaves shower down in shades of orange, red and umber; how the crisp air smells as it pushes summer out of its way. Or, the way pine and firewood smoke mingle and hang like a fragrant curtain.
October is a time for fall festivals, trips to local apple farms, hard cider tasting (and not so hard cider tasting), and searching for the perfect pumpkin to adorn our house. It is also a time when friends get together around a warm fireplace and turn a simple soup or stew dinner into a truly memorable evening. And, let’s not forget the array of hot toddies to keep the fall chill at bay.
Yep, October starts a fall season that is all about food, friends, family and merriment.
I break out my pumpkin scented candles, keep a big fire going whenever I’m home, and load up the slow cooker, but most of all I love to have a pot of mulling spices ready for a warm your soul cider concoction.
Can you smell the nutmeg cloves, orange, cinnamon, and apple cider?
Isn’t it heavenly?
It really sets the mood of a warm and inviting home, even if you’re not mulling cider or wine. Add the smell of a rich pumpkin pecan bread and you’ve got me hanging out at home all day! It’s that relaxing.
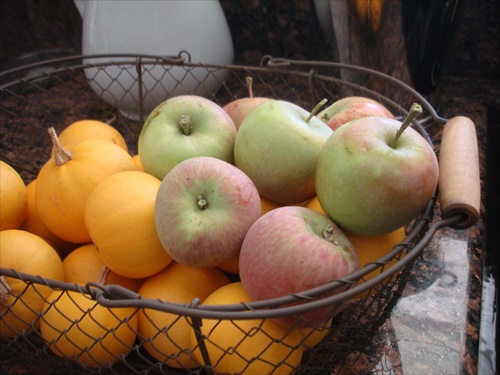
Our annual trip to the apple farms sets this scene in motion when we come home laden down with pounds of heritage apples and gallons of fresh pressed apple cider.
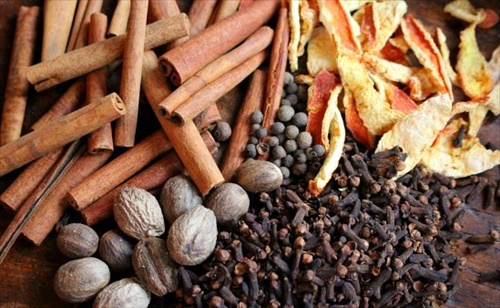
Looking towards the parties and cold weather ahead I mix up a batch of homemade mulling spices. I store mine in a canning jar and make a few 4-ounce jars to give as hostess gifts. They are unique and very much liked. This recipe makes eight 4-ounce jars.
Mulling Spice Mix
INGREDIENTS:
16 cinnamon sticks broken into pieces
4 whole nutmeg pods, smashed to pieces with the flat side of a meat mallet
½ cup whole cloves
¼ cup whole all allspice
½ cup dried orange peel
1 cup candied ginger, chopped
DIRECTIONS:
Place 2 or 3 pieces of cinnamon stick in the bottom of each jar. In a medium bowl, combine the nutmeg, cloves, allspice, dried orange peel and candied ginger.
Scoop mixture into each jar and close with the canning lid.
To make a mulling spice sachet: place 2 to 3 tablespoons of the spice mixture into empty clothe sachet or tea bags and tie closed, leaving some headspace.
TO MAKE MULLED APPLE CIDER: pour a ½ gallon of apple cider into a slow cooker and add 1 mulled spice bag. Allow to simmer for several hours before drinking. Keep slow cooker on low to keep cider warm. (Mulled cider can also be made on the stove top, but it takes longer. With the slow cooker you can add all in the ingredients and walk away; leaving the cider to do its business while filling the house with a wonder fall aroma.
To serve a “grown-up” version, adding a splash of Calvados before serving brings the whole thing together.
TO SERVE: Ladle hot mulled cider into mugs.
NOTE: One of the great things about making your own mulling spices is that you can tailor the mix to fit your tastes. Experiment with different combinations and make your own version.

It’s no mystery that fall, and especially October, is my favorite time of year. I have written about my love affair with the season many times before, and you can read about it here, and here, and here.
The cast of an amber sun setting low in the sky throws a glow over the whole farm and bathes it in the quite serenity of a changing season. Colorful leaves carpet the ground like an artist’s painting. You can smell the coolness in the air as it pushes against the warm Indian summer breeze. Fall fruits and veggies stand out with their muted hues of red and orange; gold and plum. Even the earth takes on a new smell as the scent of fallen leaves mixes with freshly turned soil waiting to be planted with fall seeds.
But, the best part of fall.
The very best part of fall can be seen in the kitchen.
After months of summer greens, fresh salads, crispy vegetables, juicy fruits and plump berries, the kitchen switches over into heartier fare for the table. Soups and stews; roasts and chops take center stage now.
But, one of my most favorite things about fall is having a simmering pot of soup on the stove or in the slow cooker. The aroma that fills our little home is like a comfortable blanket spread over you as you lay in front of a crackling fire. It’s enough to warm the heart and soul, as well as the tummy.
On our little homestead soup is not only a mid-day snack, but a full blown meal as well. My stash of cookbooks has more soup recipes tucked in between the pages than any other kind. There are hearty fare soups chock full of chunky roots vegetables, a thick broth and bites of meat; creamy, full bodied soups with tubers, or noodles or rice; and then there’s the more brothy soups that spotlight flavorfully rich bases more than vegetables or meat. But, no soup would be complete without a little crispy biscuit to go with it.
Over the years I’ve tried many different kinds of biscuits with varying opinions, but the one we coming back to, the one that everyone keeps requesting is the Parmesan cheese biscuit. I found the recipe in a Farm Bureau long ago and it has been on our table ever since. It’s one of those recipes that you fall in love with, not for the sheer genius of it, but because it’s so dang simple. With just three ingredients, it takes no time at all to become totally addicted to the little things. Make a double batch of dough to keep in the freezer, just in case…or, just because.
Parmesan Biscuits
INGREDIENTS:
16 tbsp. unsalted butter, room temperature, softened
2 cups finely grated Parmigiano-Reggiano cheese (it’s important to use the real stuff. It is 1/3 of the ingredients after all)
1-3/4 cups all-purpose flour
DIRECTIONS:
1. Preheat oven to 350; position racks in top and bottom third of the oven. Line 2 baking sheets with parchment paper or baking mats.
2. Fit stand mixer with the paddle attachment. In the bowl combine the butter, cheese and flour, and beat until a stiff dough forms. (For a few minutes the dough will appear dry and not come together; keep mixing and it will form).
3. Divide dough in 3 pieces and roll each piece into a 9-inch log, about 1-1/2 inches in diameter. Wrap each log tightly with plastic wrap, and refrigerate for about an hour—this will make slicing the dough much easier.
At this point, you can freeze 2 of the logs and bake one; or if making a double batch, you can wrap each log in plastic wrap, vacuum seal it and freeze for up to 2 month. When ready to use, let it sit at room temperature for 15 minutes before slicing.
Moving on…
4. Slice the logs into 1/3-inch-thick rounds, and arrange on the cookies sheet about 2 inches apart. Bake for 15-18 minutes, or until they turn golden brown around the edges. Shift and rotate the pan half way through baking for even browning. Cool on the cookie sheet for 10 minutes before transferring to a wire rack to cool completely. The biscuits can be stored for 5 days at room temperature in an airtight container.
NOTE:
These little biscuits are great for stacking on ham, smoked turkey, salmon or trout pate. Spreadable cheeses, other pate’s, or just by themselves are also good options.
You can also make Parmesan sticks by rolling out the dough into a rectangle and slicing it long and thin.
INGREDIENTS:
- 16 tbsp. unsalted butter, room temperature, softened
- 2 cups finely grated Parmigiano-Reggiano cheese (it’s important to use the real stuff. It is 1/3 of the ingredients after all)
- 1-3/4 cups all-purpose flour
DIRECTIONS:
- 1. Preheat oven to 350; position racks in top and bottom third of the oven. Line 2 baking sheets with parchment paper or baking mats.
- 2. Fit stand mixer with the paddle attachment. In the bowl combine the butter, cheese and flour, and beat until a stiff dough forms. (For a few minutes the dough will appear dry and not come together; keep mixing and it will form).
- 3. Divide dough in 3 pieces and roll each piece into a 9-inch log, about 1-1/2 inches in diameter. Wrap each log tightly with plastic wrap, and refrigerate for about an hour—this will make slicing the dough much easier.
- At this point, you can freeze 2 of the logs and bake one; or if making a double batch, you can wrap each log in plastic wrap, vacuum seal it and freeze for up to 2 month. When ready to use, let it sit at room temperature for 15 minutes before slicing.
- Moving on…
- 4. Slice the logs into 1/3-inch-thick rounds, and arrange on the cookies sheet about 2 inches apart. Bake for 15-18 minutes, or until they turn golden brown around the edges. Shift and rotate the pan half way through baking for even browning. Cool on the cookie sheet for 10 minutes before transferring to a wire rack to cool completely. The biscuits can be stored for 5 days at room temperature in an airtight container.
- NOTE:
- These little biscuits are great for stacking on ham, smoked turkey, salmon or trout pate. Spreadable cheeses, other pate’s, or just by themselves are also good options.
- You can also make Parmesan sticks by rolling out the dough into a rectangle and slicing it long and thin.

Do you have a favorite fall vegetable? I do.
I have always been crazy for sweet potatoes. They are my “go-to” fall vegetable, whether they are baked and smothered with butter then sprinkled with salt and pepper, smashed with sweet maple syrup and nutmeg, or roasted with fragrant herbs.
I love trying new fall veggies to add to my kitchen arsenal. But, I have to admit I’ve never been a fan of Brussels sprouts. Those little globe-like cabbage looking things never really appealed to me, probably because my family never ate them…ever. Really—I can’t remember one time growing up that my mom cooked Brussels sprouts.
So, when I found a recipe on the internet for roasted Brussels sprouts I was less than tempted. Even though the picture was beautiful and they looked appealing I refused to be tricked into trying them.
It wasn’t until I had them at a restaurant that I became a convert. They were tender, flavorful and downright yummy. I was sold, and they now make regular appearances on our fall dinner table.
I have never had them any other way but roasted, and I have several different ways to flavor them during the roasting process. Why mess with a good thing, right?
Boy was I ever wrong!
It was a few weeks ago and sis and I were making dinner. I had bought some Brussels sprouts from the market, but they weren’t enough for two people. When I looked around my kitchen I spied a few small sweet potatoes. Not enough for two people either.
At that moment a stroke of brilliance came over me. Why not fix both? Together.
I combed through recipes and combined pieces of a few different one’s and voila! A masterpiece was born.
I cleaned and halved the Brussels sprouts and peeled and cut the sweet potatoes into chunks. Then I drizzled everything with almond oil, sprinkled it with ground cumin, salt and pepper, and tossed the whole thing together. Best idea ever!
I loved the nutty flavor from the almond oil and the cumin brought out a wonderful earthy dimension to the whole dish. After they were roasted, I splashed a bit of balsamic vinegar over, added a bit of thyme springs for good measure and sprinkled on some chopped pecans.
The whole thing turned out divine.
What started out as not enough veggies for our two-person dinner, turned into a flavorful fall mixture and ended in discovering a new favorite side dish. Don’t ya just love experimental cooking?
NOTE: This would make a great holiday side dish. But, if you’re worried about commandeering your oven for 45 minutes make them a day or two ahead and store in a lidded container, then pop them in a 400 degree oven for 5 to 10 minutes, just until they sizzle and are hot. They turn out great!
Roasted Sweet Potatoes & Brussels Sprouts
INGREDIENTS:
1 pound of Brussels sprouts, washed, outer leaves removed and stems trimmed
4 small or 1 large sweet potato, peeled and cut into chunks
2 cloves garlic, peeled and chopped
1/3 cup Almond oil (be adventurous and try other nut oils or olive oil)
1 teaspoon ground cumin
¼ teaspoon garlic salt
1 teaspoon sea salt
Ground pepper to taste
Splash of balsamic vinegar
Thyme leaves for garnish
1/8 cup chopped pecans
DIRECTIONS:
Preheat oven to 400 degrees.
Rinse, remove outer leaves, trim stems and cut Brussels sprouts in half. Small one’s can be kept whole. Place in a large bowl.
Peel and cube sweet potatoes. Add to bowl.
Peel and mince garlic cloves. Add to bowl.
Pour almond oil over vegetables and toss to coat.
Add cumin, garlic salt, sea salt and pepper. Toss to mix.
Drizzle cookie sheet or large casserole dish with oil and spread to coat.
Pour vegetables into pan and arrange so they are in a single layer.
Roast for 30-35 minutes. Veggies are done when they are browned and fork tender.
Spoon into a serving dish and sprinkle with balsamic vinegar (about 1-2 tbsp.) Garnish with thyme and chopped pecans.
Eat hot!
INGREDIENTS:
- 1 pound of Brussels sprouts, washed, outer leaves removed and stems trimmed
- 4 small or 1 large sweet potato, peeled and cut into chunks
- 2 cloves garlic, peeled and chopped
- 1/3 cup Almond oil (be adventurous and try other nut oils or olive oil)
- 1 teaspoon ground cumin
- ¼ teaspoon garlic salt
- 1 teaspoon sea salt
- Ground pepper to taste
- Splash of balsamic vinegar
- Thyme leaves for garnish
- 1/8 cup chopped pecans
DIRECTIONS:
- Preheat oven to 400 degrees.
- Rinse, remove outer leaves, trim stems and cut Brussels sprouts in half. Small one’s can be kept whole. Place in a large bowl.
- Peel and cube sweet potatoes. Add to bowl.
- Peel and mince garlic cloves. Add to bowl.
- Pour almond oil over vegetables and toss to coat.
- Add cumin, garlic salt, sea salt and pepper. Toss to mix.
- Drizzle cookie sheet or large casserole dish with oil and spread to coat.
- Pour vegetables into pan and arrange so they are in a single layer.
- Roast for 30-35 minutes. Veggies are done when they are browned and fork tender.
- Spoon into a serving dish and sprinkle with balsamic vinegar (about 1-2 tbsp.) Garnish with thyme and chopped pecans.
- NOTE: This would make a great holiday side dish. But, if you’re worried about commandeering your oven for 45 minutes make them a day or two ahead and store in a lidded container, then pop them in a 400 degree oven for 5 to 10 minutes, just until they sizzle and are hot. They turn out great!
Looking to make your garden grow even better than it does now?
Well—if you have chickens, rabbits, sheep, goats, cows or horses you have all you need to make your own power packed liquid fertilizer.
Yep, that’s right. Manure can be made into a liquid fertilizer, often referred to as “manure tea”.
Mulching your garden with leaves, grass clippings, used livestock bedding or any other organic material is a great way to add nutrients back into the soil, making it friable and easy to work. But, adding a dose of manure tea will punch up the nutrients ten-fold.
We have a routine around our homestead…late fall is the time when the livestock trailer is cleaned out and old shavings and straw is used to fill the nesting boxes in the chicken coop. It’s wintered over in the coop and the hens add another layer of manure to the mix. Come spring we have a good amount of compost to add to the garden beds, enriching the soil and increasing the good bacteria and microorganism population. Gotta keep up the good stuff in our soil, right?
But now we have one added step. We add a generous dose of manure tea to the beds before mixing in all that great compost. Unlike compost tea, which increases the good microbes in the soil, manure tea pulls the nutrients out of the manure, dissolving them into a liquid tea. Making manure tea is also a simple and fast process, so it won’t take long before your garden can benefit from all those added nutrients.
Although chicken manure has the highest level of nitrogen and one of the highest levels of Phosphorous and Potassium, any manure can be used to make manure tea. Since we have chickens, rabbits, ducks and sheep that’s what we’ve used over the years.
So—how simple is making manure tea?
This simple:
- Grab yourself a 5-gallon bucket (preferably one without a crack, (sometimes hard to find around here).
- Dump in a heaping shovel full of aged manure. (Use aged, as fresh can burn your plants and roots).
- Fill the bucket with water and vigorously stir to churn everything up.
- Let the bucket sit for about a week so the “tea” can brew. Stir every day to aerate the mixture so bad bacteria doesn’t grow.
I told you it was simple.
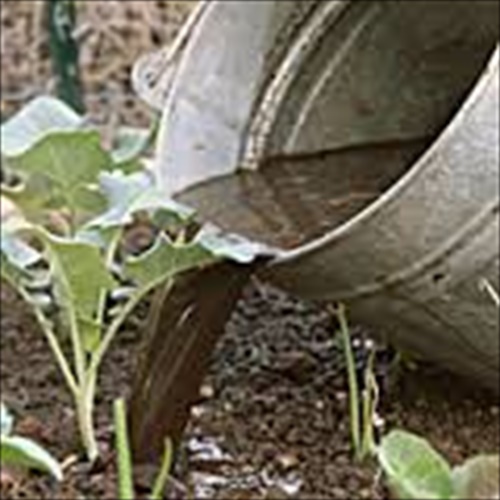
How to Use Manure Tea
Finished manure tea can be used straight from the bucket using a ladle or watering can.
If your tea turns out really dark it should be diluted at a 1:1 ratio. Simply pour half the tea into a new bucket and fill with water, then strain out the solids from the original bucket and fill with water. Now you have two buckets of tea. Add the solids to your compost pile or till them into garden beds.
Manure tea is best used around the base of young seedlings or plants, giving them a boost of nitrogen to help them grow. Applications can be made once a week using a watering can or pump sprayer. Be cautious, though. Manure has pathogens that can cause illness, so manure tea should not be used on root crops like beets, carrots, onions or potatoes. Also, it should not be applied to the leaves of edible plants like lettuce, kale, spinach or other greens where the leaves can be eaten.
NOTE: I make a big batch of manure tea using an old 35-gallon water tub. Because of the container size I fill it with about 8 to 10-inches of manure, then fill with water. I let it steep and pull out the finished tea using a bucket or watering can. It is used straight on the garden beds as I am preparing them for planting in early spring. I wait about a week or so before planting. After planting I can reapply using a watering can or ladle.
Last fall I was about to pull my hair out!!!
Seriously.
Have you ever had a conversation with someone…the same conversation you’ve had with them for years? Well, that was me this past summer, and I’m still recovering.
For the umpteen millionth time my mom asked me what is wrong with her garden. And—for the umpteen millionth time I have responded…STOP ADDING SAND AND GYPSUM!!!
Mom thinks that if a little is good a whole lot more is better.
Let me explain…
Years ago someone, somewhere convinced my mom that adding sand and gypsum to her soil would help break up the clay and make the soil more plant friendly. But, somehow I don’t think they meant she should make those additions every year for 50 years.
Yep…you got it. For the past 50 years my mom has been dumping buckets of sand and bags of gypsum onto her garden beds. Rather than creating the dark rich workable soil that is deep with organic material and teaming with life all she has managed to do is make CEMENT!
Ya know what grows in cement? Not much of anything.
This is a conversation we’ve had every year since I became an avid gardener and suburban homesteader. Every year I tell her how to improve her soil, and every year she tells me I have no idea what she deals with because my soil is so wonderful.
Well…I have a news flash…my soil wasn’t always wonderful. Great soil is created more often than it just exists. Soil can be good, but great soil is constant work and somewhat of an art form, albeit not fine art.
I think I’ve made a breakthrough, though. Mom has finally decided to take my advice on how to improve her soil so she can finally have the garden she has always wanted.
So how does one go from dead and barren soil to dark, rich, friable soil that plants actually want to live and thrive in? One step at a time, that’s how.
7 Steps to Improve Your Garden Soil During the Winter Months
Grass Clipping & Yard Trimmings:
If you still have a lawn to mow, layer the clippings in the garden instead of dumping them in the yard waste barrel. Alternate with trimmings from flowering plants, vegetables, and non-woody shrubs. Any soft plant material can be laid right on ground, like our forefathers use to do.
Pile on the Manure:
Manure is one thing most farms have in abundance. I consider my chicken, rabbit and sheep manure to be “gold” for my garden. Although chicken manure can be a bit “hot” to spread directly on plants, it is perfect for building up your soil before the planting begins. Cow manure is a great all-round addition, but may be hard to find in suburban areas. Check with local 4-H Clubs or FFA programs for possible sources. Horse is usually very plentiful, but it can contain more salt from the urine than is good for your garden. Apply it sparingly or mix with other less “salty” manures from sheep or goats. I’ve had success finding large qualities of cow and horse manure on CraigsList, but a word of caution here…you may get weed or grain seeds in the bargin, so be sure to mulch heavily so the heat of decomposition will kill them.
Add Mulch:
I’m a hug fan of mulch as the primary source to build up your soil. Straw, hay, shavings and shredded plants help retain moisture, suffocate weeds, and when it breaks down it makes the perfect breeding ground for an army of beneficial garden worms. Some mulching materials can be purchased from local feed stores or garden amendment companies. Lay your mulch about 4-inches deep.
Compost:
If you don’t already have a compost pile, it’s time to start one. It’s the best way to turn kitchen scrapes, coffee grounds, egg shells, weeds, trimmings and manure into a nutrient rich soil additive. When building your compost pile think green and brown, fresh and dried. To set up a compost bin quickly, fasten 3 wooden pallets together and then hinge the 4th for s gate. Nothing fancy is needed.
Natural Amendments:
Inferior garden soil will benefit from a sprinkling of natural amendments like bone or blood meal, worm castings, wood ash (I fill a small trashcan full when I clean out the fireplace), fish emulsion, or Epsom salts.
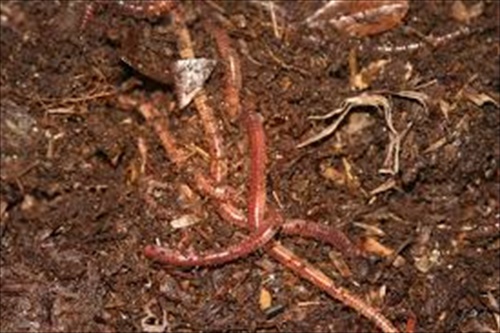
Add Earthworms:
Earthworms are nature’s eager tillers. As they move through the soil they create air pockets, allowing air, nutrients and water to penetrate dead soil. They chew up decomposing matter and shed castings that help improve the soil’s body.
Plant a Winter Cover Crop:
Cover crops are a great way to build up soil and break down hard soils while infusing it with nutrients, improving aeration, killing weeds and weed seeds, and improving water retention. Deep rooted crops like ryegrass are especially good because they’re deep root systems help break up and aerate the soil. Once you’ve built up your soil you can plant nitrogen fixing cover crops, like clover, to improve the nitrogen level of your soil.
When mom made the decision to seriously improve her garden soil we had a lot of work to do. Here are the steps we took beginning in fall and extending into the next growing season.
Season One: Layering the Garden
- Remove all plants and weeds.
- Lightly till soil.
- Add natural amendments, sparingly.
- Layer on manure.
- Top with mulch.
- Pile on compost.
- Plant ryegrass cover crop.
- Drench with manure tea.
- Winter over.
Season Two: Building the Soil
- Deeply till the garden to incorporate all the organic matter from season one.
- Test soil and add needed natural amendments.
- Add earthworms to help speed decomposition and aerate soil.
- Layer on manure, mulch and compost.
- Plant nitrogen fixing cover crop.
- Water generously with manure tea.
Now, here it is…the following fall and my mom’s garden is ready to plant with fall vegetables, bulbs, perennial herbs and flowers.

The dog days of summer are not quite over yet, but the soft, sweet, wafting early morning breeze tells me that fall is fighting its way through our hot September days.
Its days like this that I really enjoy seeing my laundry hanging on the clothes line. Vivid colors and bright whites flapping in the breeze is a quintessential farm look and looks so homey. But does that mean I have to give up my clothes line once the cooler days of fall arrive?
No way!
The benefits of a clothes line can be enjoyed year-round. So, if you’ve been on the fence about setting up your own eco-friendly clothes dryer now is the perfect time.
Need a little incentive? Here are my 10 reasons to use a clothesline all year long.
1. A clothesline uses no electricity. Kind of a no-brainer, right? What may not be so evident is the $300 dollars-a-year I save not using my dryer.
2. Clotheslines are more efficient because I can run my clothes through the washer and not have to wait for the dryer to finish. In just a few hours all my laundry is hanging on the line, letting the sun do its part while I do other chores.
3. Clothes last longer. The heat and agitation of a dryer can speed up the breakdown of fibers, while a clothesline helps preserve your clothes, especially those made from delicate fabrics.
4. Hanging clothes on a line is therapeutic. Honestly, it is. The few minutes I spend hanging clothes allows my mind drift away from our hectic world and into one that is calmer and more serene, one where hanging clothes on the line is your only important task.
5. Line dried clothes smell like a fresh outdoor breeze. No need for chemical laden dryer sheets that can cause irritation or allergies.
6. It makes my heart smile to see a line full of clothes. It’s a visual accomplishment.
7. Clothes dry faster outdoors than in a dryer. This is especially true in my area where the wind blows well into October and clouds rarely gather.
8. Folding clothes is faster when they’re not waded up from being in the dryer. I have a trick here, too. I put certain clothes on a hanger before hanging them on the line. When they’re dry, all I have to do is gather up the hangers and put them in the closest.
9. Fresh air and exercise. Moving, stretching, breathing deeply are all health benefits from hanging clothes on a line.
What’s that you say? Winter is on its way.
10. Get yourself a portable drying rack or set up a clothes line indoors. Damp clothes help humidify dry winter air while giving you many of the benefits of outdoor drying.
It’s a lazy summer day laying on my vintage patio daybed.
I close my eyes, drifting away as a warm breeze envelops me. My mind meanders to gently rolling hills with green grass swaying in the breeze, pastures dotted with grazing sheep, new spring lambs sprinting from mama to mama, a dairy cow lying quietly chewing her cud, and a steer growing fat waiting to fill a family’s freezer. I see chickens clucking and scratching around the barnyard and bees buzzing in the garden.
BUT,…
…and there’s always a but, isn’t there?
When I open my eyes instead of rolling pastures and a white picket fence I see a house on a small lot at the edge of town. Not exactly the picturesque farm I see in my mind’s eye.
That suburban reality is the reality for most of America.
But, (again with the but)
A suburban dwelling doesn’t mean you have to give up your homesteading dreams. It only means you have to readjust your thinking about what homesteading is.
Modern homesteading means different things to different people. One person might be interested in old-time remedies to keep their family healthy, while another embraces baking bread or growing herbs on an apartment balcony, and yet another combs yard sales and antique auctions for vintage watering cans or Mason jars to adorn a kitchen or patio.
Today’s homesteader can be whatever they want to be, they are not bound by the realms of farms, small towns or rural life.
Different strokes for different folks, right?
We do have a few similarities with our more rural cousins, though. We crave returning to our roots, to old time skills and a slower way of life. We want to create a more self-sufficient life for ourselves and our family. We want to be self-reliant.
If this sounds like you, you’re in luck. There is no requirement that a homesteader must live in the country or on 100-acres. You can do it right now, right where you are, even if where you are is a downtown apartment…a city lot…or a 1-acre plot.
So let’s get you started with 10 simply things you can do right now to set yourself on the path of becoming a modern day homesteader.
1. First and foremost…decide what you want as a homesteader. It may sound simplistic, but it is actually crucial and sometimes very difficult to decide what you want or why you want to homestead. Do you want it all—gardens, orchard, animals, the whole shebang? Or, do you only want pieces of a homestead life, like baking bread, canning vegetables or growing flowerbeds. The choice is yours, so take your time. There’s no right or wrong way to homestead in our modern world.
2. If you decide to “go big” then you’ll need to assess your property. What do you have room for? What don’t you have room for? What are the “must haves”, and what are the “can do with outs”? This is an important step so you don’t over extend yourself or your property. Be realistic about you and your property. While homesteading can be fun and rather addictive, it WILL be a whole lot of work. The more you have, the more work there will be and your homesteading journey won’t be so fun in the end if you overextend yourself.
I moved into my 1/3-acre home on Labor Day weekend and spent the entire winter drawing plans and laying in supplies for my “bigger picture”. By early spring were we ready to rock the barn building and garden layout.
Remember…a homestead is a constant work in progress, enjoy the journey.
3. While you’re pondering Steps 1 and 2, do some fun things.
Create a potted herb garden even if it’s on your balcony, windowsill or patio.
Begin seeking out new recipes to start cooking from scratch more often.
Try your hand at making a simple chevre cheese.
Teach yourself to bake bread, even if it’s with a bread maker.
Whip out your sewing machine and make an apron.
Here are a few ways to begin homesteading in suburbia:
4. GROW SOME OF YOUR OWN FOOD.
No matter how big your garden is you will relish a bounty of fresh veggies that will provide you with nutritious, pesticide-free meals, and save you money in the process. There are many types of gardens perfect for any suburban homestead no matter where you live. There is the traditional backyard garden with lots of raised beds or rows of produce. There’s edible landscaping where fruits and vegetables are intermixed right alongside your other plants. Then there’s potted gardens that are perfect for small spaces or apartment living. Fruit trees can be planted to take the place of shade trees giving you useful shade and using valuable water to produce food for your family.
There are few things more fulfilling than taking a bite out of a juicy, sweet, unbelievably tasty tomato that you just grew yourself. The difference in taste between those and the ones picked green and shipped from Central America or halfway across the country is absolutely astounding.
5. SET UP A RAIN BARREL AND COLLECT WATER.
Rain water is one of the few free things in this life, so why not collect it to use in the garden. Many cities have water collection programs where rain barrels are free or at a low cost. The water you save can add greatly to your household savings, especially during dry spells. Diverting grey water from the washing machine can also add to your water savings program.
6. PREPARE FOR THE UNFORESEEN.
Life is unexpected at best. We never know when the next storm will hit, knocking out power or making it impossible to get to town. The best precaution to any natural disaster is a well-stocked pantry. A closet, the basement or an extra bedroom can all be outfitted with shelves and stocked with staple items and family favorites.
Picking up a few extra items at the market will have your pantry stocked in no time. And, if a natural disaster never strikes you will have put food away at a lower price than future inflated prices.
7. CAN OR FREEZE FOR LONG TERM STORAGE.
Once you’ve had a few fresh veggies from the garden and gotten the hang of cooking from scratch chances are you won’t want to go back to store bought foods, especially if you live in an area that has long, cold winters. Preserving the harvest is the next logical step in your homestead journey. There are many ways to preserve—canning, freezing, dehydrating, salt curing, pickling, fermenting, root cellaring and more. Start with something simple, like homemade pickled beets. They are practically full proof!
8. RAISE YOUR OWN CHICKENS.
Chickens are my “go to” livestock for beginning homesteaders. A small flock of 3 to 4 laying hens is fun, easy to care for and will give you fresh eggs for the kitchen and manure for the garden. You can build a simple coop in an afternoon, or be creative and look for a large used doghouse or garden shed. Be sure to check out local ordinances so you know if you can have them and how many you are allowed.
9. START A COMPOST PILE.
A compost pile is a must have for any homestead. The rich soil you make from decomposing kitchen scrapes, grass clippings, fall leaves and manure will improve your gardens and give you a better bounty. Fall is the perfect time to start because of all those free leaves. Four wooden pallets is q quick and easy way to start making your own soil.
10. BUILD YOUR COMMUNITY.
New homesteaders may find the process of starting to homestead a bit daunting, but once you start talking to people you will quickly realize there is a whole community of like-mined people out there who are dying to help you be successful, so embrace their generosity. A great place to start talking to people is the Farmer’s Market, a local farm stand or plant nursery. While you’re making plans you can gain knowledge and build friendships that will carry you into the future.
Another great way to meet new people and get your kids involved in your homesteading journey is to enroll them in a youth program that focuses on the many areas of homesteading. 4-H and Grange are both farming centered programs that have lots to offer. Check out your county Cooperative Extension office or Grange Hall for programs near you. You will build lifelong skills and friendships while also learning about leadership.
11. SET UP A CLOTHES LINE.
This sounds so simple, I know. Sometimes it’s the simple things that really get you inspired to do more. My outdoor clothesline was the first thing I put in and the time I spend hanging clothes or taking them down is one of the most enjoyable parts of my day. It’s kind of therapeutic as well as being productive.
12. BUILD YOUR SKILLS.
No matter what kind of homestead you decide on you will need many skills to make it work. From gardening and preserving to building or cutting firewood, now is a good time to start. Learning can take place in classes offered at local Grange Halls or home improvement stores, on the internet watching YouTube videos or by spending time in the library or bookstore reading about the skill you want to learn. But, don’t forget to put your new found knowledge to work by practicing what you’ve learned. Be patient too. And remember, a homesteader is a lifelong learner willing to continue gaining skills throughout their life.
I’ve barely scratched the surface here, but this will get you started and hopefully inspire you to delve deeper into the wonderful world of homesteading.
Check out our categories for lots more information on turning your suburban lot into a productive mini-farm.

Over the years I have created a “go-to” list of favorite summer side dishes. You know the kind—baked beans, potato salad, pasta salad, corn salad, pea salad—the kind of cool, refreshing and creamy dishes that go great with BBQ’s or potlucks or just eaten by themselves when the hot weather makes eating the last thing on your mind.
This recipe has it all. Crunch. Cool. Sweet. Tang. It’s our favorite slaw and goes great with steaks and burgers, or chicken and fish. Add a handful of shredded leftover chicken and make it a meal for those hot days when heating up the kitchen is anything but appealing. It’s that good!
5-Color Peanut Coleslaw
INGREDIENTS:
1 pound cabbage, shredded
1 ½ cups red cabbage, shredded
3/4 cup celery, finely sliced
3/4 cup julienned carrots
3/4 cup julienned orange bell pepper
1/3 cup green onion, finely chopped
1/3 cup red wine vinegar
1 tablespoon water
1 ½ tablespoon sugar
1/2 teaspoon seasoning salt
1/4-1/2 teaspoon garlic powder
1/3 cup vegetable oil
1 cup roasted unsalted peanuts
DIRECTIONS:
1. In a large mixing bowl, combine coleslaw, red cabbage, celery, carrots and green onions. (Using a mandolin makes shredding quick and easy)
2. In a pint size Mason jar, combine wine vinegar, water, sugar, seasoned salt, garlic powder and oil. Shake gently to incorporate.
3. Mix dressing with coleslaw; stir in peanuts and toss well.
4. Refrigerate until ready to serve.
NOTE: This is one of those great recipes that can be added to to create a variety of styles. Add edamame, almonds and wontons for an Asian flare; or roasted corn, jalapenos and tortilla strips for a slightly Latin flavor; or add chopped kale, broccoli and peas for big veggie packed meal.
INGREDIENTS:
- 1 pound cabbage, shredded
- 1 ½ cups red cabbage, shredded
- 3/4 cup celery, finely sliced
- 3/4 cup julienned carrots
- 3/4 cup julienned orange bell pepper
- 1/3 cup green onion, finely chopped
- 1/3 cup red wine vinegar
- 1 tablespoon water
- 1 ½ tablespoon sugar
- 1/2 teaspoon seasoning salt
- 1/4-1/2 teaspoon garlic powder
- 1/3 cup vegetable oil
- 1 cup roasted unsalted peanuts
DIRECTIONS:
- 1. In a large mixing bowl, combine coleslaw, red cabbage, celery, carrots and green onions. (Using a mandolin makes shredding quick and easy)
- 2. In a pint size Mason jar, combine wine vinegar, water, sugar, seasoned salt, garlic powder and oil. Shake gently to incorporate.
- 3. Mix dressing with coleslaw; stir in peanuts and toss well.
- 4. Refrigerate until ready to serve.
- NOTE: This is one of those great recipes that can be added to to create a variety of styles. Add edamame, almonds and wontons for an Asian flare; or roasted corn, jalapenos and tortilla strips for a slightly Latin flavor; or add chopped kale, broccoli and peas for big veggie packed meal.
Recent comments
Aenean nonummy hendrerit mauris. Phasellus porta.