Archive for the ‘In the Garden’ Category
Making My Own Spring
On Ground Hogs Day, Punxsutawney Phil can out of his burrow, looked into the bright sun and signaled that spring would come early this year. But, with massive blizzards in the northeast and record lows in the west spring seems a long way off. Although the temperatures have been low in my area the sun sits high in the sky shining down like it would on a warm April day. With weather like this I can’t help but wish, dream even that I could get outside and work in the garden, but with the temps barely above 50 gardening outside just isn’t possible. So, like any die-hard gardener I have ways to bring spring to me, in my own way.
I spent last night by my fireside, sorting and taking inventory of my seed box, arranging them by roots, fruits and leaves; making lists of seeds to buy and planning out the garden beds. Many of my seeds can be started indoors, well before spring arrives, and that’s how I can make spring come to me.
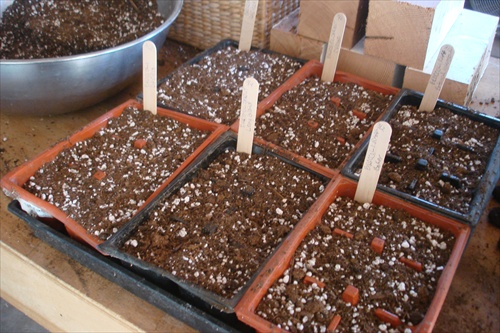
Today I spent the afternoon mixing soil, filling starter pots and flats and planting seeds of herbs, cucumbers, peppers, onions, leeks, cantaloupes, watermelons, cucumbers, squashes, tomatoes, head lettuce, cabbage, broccoli, cauliflower, and annual flowers.
The plastic lidded “to-go” containers my family saves for me make perfect little greenhouses, keeping the soil inside warm and damp so life can begin beneath the surface.
In a few weeks green things will be growing and by the time the weather changes, for the better I hope, they will be ready to set out in the garden. I can hardly wait.
Labor Day Indeed!

I know it’s long past the Labor Day weekend and I am woefully late in posting anything on the blog, but it’s been one of THOSE months and it has barely just begun. Between working on the greenhouse (a pleasurable labor to be sure), starting a new job and family issues my days have not been my own lately. But—this post isn’t about sleepless nights or long days. It’s about a greenhouse and the future of growing things and the self sufficiency it brings.
Since Brianne left for college my sis and I, two single women farming in suburbia, have been trading weekend labors at each others house, and Labor Day Sunday was my day.
We started early, trying to get as much done as we could before the heat and uncharacteristic humidity drove us inside. The roof of the greenhouse went up earlier in the week. A clear poly corrugated style with a ridge cap and an old copper rooster weathervane I’ve been hauling around for decades. I think all farm building should have a weathervane. We concentrated on finishing the plank siding inside and out, measuring and cutting and nailing the rough hewn whitewashed boards, moving around each wall like two dancers floating over a shiny polished floor. I am always in awe at how in sync sis and I are when we undertake one of these projects. It’s like we can read each others mind, handing off tools before they are asked for, fetching more wood before the last piece has been used, refilling water glasses without request. I guess when you live around someone, work with someone for as long as we have you get a 6th sense about each other and you instinctively know what comes next.
The rhythm of the work was steady and somewhat mesmerizing because with no regard for the weather we worked straight through the day, not breaking for lunch and right into the evening. We finally stopped when the sun cast a long shadow over our work, making it hard to see in the dusk. There is some left to do, and of course stocking it with my garden supplies, tools, seeds and soil will be more fun than labor, but that is still a weekend away. We have a few trim pieces to put up and build the planting shelves, but for the most part the long awaited greenhouse is done.
By the time our heat wave breaks I may be ready to start a few early spring flowers, a cool weather garden or some fall veggies. I might even try my hand at wintering over a few tomatoes; fresh tomatoes at Christmas sounds wonderful.
Work is so much more fun when it is shared.
Greenhouse Going Up
My long awaited greenhouse is in full progress. When it is completed I’ll have a dedicated space for all my gardening tools and supplies, and a place to start vegetable and flower seeds.

Building on a sound foundation for a lifetime of growing and gardening. I can’t believe it only took two days to build the floor.

Old wood frame windows and an antique Victorian style door gives the greenhouse loads of light and the vintage charm I’m looking for.

Aged tin roofing will cover the outside walls below the windows and rough sawed pine clapboards covering the outside walls around the windows and all the interior walls will complete its shabby chic look.A recent hot spell and Brianne’s pending move to college has slowed us down a bit, but not for long. We should be back at it when I return from helping her move next week.
Planting shelves will be added, along with a sink and faucet for watering new seedlings, a soil mixing bin for seed starter mixtures, storage areas for small items, hooks for gardening tools and my collection of old sprinklers, and containers for seeds and other supplies. No more running from one place to another to find what I need.
The greenhouse looks west, out over the garden that is currently in transition. An added seating area will be draped in plush cushions and a table for evening respites. The flickering light from lanterns and candelabras will bath the area in a soft glow.
Outbuildings such as this are as much about pleasure and serenity as they are about functionality. In a few weeks I’ll be kicking my feet up with a cold drink in my hand after planting flower seeds and my new fall garden, mark my words.
Going For Greens

There is a wide array of vegetable seeds available to the home gardener; we all know that from looking through seed catalogs. But, how many of us spend much time in the “greens” section of those catalogs? I know I didn’t get much past the lettuce section. That is until last season when I discovered a wonderful winter soup made with kale. I had seen kale and collards and chard and such in some of the markets, but really did pay much attention to them. But, now I had a reason to learn more about what an ingredient I was using in a new recipe.
In my research I discovered that much like bread, the darker the green the more nutritious they are. Mixing greens, in a salad or slaw, sautéed or in a soup will give you a variety of nutrients adding greatly to the healthiness of your dishes.
I think where the timidity comes in is how to properly cook different greens and finding tasty recipes the family will enjoy, at least it was with me. Cooking greens range from the very tender and quick-cooking spinach to the hearty fibrous varieties of kale. Beet greens and chard can be eaten raw, but take only a few minutes to sauté. Denser greens like kale and collard take a bit longer; you may also want to trim out the stems or ribs before cooking.
When you buy greens at the market or farm stand, be sure to wash them thoroughly. An easy way to do this is to swirl them around in a bowl filled with cold water; then dry them and refrigerate in an airtight container. They will keep for up to 10 days.
The hearty leaves of collard greens give more texture and flavor than spinach, making a great substitute in lasagna. Mustard greens, when added raw to a salad will pack a mustard radish kick. Chard is a colorful green with a mild flavor and works great sautéed in a pasta sauce. For a simple side dish though, quickly sauté in olive oil and garlic.
Beet greens make a good start if you are not accustomed to cooking or eating greens. Beets with their greens attached are one of the great produce deals (two for one!). Beet greens don’t stay fresh for long, so you’ll need to use them within a day or two. Use them as you would chard leaves but note that the greens from red beets will stain anything (including lighter vegetables) a lovely shade of pink. Or use them with the beets they helped grow in this Beet Greens Salad.
I make this salad when I have a bunch of freshly picked beets with vibrant greens. You can serve the salad simply dressed with a bit of olive oil and salt, or add lemon zest, chopped hazelnuts, or feta or goat cheese to dress it up a bit.
Note: Use a high-quality olive oil for drizzling at the end. If you happen to have some orange- or lemon-infused olive oil, this is an excellent time to break it out.
Ingredients:
1 bunch spring beets with greens attached
1 tsp. olive oil
1 clove garlic
1 Tbsp. high-quality extra-virgin olive oil for drizzling (or more to taste)
Kosher or sea salt
Optional Garnishes:
Lemon zest or orange zest
Chopped hazelnuts
Crumbled feta cheese
Goat cheese
Preparation:
Cut off greens from beets. Trim beets. Very young and tender beets can be scrubbed clean, but you will want to peel most beets. Cut beets in half lengthwise, lay cut-side flat and cut into 1/4-inch-thick slices.
Heat a large frying pan over medium heat. Add 1 tsp. olive oil, 1/4 cup water, and beets. Cover and cook until beets are just barely tender, 5 to 10 minutes.
Meanwhile, chop leaves and set aside. Peel and thinly slice garlic
Add garlic to pan, stir until fragrant, about 1 minute. Add beet greens, cover, and cook until wilted, about 1 minute.
Divide warm salad between 4 plates. Spoon any pan liquids evenly over each serving.
Drizzle each salad with olive oil and sprinkle with salt. Add any optional garnishes (lemon zest, orange zest, hazelnuts, feta, goat cheese) that you like.
The Garden Plan
 The growing season so far has been unlike any I’ve experienced. Late into spring we’ve had days covered in clouds, drizzly, blustery with temps in the low 60s and highs in the 90s, sometimes all in one week. I wonder if this is what farming looks like in other areas of the country.
Seeds I planted back in March are finally producing an edible crop. Some, like tomatoes, squash and of course the treasured pumpkins are big enough to plant out in the garden. Seedlings of cucumbers, cauliflower and broccoli bolted in the short heat wave we had and have been replanted, but not big enough to be planted out. I have to keep telling myself it’s just May and in some parts of the country it’s just now time to sow seeds in the ground.
My garden plans are grandiose this year. With the lambs just a week away from being sold and our final show season all but over my mind has turned to other projects that have been on the back burner for the past few years. One of the biggest is a greenhouse, something I’ve been dreaming of for a long time.
My neighbor Scott recommended Jordan a local handyman and part-time builder who loves to work with vintage anything and reclaimed materials for interesting building projects. When I explained what I was doing he was instantly onboard, and he completely understood the “girl thing” that it had to be functional AND cute. What a guy!
The greenhouse/potting shed will be built out of old wood frame windows I found at a local second hand store. The front door is a great old Victorian style with lots of intricate detail. Below the windows will be siding of galvanized tin roofing material. I was able to buy all I needed from craigslist for a few dollars per sheet. It’s used and the old scuffed and rusted areas will add to charm to the greenhouses look. The only materials that will be new is the fiberglass roofing. Even the rooster wind vane that will adorn the roof is more than 25 years old, a treasure I’ve been carrying with me from one house to another. The back side of the greenhouse, which faces the back of my property, will be solid siding. I will use this area to hang and store long-handled tools like shovels, rakes and hoes.
The inside I will build out myself. It will have a sink area with running water, shelves for newly planted seedlings and storage for potting soil, pots, hand tools, plant labels and all the other interesting gardening gadgets I’ve collected over the years. I’m looking forward to having all my gardening supplies in one location. But, more than that I’m looking forward to having a quiet, tranquil place to plant seeds, plan my garden and watch everything grow from the comfort of a small patio just outside its walls.
It’s been a long time since I’ve taken on a project of this size, but I’m looking forward to it. And, with Jordan’s help my dream should become a reality with just a few long hard days of swinging a hammer and cutting lumber.
I’ll post our progress and the finished product in all its vintage glory.
Tips for a Quality Harvest

When harvest time begins we all want to gather the fruits of our labors at the right time to ensure the highest quality produce for our table. When that time comes, keep these harvest tips in mind:
- Pick cabbages when the heads are solid and before they begin to split. To prevent splitting, cut or break the roots on one side after a rain with a spade.
- Pick sweet corn before it gets beyond the milk stage when the kernels are first filled out. Silks should be brown and dry with the tips of each ear filled tight.
- Harvest cucumbers every day at season’s peak, while fruits are slender and dark green, before their color lightens.
- Eggplants should be picked when half grown and before they become dull.
- Muskmelons are ready to pick when stems slip from the fruit, leaving a clean scar.
- Wait to harvest parsnips until after a sharp frost. The same holds true for rutabagas.
- Root crops such as beets, radishes, carrots and turnips are best picked before they reach the largest size.
- When the underside of a watermelon turns yellow or when thumping on the melon produces a dull muffled sound instead of a metallic ring, it’s time to harvest.
As a general rule of thumb, pick all underground vegetables, like beets, carrots, onions, etc. in the morning. Above-ground crops like lettuce, tomatoes, cabbage and the like should be picked in the late afternoon or at twilight.
WHY? you may ask…because the sun’s energy runs from the foliage to the root at night, which is why you should pick root veggies early in the day; when the sun’s energy is still in the root. The sun’s energy is still in the foliage during later afternoon when above-ground crops should be picked.
Following these few easy tips will ensure your harvest is at the peak of its flavor for you and your family.
Frosty Mornings and Milk Jug Cloches
 Two week out from our celebrated Spring Equinox, that day when we turn our backs on a long cold winter and look forward to the warming rays of spring, we have seen some of the coldest temps this season, along with our traditional spring norms in the 60s and 70s. Every morning when I get up I can see frost on neighboring rooftops, on lawns and on cars.
Traditionally our last frost date is March 15th and I normally try to direct sow root veggies the first weekend in March. It is also the time when I start a ton of other veggies for transplant later in the spring. With my garden just a few weeks under ground and the nightly lows in the 30s and 40s this usually stoic farm girl is quaking in her muck boots like an expectant mother. Was I too anxious to start gardening? Did I foolishly jump the gun? Perhaps. But, if I had not planted when I did I would not have had another opportunity until the first week in April; much too late to see a harvest of greens and early roots by Easter.
The seeds are in though and the only thing to do now is deal with what Mother Nature throws our way.
The remedy…crop covers; sometimes called cloches, which is French and sounds really cool.
Crop covers can be purchased or homemade. Purchased crop covers are sheets of semi-transparent clothe that can be placed over a garden bed, attached to the top of wire fencing or staked over flats of planted seedlings. It acts like a mini-greenhouse, trapping the warm sun of day and maintaining it throughout the night. A few degrees increase in temperature can mean the difference between garden survival and complete disaster.
In a pinch, even opaque containers can save your plants. However, if a hard freeze is on its way, cover plants as best you can and cross your fingers.
Scavenged or re-purposed materials like plastic sheeting or clear drop clothes can be used for larger outdoor beds. If you have a smaller garden area or a balcony or pot garden there are literally a zillion things you can use to protect your plants. Containers like clear soup tubs from take-out restaurants, deli containers, old refrigerator containers, and milk or juice jugs make great substitutes. Even glass jars that hold those massive amounts of food items from big box stores can be used, and are the most like a French cloche.
It doesn’t get any easier than washing out a container, removing the label to allow more light in and placing it upside down over your sprout. Give it a few twists into the soil to anchor it well then weigh it down with something heavy so it won’t blow over in the wind. If you’re area is prone to marauding critters, weigh it down with something heavier.
Milk cartons and juice jugs make great cloches for larger taller plants like tomatoes, cabbage and broccoli. Simply wash, remove the labels and cut off the bottom. Set it over your plant and push into the soil. The nice part about the jug system and the thing I like the most is that you can either drill a few holes in the lid or remove it all together (during the warm part of the day) so the inside doesn’t get too hot. Another benefit about the jugs is the 2-for-1 deal you get by cutting them in half across the middle, horizontally or down the middle, vertically. These work well for bushy shorter plants or lay it on its side over short rows of smaller plants.
Obviously glass containers can’t be cut in half and used in multiple ways, but they are the most like a traditional French cloche, which is a bell-shaped glass cover used to protect plants from frost, wind and rain. Plus, when stored in the off season they will last for a long time.
There are many different materials you can use, but the most important point is the container must be, at least, semi-transparent to let in the sun and its warmth. Also remember that protecting your plants is a day-by-day strategy. Covers should not be left on for days on end or the lack of sunlight (and over heating) will affect their growth.
Also remember that on warmer days, no covers are necessary. In fact, covering your plants during warm days can build up the heat inside, literally cooking your plants to death.
With a few recycled and homemade (or purchased) crop covers on hand you can protect your garden from harsh early spring weather.
Marching on little seedlings, March on!!
3 Days to Food Security

On Friday, Brianne and I drove to a nearby horse farm to collect a load of aged manure to fill the raised beds I made back in January. It was a horrible day for working outside, another wind storm blew through our area, kicking up dust and dirt, making it hard to breathe let alone see. But, no progress could be made on the garden until the beds had been filled with a mixture of manure, compost and soil. We don’t produce enough compost so I always need to augment what we have, and given the chance I’d rather shovel for free than buy what I need. As the wind howled, we shoveled rich black composted manure, straw, shavings and hay into trash cans we loaded in the back of the truck.
When we returned home each can was unloaded and dumped into two 4×12-foot raised beds, 3 cans per bed. Afterwards, each manure pile was raked level and large clumps were broken up, then a layer of mixed compost and soil was added and the whole dirt, compost, manure pudding was mixed up and re-leveled.
By the time we finished the wind was blowing about 50mph. Brianne and I had so much dirt in our eyes, on our face and in our hair we could have planted seeds on ourselves instead of in the garden. We put our tools away, brushed off the dirt and headed into the house for a hot shower and a warm meal.
The next day I pulled out all my seeds to sort and organize. I’m usually not one for throwing seeds away, but this year I decided a good seed box cleaning was in order, so I sorted the seed packets by the year they were packaged for, finding several dating back to 2001; anything older than 2009 will go into my compost bin garden. Appropriately named because any time I throw seeds into the compost (which isn’t often), they end up growing, which is why I hate throwing out seeds. Read the rest of the story »
Caring for Garden Tools

garden tools © by Pleuntje
The tools you purchase for the garden and how well you maintain them will, in part, determine how enjoyable the gardening experience will be for you. With care, a spade or pitchfork or lopper can last a lifetime. The key, however, is regular maintenance. It only takes a few minutes at the end of a gardening day to clean a tool so it will be in good working order and easy to use the next time you need it.
To quickly and easily clean tools with teeth, blades or tines place a 5-gallon bucket near your tool shed, greenhouse or where ever you store your tools and it fill with clean sand. Now, mix in enough motor-oil so the sand is damp, about 2/3 of a quart. Each time you come in from the garden scrap off any excess dirt and plunge the tool into the oiled sand several times. The friction of the up and down motion will gently scrub and oil the tool, protecting it from rust and corrosion. Brush off the sand and the tool is ready for storage.
With each cleaning take the time to check the handle for cracks. Minor cracks can be wrapped with hockey-stick tape, found at most sporting goods stores. Start a few inches below where the crack begins and wind the tape tightly around the handle, overlapping with each turn, and ending several inches above the crack. Replace severely cracked or damaged handles before they break and a metal blade or head flies off injuring someone.
When tools are ready to store, don’t just throw them in a shed or garage, hang them up, off the floor so they don’t get damp during colder winter months.
Recent comments
Aenean nonummy hendrerit mauris. Phasellus porta.