Archive for the ‘In the Kitchen’ Category
How to Roast the Perfect Chicken
There’s nothing better than a kitchen filled with the savory, satisfying aroma of a roasting chicken; at least in my opinion. It’s an important cooking skill too – roasting a bird that can eventually be made into 4 or 5 different meals. With just a few bought or homegrown onions, carrots and potatoes or parsnips, and a home raised or store bought broiler you’ll be on your way to a heart-warming meal the whole family will love. It’s easy, cheap and turns out wonderfully every time. It takes just a few minutes to prep and everything you need you probably already have on hand. Follow these simple instructions and I promise you’ll want to roast a chicken every week. I was taught this method by my father-in-law; one of the best meat cooks I know.
Here’s what you’ll need to roast the bird:
Whole roasting chicken
3 to 4 tablespoons, room temperature butter
Rosemary, garlic, and sage, chopped if fresh, crumbled if dry (or commercial poultry rub)
Tin foil
Roasting pan, without rack
Meat thermometer
1 medium onion, chopped
2 or 3 medium baking potatoes, peeled & quartered (parsnips can be added or substituted)
3 to 4 medium carrots, cut into chunks
These are the basics, but any seasonal veggie will do. Shake things up a bit by using yams, winter squash or summer squash, Brussels sprouts, or beets. Make it your own!
Preheat your oven to 400 degrees. I know that seems high, but you’ll see why in a minute.
Thaw frozen chickens in the fridge. Rinse thawed or fresh birds in cold water; making sure to rinse inside the cavity, under the wings and around the legs, then shake off excess water. Place your bird in a large bowl and take out your roasting pan. I use a 3-inch deep Calphon pan with high handles for easy lifting.
Chop the onions, carrots, potatoes or parsnips into chunks no large than 3- inches and spread them around the bottom of the pan. The veggies will act as a rack for the bird, letting air underneath so the bird cooks thoroughly as well as being cooked in the bird’s juices and fat. Drizzle the veggies with olive oil and sprinkle with salt and pepper or poultry rub. Set the roasting pan aside and go back to your bird-in-a-bowl.
Shake the bird again to get off any excess water and set it on a cutting board. Smear the bird all over with butter, making sure to get under the wings and around the legs. Gently slip your fingers under the skin that is over the breast and smear butter under the skin as well.
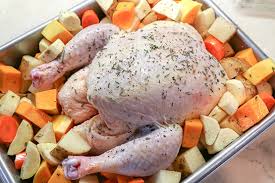
Now, take your finely chopped rosemary, garlic, sage or commercial chicken rub, and sprinkle them all over your bird. For a nice presentation on a serving platter, tie the drumsticks together with some kitchen string, and place the bird on top of your cut veggies.
Your buttery herb-rubbed chicken is ready for the oven.
Place the roasting pan on the center rack of your 400 degree oven. The flash of a hot oven followed by a slow roast will give the bird a luscious, crispy, golden skin. Let it crackle and pop for about 20 or 30 minutes before lowering the temp to 350. At this point you can cover the bird with foil which will keep it from scoarching the skin, but will allow it get crispy. I let mine cook undisturbed for an hour before taking it out to check for “doneness”. The skin should be a nice rich brown color and the internal temperature should be about 170 at the thickest part of the breast. I usually make a slice near the thigh to see if the juices run clear and not red or pink. If this happens just pop it back into the oven and recheck it every 5 to 10 minutes until it is done.
When you’re confident it’s done, pull the pan out and let it stand for about 15 or 20 minutes (the meat will continue cooking as it cools). As the bird cools, spoon the pan juices into a fat separator, pour off the juices into a small saucepan, add a tablespoon of butter and boil until reduced by about half. Taste and adjust the seasonings. Now you’re ready to slice the meat and serve it with a side of savory roasted veggies and a fabulous rich, herb infused gravy. Enjoy!
The leftovers from this easy roasted chicken make a great chicken salad, chicken sandwich, or chicken and rice casserole. And — don’t forget to simmer down the carcass (bones, skin and all) and pull off any remaining bits of meat for the best chicken soup base ever!
Learn to raise your own homegrown chicken with these helpful posts.
Raising Meat Chickens in Suburbia
Why Raise Chickens on a Suburban Homestead?
How to Cook Crispy Brussels Sprouts
At our house, Brussels sprouts have become the quintessential winter vegetable. Those small, tightly bound, cabbage looking globes that most people hate happen to be our favorite. But, that wasn’t always the case. I wasn’t always this much in love, it came gradually over time. I can only describe my past views on the leafy orb as loathing. It wasn’t until I ate at an upscale restaurant in TN that the love affair began. The simple mix of olive oil and sea salt and the pan roasting made them taste amazing and convinced me that my prior judgments were unfounded.
On a cool fall day I set out to recreate the simple sprouts with olive oil and sea salt I had in TN. As usual I was doing too many things at once and got side tracked with God knows what because I forgot about my experiment. When the smell from the oven brought me back my little globes had “over-cooked” a bit, or so I thought. Being the frugal farmgirl that I am and not wanting to waste anything I popped one into my mouth to see if they could be salvaged. One right after the other they went into my mouth until I realized I had hit on something! They were browned, almost to the point of being caramelized, crispy with slightly blackened leaves, and the center was tender and meaty. That’s right…meaty.
A drizzle more of olive oil and another sprinkle of sea salt and we had hit the jackpot.
Below is my “go-to” way of roasting sprouts. But, don’t stop there. Brussels sprouts are the perfect canvas to creating many different flavors with spices, glazes, and sauces, whatever strikes your fancy.
Now—for one important point, they are a pain to prep. There…I said it.
It must be done, though, so get to it. Halve and peel the outer leaves. It shouldn’t take more than a few minutes to do a pound.
INGREDIENTS:
- 1 pound Brussels sprouts, washed, trimmed, halved and outer leaves removed
- 1 tablespoon olive oil, plus more for serving
- ½ teaspoon fine sea salt
- Fresh ground pepper to taste
DIRECTIONS:
Preheat oven to 400F and coat a large baking sheet with spray oil (preferably olive oil).
Use a paring knife to trim the ends, then slice in half lengthwise, remove any loose outer leaves.
Place prepped sprouts in a large bowl.
Add oil over sprouts and stir or toss with hands until thoroughly coated.
Add the salt and stir to combine.
Spread Brussels sprouts in a single layer on baking sheet. Season with freshly ground black pepper.
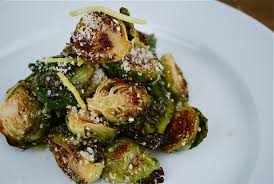
Roast at 400F on middle rack for 20 minutes then turn sprouts. Continue roasting for another 5-15 minutes until browned to your liking. To make them “crispy” and charred, brown a bit more than you think you should. This is where personal taste comes in. You may have to make a few batches to find your desired doneness. Keep in mind, smaller sprouts will brown faster than larger ones. Choosing sprouts the same size will help with this.
Before serving, drizzle with a teaspoon or so of olive oil and toss to coat. This will infuse them with flavor and moisten them a bit after roasting. Taste and add salt and pepper, if desired. Serve piping hot, immediately.
For variations on this recipe, try:
Adding a ½ teaspoon of Harissa spice blend to the above recipe
Sprinkling with grated Parmesan cheese before serving
Drizzling with pomegranate molasses or balsamic reduction before serving
Minced garlic cloves, garlic-infused oil, instead of the olive oil or garlic salt, instead of sea salt during the preparations
Drizzling with teriyaki sauce and sprinkling with sesame seeds before serving
Using BBQ sauce as a dipping sauce
Sprinkling toasted ground nuts, like pecans, or sesame seeds over the top
Or, use the recipe as a base and come up with your own creations. Brussels sprouts go well with spicy and hot seasonings, even hummus, so have fun experimenting.
White Bean & Chicken Chili

I like chili. That thick spicy concoction that goes great with shredded cheese and sour cream or scooped with tortilla chips. It just says cold day, with a warm filling smile.
It was the perfect lambing season food when time was a luxury and we never really had time to sit down to a real multi-course meal. We could take it to the barn in a thermos and eat whenever we were in between ewes lambing. Life on a farm moves quickly and never rests so the humans can eat!
There are multiple ways to make chili–with beef, pork, chicken, even turkey. Over the years I have tried to experiment with different kinds and find an alternative to our old favorite to no avail. Not until this year, that is, when I stumbled on a chicken chili made with white beans, mild green chili’s, spices and corn. It’s the kind of bold richness in a bowl that chases away the cold weather screaming outside. And, we have needed to chase away a lot of cold windy weather lately.
I read over the recipe and made a few adjustments to the original to fit my style and I think it turned out great. The best part is you can make this chili on the stovetop for a quick to put together meal, or you can dump all the ingredients into a crockpot and let it meld all day long, coming home to a house filled with the aroma of chicken and chili’s. And, you can use leftover chicken (as I did) or use store bought rotisserie chicken. How easy is that!
Try it. I think you’ll like it!
INGREDIENTS:
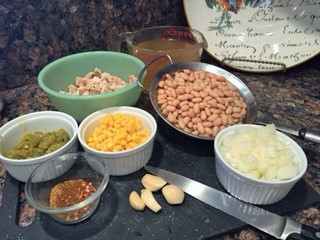
- 2 (14.5-ounce) cans white beans, drained and rinsed
- 4 cups chicken broth
- 1 tablespoon avocado oil
- 1 large yellow onion, diced small
- 1 (8-ounce) can mild green chili’s
- 1 tablespoon cumin
- 1 generous teaspoon Penzey’s chili 9000
- 1/2 teaspoon red pepper flakes
- 4 garlic cloves, minced
- 1/2 teaspoon salt (more if needed)
- 4 cups cooked chicken, chopped or shredded (leftovers or rotisserie)
- 1 (14.5 ounce) canned corn, drained
- 1/4 cup fresh chopped cilantro
- 1 tablespoon fresh lime juice, plus more to taste
DIRECTIONS:
Using a stick blender, puree about 1 cup of beans with 1 cup of chicken broth and set aside.
Pour oil into a large pot or Dutch oven and heat over medium high. Add the onion and sauté until soft, about 4 minutes. Add the garlic and sauté for another minute. Add the spices and continue to cook, stirring frequently, for a minute so spices can toast. Add canned chili’s and stir for 1 minute. Add the chicken stock, puréed beans and 1/2 teaspoon of salt; bring to a boil. Reduce the heat to low and simmer, uncovered, for 20 minutes.
Stir in the chicken, whole beans, corn, cilantro and lime juice; bring to a simmer and cook for about 20 minutes. Taste and adjust salt and lime juice, if necessary. (The broth will look soupy — that’s fine, it will thicken up as it sits). Serve in individual bowls with a dollop of sour cream, crushed tortilla chips, and lime wedges.
On a side note: If you make this in a crockpot, combine all ingredients except for the cilantro. Add that about 1/2-hour before serving.
Another note: The chili thickens as it sits. If you make it ahead of time, you may need to add more broth to thin it out, but that’s your call. I like a thick chili.
How to Make Baked Oatmeal

Oatmeal in winter time is a favorite at our house. There’s nothing like coming in from a morning of chores to a piping hot, creamy bowl of oats and milk, sprinkled with brown sugar and topped with nuts and dried fruit. It’s a stick to your ribs kind of meal that keeps you going well into midday.
I have always enjoyed my oatmeal the old fashioned way. Cooked in a saucepan on the stove then spooned into a bowl and dressed with a variety of toppings. Never had I eaten it any other way. Well – not until a fellow blog friend introduced me to “baked oatmeal” that is.
If you’ve never heard of baked oatmeal before, think of it as a cross between an oatmeal fruit bar and traditional creamy oatmeal, in casserole form. It’s an Amish favorite because there are an endless number of ways to make it your own; there’s apple, raisin, walnut; banana, huckleberry, walnut; or our house favorite…pecan, blueberry. The recipe can be easily adapted to whatever you have on hand. And, the other good thing? It can be made ahead of time and reheated, perfect for a busy farmstead or a busy family. If there are any leftovers simply score them with a knife and put them in the fridge for a nutrient packed grab-and-go snack.
INGREDIENTS
- 2 cups regular rolled oats (not quick oats)
- 1/2 cup pecan pieces, chopped
- 1/3 cup brown sugar plus more for serving
- 1 tsp. baking powder
- 1-1/2 tsp. ground cinnamon
- 1/4 tsp. fine sea salt
- 2 cups whole milk
- 1 large farm fresh egg
- 3 tbsp. unsalted butter, melted and cooled slightly
- 2 tsp. pure vanilla extract
- 1-1/2 cups dried blueberries, cranberries or mixed berries
DIRECTIONS:
1. Preheat the oven to 375. Liberally butter an 8×8-inch square baking dish.
2. In a bowl, mix together the oats, all the dry ingredients, the ¼ cup pecans and 1 cup of fruit.
3. In another bowl, make the custard by whisking together the milk, egg, half the butter, the vanilla, and the maple syrup, if using it instead of brown sugar.
4. Mix wet mixture into dry and spoon into prepared baking dish. Slowly drizzle the custard mixture over the oats. Gently thwack the pan on the counter top a few times to make sure the milk penetrates the oats. Scatter the remaining berries and pecans over the top.
5. Bake for 35 to 45 minutes, until the top is nicely golden and the oat mixture has set. Remove from the oven and let cool for a few minutes. Drizzle the remaining melted butter on the top, spoon into bowls and eat as is or pour a bit of milk over the top. Sprinkle with a bit more sugar or drizzle with maple syrup if you want it a bit sweeter.
Although we love the pecan, blueberry version you may want to experiment to find your family favorite. For a bit of an upscale version try plump, amaretto-soaked golden raisins in place of the berries and sliced almonds in place of the pecans, or diced apples and walnuts for a truly seasonal flare.
How to Make Squash Seed Gremolata
I know you’ve been eating lots and lots of squash since we posted the perfect roasted squash recipe. And, with squash comes loads of seeds, probably more than you need for the garden. So, what to do with the rest?
Well–not wanting to waste a food item that can be made into a fabulous accompaniment how about trying a simple gremolata?
This recipe uses the seeds from just two squash so you don’t have to wait long to try it.
Once you’ve scooped the seeds out of your squash, rinse them, pat dry and remove any stringy stuff. Spread in a single layer on a cookie sheet and lightly roast the seeds in a 350-degree oven for about 15 minutes. (you can also use shelled pumpkin seeds, known as pepita’s) No far sneaking samples, though. I know they are pretty (and tasty) enough to eat right from the pan, but hold yourself back.
You’re ready–place 2 garlic cloves in a food processor and pulse until finely chopped. Now, add 1-cup of flat parsley, 1/2-cup chives, the zest and juice from one lemon, salt, to taste, and freshly ground pepper, to taste. While the food processor is pulsing, drizzle in 1/8 to 1/4-cup of extra-virgin olive oil and process until the seeds are finely chopped.
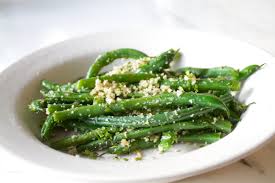
There you have it, a savory, nutty gremolata!
Gremolata can be a topping for braised meats. But, don’t stop there.
Sprinkle over roasted vegetables, like asparagus, greenbeans, brussels sprouts, carrots and others to make an impressive looking dish with major deliciousness.
Sneak some gremolata into your next batch of meatballs for great texture and bright flavor.
Mix with a bit of olive oil and lemon juice or vinegar for a great tasting salad dressing.
Sprinkle over pasta instead of parsley to boost the flavor.
Add a bit more olive oil and flavor-up meats or chicken by rubbing it on.
Making Mulled Spiced & Spiked Cider
Today was firewood day. Long overdue due to the hollowing winds and searing temps we’ve had lately. Definitely, NOT in keeping with the Christmas season.
This weekend came just in time, as we had used the last remaining logs from last year’s firewood stack last night.
We are fortunately enough to have a local rancher who allows us to pick up firewood for free, as long as we load and haul it ourselves. Not a bad deal in my book (and the exercise ain’t bad either). Our truck will hold about 2 cords of wood, and hold us until we can get another 2 cords the beginning of January.
The weather was chilly, about 48-degrees. Not frigid by any stretch. Cool enough to work up a sweat filling the truck bed with seasoned, split eucalyptus and not feel overheated.
Before we left, though, I had a feeling that we’d be wanting a nice warm drink when we returned. Something soothing to take the chill off with just a slight kick to warm us down to our toes. So, I readied the crock pot!
My “go-to” recipe on these cold days is a crock pot version of a mulled spiced cider, with a bit of a kick. How hard you want that kick to be is entirely up to you!
Here ya go.
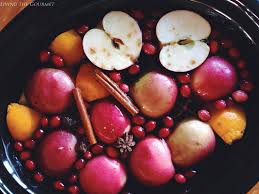
Pour 1 gallon of apple cider into a crock pot;
Add 3 small apples, cut in half and, 2 oranges, cut into quarters;
Now, toss in 1/2 cup fresh whole cranberries, 3 whole star anise, and 2 small cinnamon sticks, about 2-inches long;
Add to that a teaspoon of ground ginger and ground cloves.
Here comes the kick…pour in 1/2 to 1-1/2 cups of bourbon.
Set the crock pot on high and GO STACK FIREWOOD!
When you return, not only will you house smell amazing, but you have a piping hot seasonal drink that will warm you down to your toes.
I like to serve mine in clear glass coffee mugs or pint sized canning jars. To be extra festive, float a thin slice of apple or orange on top, or use a cinnamon stick as a stir if you like an extra cinnamony flavor.
CHEERS!
To learn more about stacking firewood or making a more efficient fire check out these two articles.
How to Roast Butternut Squash
Nothing says winter more than squash. And, a roasted creamy butternut squash is a cold weather favorite at our house!
And, butternuts are loaded vitamins and nutrients, too!
We usually have squash as a side dish to roasted lamb or pork, but sometimes we make it a light supper all by itself. There’s nothing like a piping hot squash drenched in butter, spices and maple syrup. Yummy!
We usually grow our own and store them, but in season they can be found at farmer’s markets or grocery stores very inexpensively. Find a cool dark place in your pantry or cellar and buy baskets of them to store so you can have this sweet and tasty treat all winter long.
For baking, I like to choose heavy, thick necked squash rather than those with long skinny necks. This will give you more “meat” and a nice hollow seed cavity for the goodies.
To prepare your squash:
Cut in half long-ways, leaving the stem and bloom ends intact. You don’t want all the sweetness spilling out. Now, scoop out the seeds and stringy stuff. I like to use a melon baller because it has a lightly sharp edge that slices through the flesh easily. I don’t peel my squash because I don’t want the flesh to get hard and crusty during cooking.
If your squash came from the farmers market you can save the seeds to plant your own crop, or roast them like pumpkin seeds.
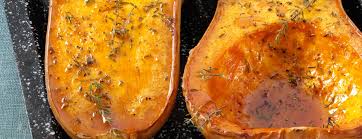
Score the fleshy neck part of the squash in a diamond patter so the butter, maple syrup and spices can sink in.
Place the squash, skin side down, in a baking dish. Try to nestle them together so they keep each other from tipping over.
Now, for the good part.
Place about one tablespoon of butter in the seed cavity of each side, followed by a tablespoon of maple syrup. If you prefer you can use brown sugar instead of the maple syrup. Then sprinkle the whole thing with pumpkin pie spice. The amount is up to you.
Pop it into the over and bake at 400-degrees for about an hour. Spoon the melted buttery sweet syrup over the neck a few times and let it ooze into the scoring. At one hour, insert a knife to make sure it is baked all the way through. If it is, the knife will slide through the fleshy part easily. If there’s any resistance continue baking and checking until it is done.
To bake a more savory, rather than sweet, squash drizzle it with a bit of olive oil, sprinkle with sea salt and pepper, and bake as above. Herbs like savory, sage, tarragon or thyme will also compliment a savory version of the baked butternut squash.
If you can’t wait a whole hour for your squash to bake, peel the skin off with a vegetable peeler, cut into cubes and then toss in the ingredients for the sweet or savory version.
There’s a few ways you can serve your squash. One is to serve it whole so the flesh and syrup can be scooped out together with each yummy mouthful. Or, you can scoop out all the flesh and mash it, like mashed potatoes, or puree it if you like a smoother consistency.
But, no matter what your favorite turns out to be you’ll be loving your squash all winter long.
What to do With an Old Hen or Rooster
Chickens are almost synonymous with homesteading. For most people they are an integral part of food production because they supply eggs, chicks, fertilizer, rototilling and eventually meat.
Now, some may be horrified at the thought of using one of their beloved “girls” or “boys” for food, but life on a farm runs in cycles, for good or bad. Animals, like crops, have a period of productivity and then they phase into not being very productive at all.
When food production is the primary focus of the farm, like mine is, nothing goes to waste. I can’t afford to let non-laying hens or old roosters stick around gobbling down expensive grains when they can be put to another use—in the house. And I don’t agree with the new trend of letting farm animals live out a life of idleness in a shelter or sanctuary. Farm animals are not “pets” they are partners in our quest to be more self-reliant and produce as much of our own food as possible—that is their purpose.
That sounds harsh, I know. I don’t take pleasure in dispatching an animal that I have enjoyed watching scratch around the garden or raise chicks, but it’s part of the farm cycle, and one I accept living this life.
So…the question becomes what to do with old unproductive chickens?
Old chickens are fairly tough, as far as meat goes, eating them roasted or grilled is not a very appealing option, but aged and slow simmered with vegetables and aromatic spices and herbs makes the most wonderfully flavorful broth and base for soups, pot pies and casseroles.
Once you have processed your bird, rinse thoroughly. Don’t trim the fat, it will help flavor the broth.
Place the whole carcass in a large pot or container, deep enough so it can be covered with water.
Add…
Herbs of your choice, like sage, thyme, marjoram, parsley and rosemary, plus a few bay leaves.
Sprinkle in 1 teaspoon of salt and ½ teaspoon of whole peppercorns.
Add an assortment of root veggies like onions, carrots, garlic cloves, and celery. These can be rough chopped into chunks.
Now, cover the pot with the lid set a little ajar or loosely cover with parchment or wax paper (don’t use plastic wrap). Place in the fridge for a few days, but not more than a week. This is an important step in aging an old bird, as the process helps break down the muscle fibers and tenderize the meat. DON’T SKIP THIS STEP! It will make a much better end product.
When the aging process is complete put the carcass, along with all the herbs and veggies, in a large stock pot and cover with water, adding more herbs and veggies if you like, then put the lid on. Set the pot to simmer and wait. This part can take 10 to 12 hours. Check periodically and keep the water level up.
If you are using a slow cooker you can let it go all day and into the next day for really tender meat. Just monitor the water level.
The bird is done when the meat is literally falling off the bone. Remove from the pot and set aside to cool. Once cooled, strip all the meat off the bones, reserving the skin, bones, veggies and herbs. You’ll see why in a moment.
At this point you can shred the meat and return it to the pot to make a large batch of chicken soup or you can put the meat into freezer containers and cover with liquid for a later use. I like to freeze the base so I have the option of making soup, chicken pot pies or a chicken casserole at a later time.
I don’t have a standard Chicken Soup recipe because it changes depending on what I have and what kind of chicken I’m using (I cook down every chicken carcass I bake). However, the basics are onions, carrots, celery, garlic, salt, pepper, savory herbs, a little Better Than Boullon and either noodles or rice. It makes a hearty cold weather feast after a day of chores.
Back to our pile of bones.
Toss the bones, skin and any drippings back into the pot and add water, more herbs and veggies to give it flavor, and simmer for 12 to 24 hours for the most fantastic broth you have ever tasted! You can also do this process in a crock pot if you don’t want to watch the stove. Once the bones have leached out all their nutrients you can strain the broth and either freeze it or can it.
There you have it, a tough unproductive chicken turned into many flavorful meals for the long cold winter ahead.
This is a lengthy multi-step process so make sure you give yourself plenty of time. I usually pick a cold rainy weekend. The warmth and smells fill the house. It’s amazing!
5 Ways to Preserve your Carrot Harvest

I sat at the patio table organizing my stash of vegetable seeds, sorting by like kinds and those that were out of date. Without thinking I decided to sprinkle an old package of carrot seeds in my patio wash tub garden, not thinking what would happen if the seeds were still viable. When I say out of date I mean years, like 3, out of date.
I suppose I thought not many of them would be good and only a few would sprout. Man was I wrong, dead wrong!
It was kind of exciting to see a few green shoots emerge from the compost rich galvanized tub a week or so later. But, as time went on the sprouts multiplied and before I knew it the entire tub was covered with a feathery green carpet. I was not expecting a good portion of the seeds to sprout, that I can tell you. By now it was clear…I would have a bumper carrot crop, but in a potted garden instead of a raised bed.
As time went on and the feathery tops grew it occurred to me that at harvest time I would have more carrots than a one person household could handle. I needed a plan and I needed one FAST!
Fortunately, I love carrots, but honestly who needs that many fresh carrots…all at one time.
I mulled it over in my head and did a bit of research, then went back and forth trying to decide what to do. It was exciting to find several very useful ways to preserve my orange harvest, ones that would fit nicely with the kinds of dishes I use carrots in. That was a relief, I can tell you.
So here are five ways to preserve your carrot harvest, whether it’s small or large.
1.) Leave them in the ground
How easy is that? My temperate climate lends itself well to just leaving carrots in the ground for quite a while. In colder climates, though, carrots can be covered with a thick layer of straw or leaves, about a foot deep, then covered with plastic, a tarp or even a small hoop house. If you live in an extremely cold area you can add an extra layer of mulch just to be safe. These thick layers will help insulate the carrots while the covering will help keep them from getting overly wet and rotting. When it’s time to use a few, simply move the mulch away from the tops and pull as many as you need, then push the mulch back into place. Easy, right?
2.) Store them in a root cellar
Root crops do especially well in root cellars. The trick to holding them for a long time is to leave them as natural as possible, meaning don’t was them. When they are harvested, gently brush off the excess dirt, trim the tops to about 2-inches and store them in a single layer in sand, straw or shavings. Make sure, though, that the shavings have not been treated with any anti-flammable substance. For best results and long storage the root cellar temperature should be consistently between 35-40 degrees and have plenty of humidity. Under the right conditions carrots should keep for about 4 to 6 months in a cellar.
If you don’t have a cellar, like me, check out the link below for a simple root cellar perfect for the suburban homesteader. Or, you can cellar them in the fridge. Simply harvest, brush off excess soil and trim then store carrots in a zip lock bag or a shallow lidded container.
They won’t keep as long in the fridge, but you should have fresh carrots for several months at least.
3.) Freeze your carrots.
With a little bit of prep work carrots freeze very well. Wash thoroughly before cutting off tops and peeling. Slice or dice into desired size or cut into sticks, then blanch them for 3-minutes in boiling water. Remove from boiling water and immediately plunge them into a bowl of ice water to stop the cooking process. Cool completely before placing carrots into plastic freezer containers or bags. Frozen carrots work great in soups, stews, pot pies or casseroles.
If you don’t mind a little bit more work, place carrots on a parchment lined cookie sheet in a single layer and freeze. This way they freeze individually and are easier to pull out a small amount if that’s all your recipe calls for. I freeze my carrots this way because it’s the easiest method if I don’t have a large batch of carrots all at once.
4.) Traditional canning works, too.
Carrots are a low-acid vegetable and needs to be pressure canned if you choose this method. However, if you choose to make pickled carrots you can use the regular water bath method.
To pressure can carrots…
Wash thoroughly, removing all dirt then trim tops and peel.
Pack carrots into hot sterilized jars, and fill with boiling water leaving a 1-inch headspace. For my one person house I use primarily ½-pint and pint jars, but families may want to use larger jars.
Processing time & pressure…
Pints – 25 minutes at 10 pounds of pressure
Quarts – 30 minutes at 10 pounds of pressure
5.) Dehydrate your carrots.
Carrots lend themselves very well to being dehydrated, to be used later in many crock pot or casserole dishes, even baked goods like muffins and cakes. To dehydrate carrots, wash, trim and peel as in the other suggestions, then blanch them for 3-minutes in boiling water and dry completely before placing them on the drier tray. Place in a single layer at 125 degrees and dry until they are almost brittle.
There you have it, five ways to have the great taste of carrots in your winter dishes and baked goods.
Check out this post to learn how to make a simple mini green house for your garden beds.
How to Freeze Green Beans
With Labor Day just past many are turning their minds towards fall and winter preparations. It’s a time of transition for the garden; some crops are winding down while others are just coming on.
Green beans are still going strong, their long green pods dangling on the vine with the promise of sweet crunchy goodness all winter long, if preserved properly. I love fresh green beans, blanched with a bit of oil and almonds or sauteed with bacon and onion. Nothing says fresh or summer like green beans. But how do you get that goodness during the cold winter months?
I’ve never been a fan of canned green beans, either home canned or commercially canned. I get bored with the soft mushy texture when I’m longing for a bit of snap in my veggies. So I had to find a way to get what I wanted, and I think I have.
One day, as I was setting blueberries out on parchment paper to freeze for winter storage, it came to me! What if I did the same thing with the green beans? So I gave it a try.
First, I set a large pot of water on the stove to boil and a large bowl of ice water in the sink.
While the water was heating up, I rinsed a batch of beans, trimmed the ends and set them in a wire colander.
When the water came to a rolling boil I set the colander full of beans in the water to blanch for about a minute. You normally blanch beans longer, but I wanted to preserve as much of their crunch as possible. When the minute was up I pulled the colander out and immediately plunged the beans into the bowl of ice water to stop the cooking process.
When the beans had cooled I dried them between two dish towels before arranging them in a single layer on a cookie sheet lined with parchment paper. You could also use wax paper, foil or any standard paper. The object here is to separate the beans from the metal so they don’t stick during the freezing process. Then I popped them into the freezer just like I do my berries. They will freezer individually instead of becoming anbig green bean ice block.
When they had frozen completely I could now pack them into a freezer bag or in a tall lidded freezer container. The beauty of this method is that the individually frozen beans can be packed in small or large quantities depending on use or household size. For me, a loosely packed quart size freezer bag is just enough for this empty nester, with a bit left over for another meal.
Now I can have the fresh crunchiness of green beans all winter long. I can cook them as a side dish or add them to soups or stews. I can even chop them up to add to a big green salad. But, my new favorite green bean dish is one I picked up from a little café in Texas—green beans with onion, bacon and a sprinkle of brown sugar. Try the recipe below…it’s easy, quick and I’m sure you’ll love it too!
Sauteed Green Beans with Bacon and Brown Sugar
INGREDIENTS:
¼ Lb. Green beans (fresh or frozen and thawed)
½ Onion, diced small
3 Slices Bacon, chopped, cooked until crispy
1 tsp. Brown sugar
DIRECTIONS:
Thaw green beans completely if using frozen. If using fresh, blanch for 2 minutes in boiling water, remove from water and set aside. Cook bacon in a large skillet until almost crispy. Add onions and cook until onions are soft and bacon is crispy. Spoon out bacon grease, leaving about a tablespoon or so. Add green beans tossing to coat in bacon and onion. Sprinkle brown sugar and toss again. Remove green beans to a serving bowl and spoon the onions and bacon over the top.
Recent comments
Aenean nonummy hendrerit mauris. Phasellus porta.