Archive for the ‘In the Kitchen’ Category
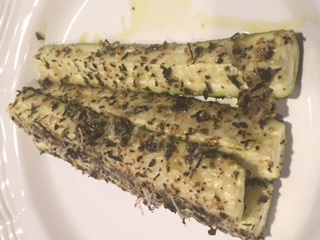
How to Make Baked Parmesan Zucchini Sticks
Zucchini’s can be very plentiful in the garden. In fact, most home gardeners harvest way more than they can consume. One particularly ambitious year found us planting six, yes six, zucchini plants for a family of two.
Talk about a green flood. After a while I couldn’t even give them away. The chickens had a field day, though.
I thought I knew every possible way to cook or prepare zucchini, but I was wrong. I recently came across a recipe that is so easy and so delicious that it has become our “go to” way of cooking the little green gems…no matter how many we have.
Zucks taste best when they are harvested at about 6-8” long and no more than 1-1/2-inches in diameter.
You’re on your own with the monster-sized zucchini’s that hide until they become so big no one knows what to do with them.
This oven baked recipe is not only healthy and addictive; it also makes for a crispy and tender zucchini stick.
Oven Baked Parmesan Zucchini Sticks
INGREDIENTS:
- 4 zucchini, ends removed, cut lengthwise into quarters
- ½ cup grated parmesan cheese
- ¼ teaspoon garlic granules
- 1 tablespoon Herbs de Provence or Italian herbs
- Kosher salt and ground pepper to taste
- 2 tablespoons olive oil
- 2 tablespoons fresh chopped parsley
DIRECTIONS:
- Preheat oven to 350 degrees. Lightly spray a cooling rack with oil and set on top of a baking sheet.
- In a small bowl, combine parmesan cheese, garlic, herbs and salt and pepper, to taste.
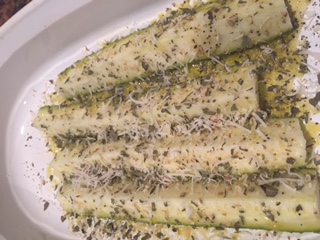
- Place zucchini spears on the cooling rack and drizzle with olive oil. Use your hands to completely coat each spear, and then sprinkle with herb mixture.
- Place baking sheet into oven and bake until tender, about 15 minutes. The turn on broiler and broil for a few minutes until cheese mixture turns golden brown. Watch to make sure the spears don’t burn.
- Plate up, sprinkle with parsley and serve while still warm.
How to Season a Cast Iron Pan
There’s just something about cooking in cast iron that transports me back to days of old.
I’m not sure what it is…the weight, the sizzle, the smell, the feel in my hand. Whatever it is, it makes me feel a bit more comfortable in the kitchen.
I remember my mom cooked in a cast iron skillet, a big, black, deep skillet that turn humble ingredients into warm and filling meals. There were hearty beef stews, thick pork chops and dad’s Sunday fried chicken. Meals just seemed better from that skillet, tasted better.
Over the years I have used many cast iron skillets and pans. Some came from yard sales, some from thrift stores and some were given to me. And, although they were all different they had one thing in common.
They all needed to be seasoned.
Seasoning cast iron means to slowly bake on thin layers of oil to protect the cast iron from rusting and create a non-stick cooking surface. Every time you cook with oil you are actually re-seasoning your pan.
Whether you have a new cast iron piece or one that has been loved for years, seasoning it will protect it so you can continue making memorable family meals.
To season a cast iron pan in good shape…
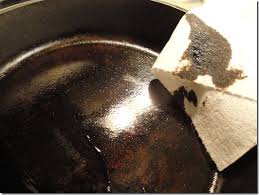
- Wipe it clean with paper towels or a cotton rag, reserved just for cleaning your cast iron. If there are crusty bits stuck on, gently scour the pan with a bit of coarse kosher salt, but NO SOAP. Cast iron is porous and the soap can get into the pores. AND NEVER, EVER PUT CAST IRON IN THE DISHWASHER.
- Once the pan is clean, wipe or brush a thin layer of oil all over the pan, including the outside and the bottom. Thin is best because your next step is to wipe the oil off. It may not look like there is any oil on, but actually it has sunk down into the pores, which is what you want. Any cooking oil is fair game as long as it has smoke point higher than 350 degrees. Oils like canola, olive, vegetable or coconut will do. Even rendered Crisco or lard can be used, as long as it’s clean.
- Now, take your paper towels or rag and wipe off the oil until you think there isn’t anything left.
- Place your pan in a pre-heated 200-250 degree oven for 15 minutes.
- Remove from the oven and let cool completely before storing it.
If you have serious crusty bits or rust on your pan, use a well-worn and well-oiled piece of steel wool to scour off the gunk, then…
- Wipe it down – using paper towels or a cotton rag.
- Oil it up – using any common cooking oil, as mentioned above.
- Bake it on – in a preheated 350 degree oven for one hour. Place the pan upside down on the oven rack with a piece of heavy duty aluminum foil underneath to catch any oil drips. When the hour is up turn the oven off and let the pan cool down inside.
Once it’s cool, you’re ready to start cooking.
Hints & Tips:
- Never put cast iron in the dishwasher.
- Never use soap to clean cast iron.
- Never put cold water into a hot cast iron pan. IT WILL CRACK!
- Season after every use to keep cast iron in good shape.
- Learn to cook with cast iron like ya mean it.
Alpine Bean Casserole
Years ago, we were looking for a new church to attend, friends invited us to there’s on a Sunday in summer because they were having a pot luck after the services. Our friends thought it would be a good chance to meet a lot of the congregation.
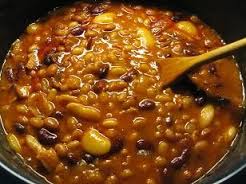
The spread was huge with lots of homemade dishes, but the one that caught my eye, and my taste buds, was bean casserole the pastor’s wife had made. She called it an Alpine Bean Casserole, which confused me, mainly because there’s nothing “alpine” about beans. Beans don’t grow in alpine conditions and most alpine countries don’t eat a lot of beans. But after I tasted them I didn’t care what she called them, they were wonderful!
Over the year’s this has been my “go to” recipe for any event from beach parties to livestock shows. In fact, I get so many requests for this dish that I wonder if people know I can cook other dishes with as much success. In the words of my dear friend Judy, “we don’t care what else you can cook, just bring the beans”. Well—if you’re going to be known for something I guess your cooking isn’t all that bad.
I’m sure once you try them, you too will agree, they’re pretty darn good. Enjoy!
Alpine Bean Casserole
INGREDIENTS:
8 slices bacon, chopped and slightly cooked, but not crispy
4 onions, quartered and sliced thin
1 cup brown sugar
2 Tbsp. dry mustard (can use yellow mustard in a pinch)
½ cup vinegar (white or cider)
14 oz. ketchup
1 14-15 ounce can of each (Do not drain)
Lima beans
Butter beans
Kidney Beans
Garbanzo beans
1 28 ounce can of beans in molasses, like S&W or Bushes. (DO NOT USE beans in tomato sauce, like pork & beans)
DIRECTIONS:
Put all ingredients in a large Dutch oven, stir to combine. Bake at 300 degrees until bubbly and thick, approximately 2-3 hours. Stir occasionally. The longer it cooks the thicker it will become.
You can also use a slow cooker set on low for 8-10 hours or overnight.
NOTES: This is one of those large crowd recipes that always get rave reviews, perfect for potlucks, picnics or BBQ’s. It’s also a recipe that is hard to mess up. I have made it without cooking the bacon, used yellow mustard instead of dry, all kinds of vinegar (except Balsamic) and even added browned ground beef, and it turns out great every time.
How to Make Herb Ice Cubes
There’s nothing better than herbs fresh picked from the garden and used in a favorite recipe.
I have herbs inter planted with my flower beds and some in the garden to help ward off bugs. And, then there’s my livestock water trough planter that sits on my patio. That one is handy to the kitchen door and is my “go to” herb garden when I get ready to fix a meal.
The warmer months are prime herb growing season, but what is a cook to do during the dark, cold days of winter? How do you get that “just picked” flavor in the dead of winter?
First off…you start long before the cold weather begins. You start with your seed selection and planting of the herb garden, taking into consideration what herbs you use the most and which ones are well suited to being preserved.
There are several ways to preserve herbs; there’s air drying, dehydrating, making herbed vinegars, oils, butter, salt, pesto’s and even herbed sugar, given the right kind of herb.
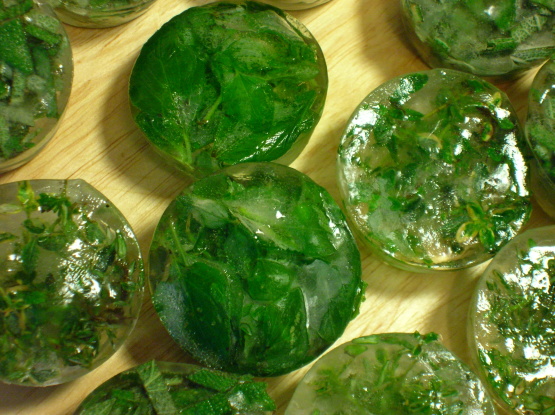
But, the one I like best for preserving that “just out of the garden” flavor is freezing, herb ice cubes as we call them. They are easy, fast and bring life to ever dish we make all winter long.
Follow these easy steps and you’ll be enjoying the taste of fresh herbs no matter what the weather is outside.
STEP ONE: Choose full bodied, blemish free herbs. Pick herbs just before or at the beginning of their flowering cycle. This is the time when the herb oils are at their peak.
STEP TWO: Wash herbs gently and pat dry, or let air dry.
STEP THREE: This is where you have a few choices. You can either freeze herbs in water or oil. Also, decide what size herb cubes you want; regular ice cube tray size or larger cubes using a muffin tin. The ice cube tray will give you about 2-tablespoons of herbs per cube, while the muffin tin will give you about 1/3-cup. (I like the muffin tin size because it gives me enough herbs for several dishes, when defrosted).
STEP FOUR: Mince your herb, either by hand or in a food processor. Be sure to keep the herbs separate if you’re freezing more than one at a time.
STEP FIVE: Pack minced herb into an ice cube tray, about 3/4 full. (I find it easier to have one ice cube tray for each herb, or use each side of the try for one herb. That way they don’t get mixed up).
STEP SIX: Fill each cube, or muffin tin, with boiling water. This will blanch the herbs, helping them to retain their fresh flavor and natural color. OR, you can fill each cube with neutral oil, like vegetable or canola.
STEP SEVEN: Pop the trays, or tins, into the freezer, making sure they are level, so they don’t spill. Once they are frozen solid take cubes out of the tray, or tin, and store in freezer bags or freezer containers.
To use herb ice cubes, take what you need out of the freezer and drop them into your pot. It’s that simple!
Creating a Well-Stocked Homestead Pantry
Homesteading is not just about growing a garden or raising livestock. It’s a whole mindset of having what you need to live a simpler more fulfilling life. Part of that more simple life, at least in my opinion, is to have what I need when I need it so I can 1) reduce the number of trips into town, and 2) reduce the amount of money I spend for so-called unexpected purchases. You know the one’s I’m talking about. That missing ingredient you need for a new recipe or not having enough of something you need to make a full meal. The primary place I put this thought into action is in the kitchen.
Although I raise livestock, have laying hens and have a garden, I still purchase some items from local stores. These are items that I either can’t or don’t grow myself. Things like oil and flour and spices. When you have a well-stocked pantry you have choices, choices about what to make for dinner, choices about cooking at home instead of picking up expensive take-out and choices about how to alter a recipe to fit what you have on hand. You even have the choice to hunker down at home when weather turns bad or illness strikes, making it hard to get to town.
With more and more people reclaiming the art of cooking from scratch to avoid processed foods or manage food allergies, and more people realizing the benefits of weathering a natural disaster at home, it has never been more important to create a stocked homestead pantry.
But, where do you start? Isn’t creating a stocked pantry challenging, time consuming and expensive?
NO! It’s not. And, in the end you will be able to look at your pantry with peace of mind, and choices.
Keep in mind, though, the list I’m providing isn’t your whole pantry, it will support the “whole foods” you raise, grow, preserve or buy from a farmer or CSA, foods like meat, dairy, fruits and veggies. Some of the items listed can be made at home, but I’m including them in consideration of people (like me) who do not always have time to make them from scratch. Pantry items are the components that will help you pull the whole meal together.
Many of these basics can be purchased in large quantities or in bulk so you never run out. Whether you buy in large or small quantities remember to keep track of your stock on hand so it can be replaced before you run out. I purchase multiples of some items, while others I stock up on when they are on sale. After the list I’ll give you pointers on how to fill your stocked pantry.
Wondering what the benefits are to having a well-stocked pantry? Here they are:
- You cut down on buying expensive take out or fast food. Saving money and your health.
- You can always make something. It may not be 5-star cuisine, but it will be warm and filling.
- You have the opportunity to buy in bulk, saving money and creating a food safety net if a crisis keeps you at home for any length of time.
- Your shopping trips become shorter because you’re list isn’t as long.
- You can easily plan and cook meals knowing you have needed ingredients.
- It just makes good sense.
CATEGORIES OF A WELL STOCKED PANTRY
CONDIMENTS
Mayonnaise
Mustard – yellow, Dijon, Honey, and any other kind your family enjoys
Catsup
Pickle Relish – if you don’t make your own
Did you know that with these ingredients you can make your own Thousand Island dressing?
GRAINS & GRAIN ITEMS
Rice – white and brown, Jasmine, Basmati, Arborio
Barley – pearled
Oatmeal – old fashioned
Rice is the main character in many casseroles, while barley is great for making hearty soups.
Oatmeal, choke full of fruit and nuts makes an inexpensive stick to your ribs breakfast.
Pasta & Noodles – spaghetti, tube, macaroni, egg, and any others your family likes
BEANS
Dried Beans – pinto, Great Northern, kidney
Lentils –yellow and brown
Split peas
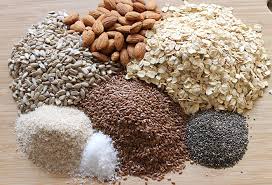
NUTS
Walnuts, pecans, almonds (slivered & sliced), sunflower seeds, peanuts, and any others your family likes.
FATS
Butter
Oil – olive, sesame, coconut
Bacon grease – strain and store bacon grease to use instead of oil.
Lard
BAKING ITEMS
All-Purpose Flour – White and whole wheat, if you don’t grind your own.
Bread Flour – White and whole wheat, if you don’t grind your own.
Corn Meal
Baking Power
Baking Soda
Yeast
Powered Milk
SWEETENERS
Sugar – white, brown and confectioners
Honey – locally sourced, if possible
Molasses
Maple Syrup
OTHER ITEMS
Salt – non-iodized, fine, sea, course, kosher
Pepper – black and white, or peppercorns for each and grind your own
Vinegar – white, cider, wine, Balsamic
Cornstarch
Peanut Butter
Chocolate Chips or other cookie additions
Tea & Coffee
Dried Fruit – if you don’t dry your own
Herbs & Spices – buy from ethnic markets or the ethnic section of your grocery store where quantities are larger and prices are cheaper.
There you have it, the basic list for a well-stocked homestead pantry. Feel free to add any family favorites or items you use most often. Your pantry is the best place to start when creating your own list or adding to the one above. With these items always on hand you’ll be able to make any number of hearty wholesome dishes your family will love, without having to run to the store for last minute additions.
So—how do you go about stocking the pantry without breaking the bank?
You have a few choices here.
You can go ALL in and buy everything in one shopping trip if your food budget can handle it. Mine couldn’t, so I built the pantry over time. My first shopping trip was actually to price every item on my list. I compared prices at the stores I shop at most often—the ethnic market, Wal-Mart, Big Lots, Target and Smart & Final. Now I could group items depending on which were cheaper at what store. Cheaper can be deceiving, though. You’ll want to calculate the cost per ounce, or pound, to find out which store is REALLY the least expensive. (Use this formula to calculate the cost per unit: cost ÷ ounce or pound).
Over a few months I allotted a certain amount of money each week just for stock-up items. This also gave me the choice to buy larger quantities of certain items. Take white sugar for instance. I could spend a few dollars buying a one pound bag one week or I could wait and spend $3 to $4 and buy a 10-pound bag, which would last me much longer.
With the essentials taken care of more of your grocery money can be used to take advantage of sales on items that can be frozen, like meat and poultry, fruits and vegetables. Items you may not raise or grow yourself.
By having a well-stocked pantry (and freezer) I have been able to reduce my grocery shopping to just a few times a month, mainly filling in or buying sale items, and spending less than $20 each trip.
Final Words: I haven’t mentioned buying on-line or strictly buying organic and non-GMO items. It’s not that I don’t believe in these avenues, I just wanted to be more general. Each person can, and should, decide how best to feed their family.
How to Care for a Wooden Cutting Board
Cutting boards have been a kitchen necessity ever since the first lumberjack took a slice out of a felled tree. Today’s cutting boards are both utilitarian tools and works of art. Just look at the array of shapes and styles available—cows or pigs; ovals or rectangles with routered or carved decorative edges. They are worthy of being displayed right alongside other treasured pieces that adorn your kitchen.
Some people collect for sentimental reasons, some for artistic collections. No matter the reason, cutting boards are hard workers in the kitchen and should be cared for properly if they are to retain their beauty and their functionality. Following these four steps will keep your cutting board(s) both useful and beautiful.
- Refrain from putting wooden cutting boards in the dishwasher. The heat can cause cracking of the wood.
- Wash wooden cutting boards in warm soapy water after each use, and allow to air dry.
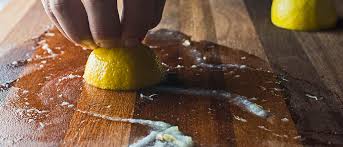
- To keep your board fresh, sprinkle it with coarse salt then rub with a lemon cut in half. Rub in a circular motion to scour the board, then rinse in hot water and air dry to keep it smelling fresh.
- To prevent the board from drying out and cracking, use a lint-free cloth dipped in mineral oil and rub well into the board. Reapply as the oil soaks in. When the oil stops absorbing, wipe the board clean and let sit overnight. Do not use food grade oils like olive or vegetable as they will turn rancid.
With these simple maintenance tips your cutting boards will last for years.
Homemade Golden Corn Bread Muffins
Okay…I know what you all are thinking…who the heck CAN’T make a simple corn muffin? I would be thinking the same thing, but hear me out.
Have you ever had one of those culinary mishaps that looked like it was going to be a complete and total disaster? The kind that you think is not recoverable, but in the end turns out to be one of your best dishes ever?
Well—that was me the other night.
I had gotten off late from work and for some ungodly reason I had been thinking of cornbread muffins for most of the day. Not just a slight pang of interest, but an uncontrollable urge to scarf down an entire batch of corn muffins slathered with butter and dripping in honey. It was ridiculous, actually.
So, when I got home, dropped my gear and got into the kitchen I began pulling out the ingredients. I quickly realized, much to my horror, that I had soy milk, but not regular milk, and lots of butter, but no canola oil. (I primarily use olive, avocado or nut oils). I thought right then and there that my long craved for muffins would be just another unfulfilled dream. As I starred in the fridge at the butter and soy milk I thought, “What the heck, what do I have to lose”. I grabbed the two misfit ingredients, melted the required amount of butter to substitute for the oil and began whipping up a batch of muffins. As I spooned the batter into a muffin pan lined with papers I tasted the batter. Not bad, I thought. I couldn’t really tell the difference. Was that a good sign, I wondered. Would all be well, I thought.
Into the oven they went. Now—I have to say cornbread muffins are a quick bread to make, usually done in about 12 to 15 minutes. I set the oven timer for 15 minutes just to accommodate the less than normal ingredients and began cleaning up the kitchen. In a few minutes I could smell the muffins. The aroma was sweet and fragrant. When the timer went off I pulled the muffin pan out. They were slightly golden, but not too golden. They had risen well and looked like every other cornbread muffin I had ever made. I gently pressed the top of one of the muffins to see if they were done and my finger went right through the top.
DANG!!! Completely mushy!!
That was it…disaster, a waste of good food, a waste of time, and I still didn’t have my longed for muffins. I was disappointed.
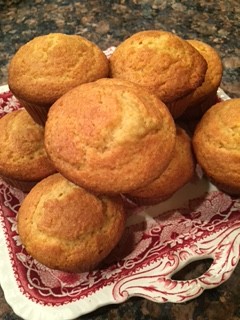
But, something told me not to give up. After all they looked fine. The batter tasted fine. I slid them back into the oven and set the time for another 5 minutes, then another, then another. After they had been in the oven for a full 30 minutes their tops were a deep golden brown, but not burned. A toothpick inserted came out clean and they smelled heavenly. I pulled them out to let them rest for a few minutes. The proof would be in the tasting, though.
When the muffins had cooled just a bit I pulled one out of the pan, gently removed the paper liner, pulled off an edge and popped it into my mouth.
SUCCESS!!
It was divine; light like a cake, slightly sweet and buttery. I cut the muffin in half, spread some soft butter over the top, drizzled it with wild clover honey and took a huge bit. It was heaven.
What started out with a craving, skated the edge of disaster and finally reached a wonderful end would now become my dinner.
I heated up some soup I had made earlier in the week, stacked a few muffins on my plate and nestled down in front of the fireplace for a perfect winter meal.
Not every supposed kitchen mishap turns out to be a disaster. Sometimes they turn out to be a brilliant alternative to the norm.
Check out this recipe for making cornbread muffins with soy milk and butter instead of milk and oil.
Golden Corn Bread Muffins
INGREDIENTS:
1 cup corn meal
1 cup all-purpose flour
1/3 cup honey
4 tsp. baking powder
½ tsp. salt
1 cup soy milk
1 large egg
¼ cup butter, melted
DIRECTIONS:
Preheat oven to 400 degrees.
In a large bowl, mix all dry ingredients then stir in milk, egg, and melted butter. Beat until fairly smooth. (the batter will be fairly thick).
Line muffin pan with muffin papers and fill each paper about 2/3rds with batter.
Bake for about 20 minutes and then check every 5 minutes until muffins are golden brown and a toothpick inserted comes out clean. Makes about a dozen.
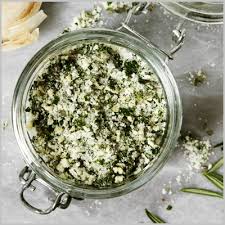
Making Homemade Tuscan Herbed Salt
During the long winter months I can’t help but think of spring planting, sprouts emerging or the bright fresh harvest of summer. Fresh anything is a welcome relief from a desolate winter. Herbs especially make winter seem a little less brutal. They add so much life to winter dishes and nothing tastes better than dishes made with fresh herbs.
Most of my herb harvest is preserved in oil or ice, to be pulled out and added to soups or stews or to other hearty winter fare, but roasts, those hunks of meat cooked long and slow, benefit greatly from a crust of salt and herbs. Preserving herbs with salt lets you savor a bit of summer in the middle of winter. The herbs will dry out as the salt draws out the moisture, but somehow they still seem fresher than those I dry the traditional way.
It’s important to use a coarse salt rather than table or iodized salt because these will make the mixture too salty and overwhelm your meat. This is where you can be a bit adventurous as well. Try a Celtic or pink salt for a different flavor. Experiment and find your favorite mix. The mix of herbs can also be changed to fit the meat you are cooking. I like rosemary and thyme for lamb or parsley, basil and tarragon for beef, but the choice is yours.
No matter what salt or which herbs you choose a fresh batch of herbed salt will enhance any cut of meat, so it’s worth the few minutes of your time to bring summer’s flavor to your winter dinner.
This batch is made using a food processor, but you can also use a chef’s knife and chop the whole pile by hand. Just remember to keep scraping and piling the mixture in the middle of a cutting board, and use a rocking motion when cutting. Scrape, pile, chop. That’s all there is to it.
Tuscan Herbed Salt
INGREDIENTS:
- 6 large cloves of garlic
- 1/2 cup coarse sea salt or kosher salt or a mixture (not table or iodized salt)
- 4 cups fresh herb leaves – any combination of rosemary, sage, thyme, oregano, savory, dill, parsley, tarragon, chervil, basil, etc.
DIRECTIONS:
- Peel the garlic cloves and rough chop
- Clean, dry & remove leaves from herbs (you don’t want stems)
- Add ½ the salt to a food processor
- Add ½ garlic and top with ½ the herbs
- Pulse until mix is incorporated, but not pureed
- Add remaining salt, then garlic, then herbs
- Pulse more until mixture is well incorporated
- Spread mixture in a thin layer on a parchment lined baking sheet, and let air dry for a few days
- Store in an air tight container (will stay fresh for several months)
Woodcutter Carrots

Carrots are a staple in most gardens. Those bright orange cylinders are sweet and crunchy, packed with wholesome goodness. They are the perfect snack dipped into sour cream seasoned with garlic and herbs. They are a versatile addition to soups and stews, and stand up well to being sauteed, braised and covered in glaze. But, our favorite carrot dish is one that we discovered year’s ago in France.
Woodcutter Carrots is actually a French peasant dish. In days of old poor workers would eat this dish for lunch. The heartiness of the carrots, combined with the sweetness of the onions and crispness of the bacon made it a filling and nutritious mid-day meal. Not to mention inexpensive to make.
This has become our favorite carrot dish and graces the dinner table several times a month in the fall and winter months. The fact that it is easy and almost full proof to make is just an added bonus. Although the recipe calls for pancetta, we have been successful making it with maple cured and regular bacon. And, we have used a variety of carrots from baby to fresh picked with a bit of the tops still on for a more elegant presentation.
No matter how you chose to alter the recipe I’m sure it will end up being a favorite with your family, too.
INGREDIENTS:
1 pound of carrots, peeled and kept whole
1 onion, diced small
6 slices of pancetta or any other bacon, chopped small
15 ounces beef broth, canned or homemade
2 tbsp chopped parsley
DIRECTIONS:
Chop bacon into small pieces and place in a large skillet. Cook until almost crispy.
Add onions and cook until browned, almost caramelized.
Lay carrots in a single layer on top of the onions and bacon.
Pour beef broth over all.
Place lid on skillet and simmer over low-to-medium flame until carrots are tender but firm, not mushy, about 10 to 15 minutes.
Remove carrots to a serving plate. Increase flame and cook down broth until reduced by half. Spoon bacon and onion mix over carrots, sprinkle with parsley and serve.
The leftovers make a wonderful mid-day meal paired with a salad and crusty bread.
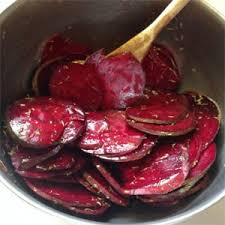
How to Make Beet Chips
Beets are one of the mainstay veggies in our garden. With names like Bull’s Blood, Boro, Merlin or Golden how can anyone not have them growing as long as weather will allow. They are full of vitamins and nutrients, and work well cooked in a variety of ways. It only takes a few beets to make a tasty filling side dish. We plant them in all seasons. There’s even a small bed of them growing right now.
Root veggies are a favorite at our house. They are roasted, braised, baked, smashed and now made into chips. Yes, that’s right…beet chips! Terra Chips are one of our favorite snacks, but at over $4.00 a bags they are a bit pricey to eat with any regularity, so we set out to create our own, and discovered how very easy they are to make.
Follow these simple steps and you’ll be eating the most delicious chips ever in just 30-minutes. They are our guilty pleasure because they don’t have the fat and calories of potato chips. Or…at least that’s what we tell ourselves.
INGREDIENTS:
6 small to medium beets, peeled and sliced thin
2 Tbsp olive oil
Fine sea salt
Black pepper (optional)
DIRECTIONS:
Peel beets and thinly slice using a Mandoline
Place beet slices in a large bowl and drizzle with olive oil, then toss to coat.
On a parchment lined cookie sheet, arrange beets in a single layer.
Bake in a 350 oven for 25-30 minutes.
Remove and blot any excess oil, then sprinkle with sea salt. Add pepper if desired.
For another great chip idea try the above recipe using sweet potatoes for a truly decadent snack that won’t leaving you feeling guilty.
Recent comments
Aenean nonummy hendrerit mauris. Phasellus porta.