Posts Tagged ‘Array’
Holiday Gifting

Ready or not, the holiday gift giving season is well on its way. But, instead of fighting the stores, dealing with overworked or angry salespeople why not give gifts from local farmers or crafts people? Farmers Markets and Farm Stands provide the gift giver with a wide array of fruits, meats, honey, flowers and farm items that can be made into attractive gift baskets. Local craft fairs showcase hand-made items from area artists and crafts people.
And, with LocalHarvest outlets and CSA’s you can give fresh made cheese and baked goods, homemade soaps and canned goods, or wool, yarn and spinning supplies. Check out the more than 10,000 farm products in the LocalHarvest store.
Better yet, give the gift that keeps on giving…give a chicken.
Make Your Own Dibbler – It’s a Dandy in the Garden
What the heck is a dibble?
I’m usually not much of a perfectionist because it tends to create a whole lot of extra work. I leave those little idiosyncrasies to people like my sister, who actually measures the position of her place settings when giving a dinner party. I do however; tend to be a bit more fastidious when it comes to gardening. I lean more towards formally laid out gardens with their clean lines and appealing symmetry. And, at times I find a gardening approach, or tool, that gives me the formality I like while decreasing my workload. Fabulous!
Case in point…The Dibble…a centuries old tool that creates holes in the soil for planting bulbs or seeds, like the one below.
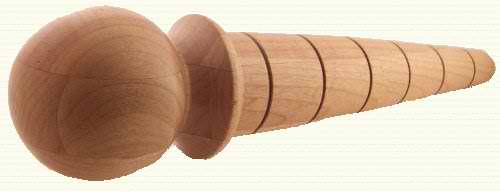
Most dibbles however, make only one hole. I wanted something that would speed up the planting process and get me off my knees. I pondered and stared, stared and pondered, before coming up with a brilliant idea – a dibble that could plant many perfectly spaced seeds at one time (did I say I wasn’t a perfectionist?).
I fantasized about how beautiful my vegetable beds would be, so formal, so linear, so precise that the gardeners of Versailles would weep. And the best part of all…I’d save money on seeds because with the right spacing I wouldn’t need to thin!
So, I set out to create the ultimate dibble for my vegetable beds. Anytime I act on one of my “fantasies” the first thing I do is scour the garage and barn to see what I have on-hand that can be salvaged. The vision in my head called for a dibble that would fit in my raised beds (4’x8’), be easy to handle and allow me to plant my seeds successively for an ongoing crop.
The vision…a board with evenly spaced pegs.
I found a nice piece of ½-inch plywood, but wanted to keep it for another project. I found 2×6’s. No. 2×4’s. No. Smaller pieces of plywood. No, no, no. Then, buried beneath a pile of scrap 1×6’s I found what I was looking for, a 1×6 that was 24 inches long, half the width of my raised beds. Perfect! I brushed it off and sanded down the edges a bit till all was smooth and clean. Then I started marking a grid pattern along the ends and sides. Since most seed spacing is 2 inches my grid spacing would be 2 inches.
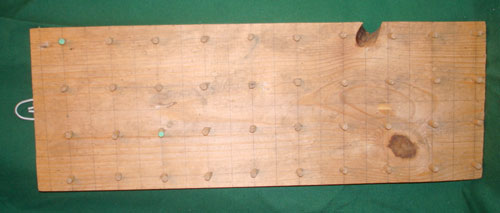
Some may think it may have been better to make a dibble that would cover a larger area, but such a contraption would be large, heavy and unwieldy. Nope this was the perfect size for my needs mainly because I often make successive plantings of certain crops and other times I plant many different varieties of the same crop in one bed. With a smaller dibble I would have more options on how to use it.
The process of making my dibble was fairly simple. After cleaning off my piece of wood I drew out the grid with intersecting points at 2 inch intervals. Read the rest of the story »
Making Juice with a Blender
At our house juice is consumed almost as much as water. It is the beverage of choice on hot days when we’ve been working hard in the garden or in the barn. It gives us a little extra burst of energy with all vitamins and natural sugar it contains. The problem is, commercially made juices are expensive and full of unwanted chemicals, corn syrup and preservatives; and juicing machines are more money than this frugal farmer wants to spend. The answer: making juice using my blender or food processor.
You can make virtually any kind of juice with your blender, and what’s more, a blender won’t separate the healthy fiber found in the peels and pulp like a commercial juicer can. The fiber in the peel and pulp helps your body regulate the absorption of sugar, vitamins and minerals.
Making your own blender juices is simple and fun, and allows you to combine several different fruits to make a juice blend.
To make your own homemade fresh juice:
- Wash fruit thoroughly.
- Remove thick peel on fruits such as pineapple, mango or papaya.
- Remove any large seeds. Smaller seeds can be strained out later.
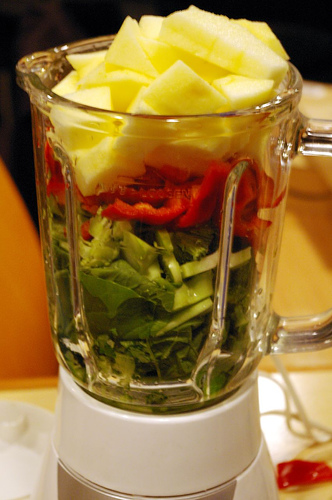
- Rough chop fruit and add to blender with a small amount of water so it will blend easier.
- Flip the switch and blend away.
While the fruit is blending, place a strainer over a bowl or 4-cup measuring cup. When juice is blended well, pour it into the strainer, and using the back of a spoon mash the juice and pulp through, leaving the peel and seeds in the strainer. If you prefer a clearer juice, strain it again through a layer or two of cheesecloth.
The interesting thing is that you will get more juice and less pulp from the blender process than when using a traditional juicer. In fact, you may get as much as 50% less pulp.
If your juice needs a bit of sweetening add a small amount of honey or some apple juice. Apple is one of the sweetest fruits, and is perfect for adding natural sugar to your juice mix. Most juices can be kept in the refrigerator for a day or two. When making larger batches, freeze in small containers for later use.
There you have it…simple, fresh, homemade juice.
![]() photo credit: taka_horri
photo credit: taka_horri
A New Generation of Farmers Emerge
In an age when people want to feel more connected to their food than they can at a grocery store a younger group of farmers have emerged. Young people in their 20s and 30s who have chosen farming as a career. Influenced by punk rock bands and a “foodie” culture this new generation of farmer is embracing the connection between what they grow and who ultimately consumes it; bringing back the trust between them.
Garry Stephenson, coordinator of the Small Farms Program at Oregon State University, said he had not seen so much interest among young people in decades. “It’s kind of exciting,” Mr. Stephenson said. “They’re young, they’re energetic and idealistic, and they’re willing to make the sacrifices.”
Though the number of young farmers is increasing, the average age of farmers nationwide continues to creep toward 60, according to the 2007 Census of Agriculture. That census, administered by the Department of Agriculture, found that farmers over 55 own more than half of the country’s farmland.
To read the entire New York Times article click here.
Tales of a Night Table
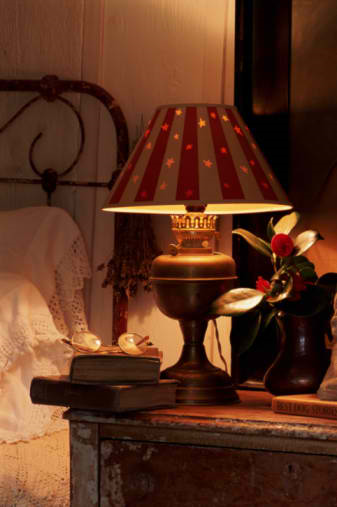
I spent part of this evening cleaning my room. Nothing wildly exciting I know, but after two livestock auctions and three major sheep shows that sent us north five times in 6-weeks my sleeping place was beginning to look like – well – a shambles of laundry, suitcases, half completed quilting projects, shoes, and a pile of tax documents waiting to be organized, and, sadly, cobwebs. The bathroom was much, much worse.
I moved through my room with single minded determination, dusting, putting away, throwing away, organizing. When I reached my night table I stopped for a moment. Looking down at all that I keep close to me at night, it crossed my mind that you can tell a lot about a person and who they are by the contents of their night table.
My night table is not a night table at all, but a four foot long antique drop leaf table. Its top is smooth like tumbled glass from years of polishing; the claw feet are rugged and bold like some kind those of a mid evil cat. The urn shaped lamp glows through a sage green shade that sparkles with green and amber beads hanging from its rim. Its power illuminates my latest read. There’s a small floral notepad for jotting down things to do, items to buy, people to call, story ideas, phrases, quotes and projects that come to mind. A small vintage silver tray lined with a woven cloth napkin I found at a flea market in Vermont holds a warm cup of tea in winter and a cool drink in summer. A small Waterford vase holds seasonal flowers, whose fragrance fills the room. A picture of my daughter and I, taken for my parents 50th anniversary sits in the back reminding me of how far the two of us have come and how lucky we have been in our journeys. The radio is set to NPR, my go to station for morning news and interesting talk shows. Then there’s the pile of books at one end, at least eight, with titles like Goat Song, One Acre and Security, Amazing Rare Things, The Contrary Farmer, along with an array of Thoreau and Emerson thrown in for good measure. There are the magazines on farming, gardening, livestock and homesteading, too.
If a stranger came into my room they could tell at a glance that I am a mom, a gardener, a farmer, a homesteader, a reader who likes to educate herself and be informed, a traveler, an owner of livestock and a walker.
But, most of all it would tell them that I like serenity and tranquil surroundings. I like calm.
Rainy Saturday

I just heard on the radio it’s going to pour all weekend. Usually, this is good news; I am a big fan of rainy Saturday mornings. I get to wake up and face a wet and chilly farm then after all the animals are fed and I’m back inside my little house all is right with the world. I get to relax. I can leisurely cook the breakfast of champions (scrambled eggs with diced ham and cheese), start a fire in the living room, and curl up on the sofa with a dog and a good book or maybe watch a movie or work on my latest quilt project.
It could be a perfect morning, but not this Saturday. This weekend is a sheep show weekend. We leave Friday after Brianne gets out of school and will drive the three hours up the coast to the show grounds. We would never consider skipping a show on account of the weather. We’re not those kinds of people. Weather never gets in our way. We will unload and set up shop in our assigned pens. We’ll wash and groom four unwitting lambs who would rather be anywhere other than in a cement wash rack being doused with cold water, then sheared slick of all their warmth holding fleece. I have to admit it does take its toll, standing around in a cold damp show barn for hours on end.
But, come rain or shine it’s what we do, folks, show sheep, raise chickens, grow our own food, make our own way and deal with what ever Mother Nature throws our way. I’ll hope for the best or at least hope for a warm rain, but we’re ready for the worst; raingear, muck boots, hats and gloves. We’ll play it by ear, but personally I’m gonna take a move out of Gene Kelly’s playbook…
I’m singing in the rain
Just singing in the rain
What a glorious feelin’
I’m happy again
I’m laughing at clouds
So dark up above
The sun’s in my heart
And I’m ready for love
Let the stormy clouds chase
Everyone from the place
Come on with the rain
I’ve a smile on my face
I walk down the lane
With a happy refrain
Just singin’,
Singin’ in the rain
Think warm thoughts for us, folks, and, if you don’t mind have a hot toddy for us – we’ll need it.
![]() photo credit: rustyfrank.com
photo credit: rustyfrank.com
Organizing the Well Stocked Freezer
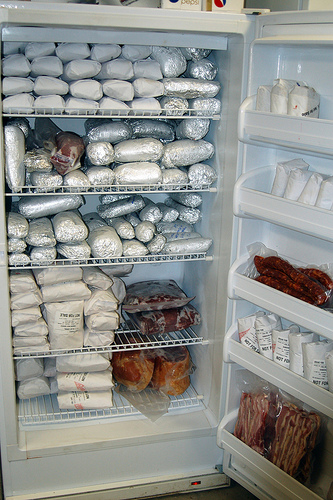
I opened the door to my freezer the other day, to get something out for dinner, and instead of finding what I wanted an avalanche of frozen meat came tumbling out and landed right onto my foot (%#@$), nearly breaking my toes. At that moment, amidst the pain and four-letter words I vowed to get my freezer organized and stay organized so something like this would never happen again.
I normally purchase frozen items when they are on sale and when I have a coupon for them. Meat from the discount bin and butter when it’s on sale at holiday time are big items. But, because they are not “planned for” purchases I usually have not made space for them in the freezer, so things are just shoved in where ever they will fit. Bad idea, as I came to discover.
So, I set out to reorganize my 25 cubic foot upright. But, how?
Easy part first – The Freezer Door: This is the warmest part of the freezer. I use it to store soup base, butter, lemonade concentrate and half-gallon milk jugs filled with water to use in the ice crest or in the rabbit hutch on hot summer days.
When the door was finished I stood there staring at four large shelves and one pull-out drawer crammed full of chicken, lamb, beef, pork and a variety of other frozen staples like flour, rice, spaghetti sauce and pre-made soups. Where to begin? I scratched my head.
I knew I wanted everything “contained”, easy to locate, with older items close to the front so they would be used before newer purchases. After standing there for a few minutes I decided to use the same approach as I had when I organized my garage, plastic lidded bins. Only this time I wouldn’t need the lids. I measured the length and width of the shelves and determined what size bins to buy. One large bin would be too heavy when full, so I decided to buy two smaller bins that could sit side-by-side. I headed off to town and purchased eight 16-quart bins that measured 11”x16”. Perfect!
Fortunately for me the day was cold and I didn’t have to worry about spoiling what was in the freezer as I pulled packages out and sorted them. Shelf by shelf I sorted meat into bins and vegetables, soups, sauces and other items out of the way as I worked my way through the freezer. Now I have an individual bin for chicken, pork and beef. Since we butchered a whole lamb last fall I needed two bins for those packages. The bins also have a slight slant to them and when sitting on the shelf provide a nice little “cave” between them for oddball items or overflow. The bottom drawer is used for miscellaneous items like odd cuts of lamb we feed to the dogs, lamb salami I had made out of our ground lamb, and large roasting chickens that won’t fit in the bins.
The top shelf is stocked with rice, flour, vegetables, fruit, ice cream, pre-made soups and sauces. At a glance I can now see if I need to purchase more of a particular item, helping me take advantage of sales and coupon specials. I can also see what I may have too much of, enticing me to find new recipes in order to use it more quickly.
My organization project also showed me how woefully lax I have been at dating my meat and freezer containers, leaving too much to memory on when it was purchased or made. In the future, I’ll be more diligent about dating and labeling what goes into the freezer so I can use the oldest items first.
All-in-all it was a well used chilly afternoon.
![]() photo credit: Cowgirl Jules
photo credit: Cowgirl Jules
Recent comments
Aenean nonummy hendrerit mauris. Phasellus porta.