Posts Tagged ‘Local Farm’
27- Days to Change the Way We Eat

I once read that it takes 27 days to change a habit, either good or bad. 27-days to stop smoking, start a diet and stick to it, or make exercise part of your daily routine. In 27 days the “new” habit has formed in the brain and becomes second nature, you do it without thinking.
So why am I telling you all this?
Because today is Day One of a 27-day family challenge to eat more locally, buy locally and consume locally. It’s a personal challenge I know, but one I hope many of our readers will champion as well. If we stop and look (or research) what is available in our county I think we would all be surprised at how many of the ingredients needed to make a meal can be found in close proximity to where we live. I have to admit that even I sometimes forget what can be found just a few miles from my home.
The challenge will mean a lot of cooking at home, eating harvested animals, shopping in the pantry (or the garden), at farm stands and Farmer’s Markets, and much more. What it doesn’t mean though is giving up on condiments, spices, tea and staples I already have on hand like flour, sugar, olive oil, rice, beans and pasta. I’ll document our progress, and be honest about the pit falls: added work of making bread on a Tuesday after work, the challenge of gardening with a full-time job and a kid in school and the sabbatical my hens sometimes go on, leaving us with no eggs for days.
It will also mean a few sacrifices (swearing off Dr. Pepper and Mint Chip ice cream for starters, but that’s not necessarily a bad thing.). We’ll be eating within 60 miles of our home (the size of our county) and sometimes 60 feet from our own back door for the next 27 days; and not for the reasons you may be thinking of – supporting the local farm economy, increase in transportation costs of goods, factory farms, high intensity animal feedlots…that kind of thing. Nope, none of that.
We’re doing this for a lot of reasons, but mostly because we want to make a permanent change to the way we think about our food. We want to jumpstart our dedication to growing even more of our own food and buying what we don’t as locally as possible. I want to know how much effort it will take and how much cheaper (or expensive) it is to truly eat where we live. So, for the next several weeks I’ll be writing about all the gory details and shining triumphs, along with some of the recipes I used just to entice all of you to jump on board.
Here are a few of our ground rules:
- Shop at home first (freezer, larder, pantry, garden, barn).
- When needed, shop local farm stands and farmers markets.
- Buy, barter or trade for local meat we don’t raise ourselves.
- Bake from scratch (wheat is a CA crop, but not farmed locally. It comes from 100 miles away, but is milled into flour 50 miles away. Works for me).
- Source relatively local dairy products.
- Cold turkey on candy, chips, sodas, fast foods, etc. (although these are not big items at our home, just the idea of it may kill Brianne).
- Eat three square meals a day, plus snacks.
- Staples, condiments, oils, spices and seasonings already on hand are allowed.
- Drink at least ½ gallon of water a day.
- Walk at least 3 miles day.
Sound like a plan? Stay tuned to see how we faire.
Hand Raised and Homemade

This past week has been a whirlwind of post fair chaos, preparing for our county fair and heading down the road to a first college semester. Needless to say it has a bit overwhelming for two women who value the calm and slowness of their farm life.
But, tonight is different. The laundry is washed and folded and put away. The trailer has been unpacked, restocked and packed up again, waiting patiently for the day it will leave on its next trip. The animals have settled back into their “home” routine. The night is slow. A westerly breeze rolls through the house, sweet and cool, from a distant coast.
After a week eating out of an ice chest or eating at restaurants, putting a crimp in our desire to eat more locally, we are more than ready for a home cooked meal. One that was raised or grown either feet from our back door or a few miles from the farm. Tonight’s menu: lamb chops from a lamb we raised last year, potato salad, made from white new potatoes and accented with celery, onions and pickles; and corn on the cob I picked up from the local farm stand.
The boiling pot of potatoes started earlier in the day, were cooled and transformed into my great grandmothers recipe later in the afternoon. The outcome…creamy tangy goodness that reminded me of my childhood summers. The olive oil, red wine and balsamic vinegar marinade was mixed up while the potato salad melded in the fridge. The chops sunk deep into the rich mixture and stayed submerged until the grill was ready. Read the rest of the story »
Cheese Making Workshop

I just returned home from a cheese making workshop. The venue was a local farm education center that holds classes about gardening and small scale farming, gives tours of the test gardens and of course, presents workshops and seminars on topics interesting to the public.
The presenter for the day was a professor from a university up the coast well known for their farm dairy and cheese making facility. Dairy farmers and cheese makers from all over the state attend their seminars and workshops as part of their continuing education required by industry guidelines.
Following introductions the professor dove into an hour long educational segment on the intricate workings of a cow’s mammary system, the complexities of how milk is actually produced, the rules and regulations governing commercial milk production and the sale of milk products to consumers.
He spoke in scientific terms about the anatomy of the mammary system, the internal pumps that make milk flow and the process that pushed protein into milk. We learned about various diseases that affect commercial dairies and the methods dairy farmers practice to prevent and treat disease. The professor even touched on small farm dairies, their involvement in the industry and, much to my disappointment, the downside of small dairies, those with less than 50 cows, to be viable contributors in the milk market.
To say I was stunned would be mild. Read the rest of the story »
Bountiful Blueberries

Long before berries were touted for their health benefits and cancer fighting antioxidants I wanted my very own berry patch. Aside from melons, berries are my favorite fruit. Whether it be strawberries on pound cake with vanilla ice cream, blackberries or raspberries in fruit smoothies or blueberries hiding in my Saturday morning pancakes, berries are on my top ten list.
When I moved to my little homestead I vowed that I would have a berry patch, bursting with all of my favorites. It’s taken me awhile, but I finally have, what I think, is the perfect berry patch for a household of two. In the backyard I built two 3’x12’ raised beds. These beds hold the blackberries, Logan berries, red raspberries and golden raspberries. But, it’s the front yard that holds the stars of my lust for berries – BLUEBERRIES!!
After reading an article about edible landscapes I decided that the west facing front planter would be the perfect place for a living, edible hedge. So, two years ago I set out to make it happen. I laid the irrigation line, amended the soil with peat moss and well rotted compost. Blueberries like acidic soil that is rich in matter. When it came time to purchase my berry plants I talked to growers from the farmers market and local farm stands trying to get information about the best varieties for our area.
Then one day, while visiting a friend, I found out that one of my former neighbors had planted a 10-acre test plot with the idea of growing blueberries commercially. I gave Andy a call and picked his brain about growing conditions, fertilizing, watering, production, harvesting and, of course, varieties suitable for our area. It was a mini crash course in berry production and it was great. He was so helpful.
With a little more research on the internet to help me, I decided on two different varieties, three plants each. My new blueberry hedge would consist of O’Neal’s and Sharp Blue. They are both highbush type plants, which means they grow more vertically; perfect for my idea of growing an edible hedge. And, they mature different times of the year, so I would have a relatively consistent flow of berry goodness.
After a few phone calls I was able to find a local nursery that carried both varieties. On a beautiful spring day, under a crystal blue sky we drove the 10 miles to pick up our bushes. I had already told the nursery we were coming and what we wanted, but when we arrived we got the surprise of our lives. When the nursery workers went to the field to get our potted berries they found leftovers from previous seasons and brought them up front in case I might be interested. “Interested” I said, boy was I ever. These were not the ordinary spindly first year plants that home gardeners normally get, but 4-year-old plants that had been forgotten about at the back of the nursery. They were almost 3-feet tall and busting out of their pots.
I took the ones that looked the healthiest, loaded them in the truck and headed home feeling smug that we had gotten so much more than we anticipated. Once home, the planting went fast, and within a few hours the berries were nestled snuggly in their new home.
The harvest that first season was light – the results of transplanting and plant shock, which is normal. But, this season the plants were covered with tiny white flowers, a sign of things to come. The O’Neal’s will be harvested in June followed by the later maturing Sharp Blue. We should have enough berries for fresh eating, with plenty to freeze for winter use or for making into jam. No matter what, we will be in blueberry heaven.
If you see a blueberry patch in your future, check out these useful resources.
http://extension.oregonstate.edu/catalog/html/ec/ec1304/
http://www.motherearthnews.com/Real-Food/Growing-Blueberries.aspx
http://www.hgtv.com/landscaping/growing-blueberries/index.html
If you’re not ready to plant your own patch, buy fresh berries at the farmers market and enjoy their burst of flavor all season long. Pick up an extra pint and try this luscious recipe, one of our favorites from the Iroquois Hotel on Mackinac Island.
Blueberry-Lemon Muffins
(makes 18 large or 36 small muffins)
INGREDIENTS
2-2/3 cups all-purpose flour
1 Tbsp baking powder
1-1/2 tsp salt
2 eggs
1 cup milk
2/3 cup cooking oil
1-1/2 cups fresh or frozen blueberries
½ Tbsp lemon zest
GLAZE:
4 Tbsp butter
½ cup sugar
Grease or coat muffin tins. Preheat oven to 400 degrees.
Into a mixing bowl sift flour and other dry ingredients.
Into a small bowl crack and beat eggs with a wire whisk for 10 seconds. Add the milk and oil to eggs and stir to blend. Make a well in the flour and pour in the egg-milk mixture. Stir as little as possible to moisten the flour. Set the batter aside for a moment.
Combine blueberries with lemon zest, and fold the berry mix into the muffin mix. Again stir gently and as little as possible. Spoon batter into muffin tins to ¾-full.
Place muffin tins into oven and set the timer for 20 minutes. It may take an additional 5 minutes to become golden brown. Check at 15 minutes, and if they are browning too quickly, move to the bottom rack of the oven.
While the muffins are baking, melt butter in a small saucepan. Pour the sugar into a small shallow bowl easy for dipping.
When the muffins are finished, cool for 5 minutes. Run a knife around the edges of each. Tilt and gently lift each muffin from the tin.
Dip the top of each muffin lightly in the butter and then in the sugar. The muffins can be held overnight and reheated for eating. They can also be frozen, but fresh is always best.
Say Cheese!
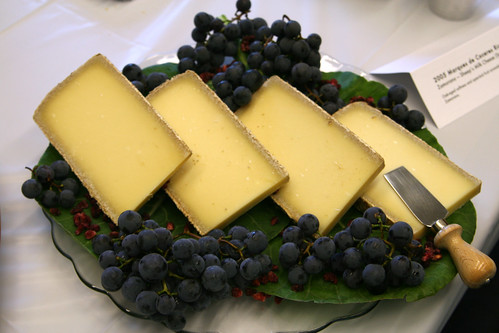
Have you ever walked through a cheese shop and marveled at the intoxicating smells, the creamy textures and robust flavors of all those varieties of cheese? From creamy, spreadable farmstead cheeses to wonderfully sharp cheddar’s to pungent crumbly blues and feta’s? It’s enough to make your taste buds euphoric.
Cheese making may seem like a daunting task. But, if you’ve never tried it, you’ll be amazed at how fast and easy it can be. The only equipment cheese making requires is a stainless steel pot (at least 10-quart), measuring spoons, cheesecloth (not gauze), colander, and a dairy thermometer.
Before you start, you’ll want to learn more about the ingredients used to make cheese and how each one will help you make your own wonderful end product.
The Main Attraction – MILK. Using fresh, whole milk from grass-fed cows or dairy goats will produce the best results. Try purchasing from a local producer or farmers’ market. (to find local producers contact your local Farm Bureau office)
Low-fat milk can also be used, but it will produce less cheese in the end. Store-bought milk will work fine also. Just be sure to avoid any brands marked “ultra-pasteurized” because the pasteurization process damages the milks ability to coagulate. Ultra-pasteurized milk may be able to sit around for many weeks without spoiling, but it can’t be made into cheese.
Get Some Culture. Cheese cultures and starters are bacteria’s, molds and acids that help the coagulation process which develops each cheeses unique flavor. Cultures can be found at natural foods stores or through specialty suppliers like New England Cheesemaking Supply or Leeners.
Rennet. Rennet, which comes in liquid, tablet or powder form, contains enzymes that cause milk solids to separate from the whey and form curds. Traditionally, rennet is made from the stomach lining of an infant ruminant or grazing animal. (The enzymes help the animal digest its mother’s milk.)
Most store-bought cheeses rely on animal-based rennet, but vegetable rennet is also widely available. Vegetable rennet is made from plants, like figs and thistle that have the coagulating properties needed to make cheese.
Salt. Salt is used as a flavor enhancer and preservative. It also draws out excess moisture in the cheese. You can use specialty cheese salt, which is coarser than table salt, or non-iodized salt, but do not use iodized salt because it stops the active starter bacteria.
Clean water. Filtered water is best when making cheese because some municipal water supplies contain additives that compromise milk’s ability to be made into cheese.
Now you’re ready to make cheese!
30-minute Mozzarella
1 gallon milk
1 1⁄2 tsp powdered citric acid dissolved in 1/4 cup cool water
1/4 tsp liquid rennet diluted in 1/4 cup cool water (if using rennet tablets, follow conversion instructions on the package)
1 to 2 tsp cheese salt
Slowly heat the milk to 55 degrees Fahrenheit in a stainless steel pot. While stirring, slowly add the citric acid solution to the milk and mix thoroughly but gently.
Heat the milk to 88 degrees over medium-low heat. The milk will begin to thicken like yogurt.
Gently stir in the diluted rennet for 30 seconds. Then don’t disturb the milk while you let it heat to between 100 and 105 degrees. In about 5 to 8 minutes, the curds should begin to break up and pull away from the sides of the pot. Turn off the heat.
The curds will look like thick yogurt and become a bit shiny, and the whey will be clear. If the whey is still milky white, wait a few more minutes before turning off the heat.
Scoop out the curds with a slotted spoon and put in a bowl. Reserve the whey. Press the curds gently with your hands, squeezing out as much whey as possible.
Heat the reserved whey to 175 degrees. Shape the curds into several small balls, rolling them between your palms. Put them, one at a time, into a ladle, and dip them in the hot whey for several seconds. Then gently fold the cheese over and over (as in kneading bread) with a spoon or your hand. (You’ll want to wear rubber gloves at this point, as the cheese will be extremely hot.) This distributes the heat evenly throughout the cheese, which will not stretch until it is too hot to touch (145 degrees inside the curd).
Repeat this process several times until the curd is smooth and pliable; mix in salt after the second time. When the cheese stretches like taffy, it’s done. If the curds break instead of stretch, they are too cool and need to be reheated.
When the cheese is smooth and shiny, roll it into balls and eat while warm. Although best eaten fresh, it can be stored in the refrigerator for a week or so.
Makes: About 1 pound
Simple Cream Cheese
2 quarts cream or half-and-half, at room temperature (about 72 degrees)
1 packet direct-set mesophilic starter or 4 ounces prepared mesophilic starter
Cheese salt (optional)
Add the starter to the cream, and mix thoroughly. Cover and let sit for 12 hours; a solid curd will form.
Pour the curd into a colander lined with cheesecloth. Tie the cheesecloth into a bag, and hang from a hook until the bag stops dripping, about 12 hours. Changing the bag once or twice can speed up the process.
Place cheese in a bowl and mix in the desired amount of salt. You can leave the cheese in this container, or pack it into molds of any size. You can also add any desired herbs and spices at this stage. Your cream cheese will store in the refrigerator for up to 2 weeks. Makes: About 1 pound
Super Simple Ricotta
Ricotta is traditionally made by recooking the whey from a previous batch of hard cheese, such as Parmesan, but this recipe is a simpler version. Use fresh ricotta in Italian classics like lasagna, or serve with honey and Italian breads.
1 gallon milk
1 tsp citric acid dissolved in 1/4 cup cool water
1 tsp cheese salt (optional)
Add the milk and the citric acid solution to a stainless steel pot. Stirring occasionally to prevent scorching, slowly heat the mixture to between 185 and 195 degrees. As soon as the curds and whey separate (there should be no milky whey, only clear whey), turn off the heat and let sit undisturbed for 10 minutes.
Line a colander with cheesecloth, and ladle the curds into the colander. Mix in the salt with a spoon. Let the cheese drain for 30 to 45 minutes. For firmer cheese, tie the cheesecloth into a bag and hang it from a hook to drain. Serve immediately or refrigerate. Makes: 1 1⁄2 to 2 pounds
Home Cheese Making by Ricki Carroll is a great resource for any new cheesemaker. Ricki has taught thousands of people to make cheese; and to her devotees she is known as “The Cheese Queen.” You can order the special ingredients from her company, New England Cheesemaking Supply or call 413-628-3808. Be sure to check out the site’s step-by-step photographic instructions for making many kinds of cheese.
Goat’s Milk Feta Cheese
Making feta goat milk cheese at great way to use up excess goats milk and can be used in almost any dish that calls for cheese. Its best use, though, is replacing ricotta and cottage cheese.
1 gallon goat milk
½ cup distilled vinegar
Any spices or herbs you would like to add
Pour milk into pot; turn heat on low. While milk is warming, set colander in sink and line with cheesecloth.
Before milk comes to a boil, the surface of the milk will look like it has a “skin,” and the skin will begin to dance. When this happens, turn heat off immediately. Slowly stir in ½ cup of distilled vinegar. This is the acid that will create curds and whey.
Let the milk sit for 1-hour while the curds form and separate from the whey.
After an hour, carefully pour the mixture into the cheesecloth-lined colander. Be very careful because the mixture is hot and will splatter.
Drain the curds to the consistency you desire. For moister cheese, drain for less time; drain longer for a drier cheese. Drier cheese crumbles better on salads.
Next, pour cheese back into the pot and add any herbs or seasonings you like. Horseradish, salt, onion mixes, garlic and chives are traditional favorites. Or, pat into rounds and roll in herbs or seasonings.
Makes: about 1 pound
![]() photo credit: quinn.anya
photo credit: quinn.anya
Recent comments
Aenean nonummy hendrerit mauris. Phasellus porta.