I was heartbroken…
The first time I sat down to calculate the cost of raising my own meat and eggs and realized I could buy them cheaper at the market.
Mass food production has lulled us into a false sense that foods like meat and eggs should be ridiculously cheap; cheaper than they actually are.
I have been raising freezer lambs for most of my life, and you would think that homegrown—anything— would be less expensive than store bought, but it’s NOT true. Not by a long shot.
So, why do I raise my own meat and eggs if it’s more expensive? Good question.
I raise my own meat and eggs more for the quality of the product and knowing how my animals are raised and processed, rather than saving money. It’s also a quality of life decision, too. I just love watching my hens cluck and scratch around the yard, lambs stand on the fence waiting to be fed or rabbits greeting me when I walk in the barn. It makes me happy having critters around!
The overall cost of the end product depends greatly on the feed costs, but even with varying prices, store bought meat and eggs will still be the cheaper option. But, that’s not why we grow our own, is it? I love a thick cut lamb chop with plenty of marbling and a layer of fat to seal in those juices. And, let’s not forget about those bright orange egg yolks that turn into fluffy omelets when the weekend rolls around. There is satisfaction, a sense of accomplishment when you raise your own animals.
But, with all the positives the one negative is the shock of increased prices every time I enter the feed store. Don’t lose heart though, there are plenty of ways to save on livestock feed, AND boost your animals’ nutrition in the process. The following list will give you some good “cost saving” ideas to lower your feed bill without lowering animal nutrition—
15 Ways to Save Money on Livestock Feed
1. Compare prices. Call different feed stores, and feed mills, to get pricing. You’ll be surprised how much they vary. I keep a spreadsheet of sources and prices to track who is consistently lower. But remember—cheaper doesn’t always mean better. Don’t sacrifice your animals’ health by feeding lower quality grains. It’s not worth it!
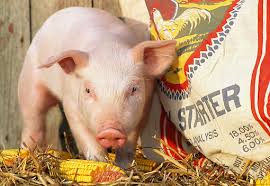
2. Buy in bulk. I buy all of my livestock feed, and a lot of other homestead supplies, in bulk. Why? Because, I can get price breaks when I buy in bulk. I love discounts, don’t you? Many feed stores will give discounts when you buy multiple bags of feed. 10 bags seems to be the magic number in my area. When buying chicken, duck, rabbit or turkey feed I try to place an order with friends who also need feed. I also combine orders of pig food with a friend who raises feeder pigs for the freezer. The more we buy, the more we save. I’m a little more particular about my sheep feed. That was especially true when DD was showing lambs. But, even then I would buy 500 to 1,000 pounds at a time. My one caution: feeds that are ground or cracked can lose nutritional value in a short time, and feeds with molasses can go rancid if they sit too long. It’s best to buy a few months’ supply rather than a year’s supply.
3. Mix your own feed. Buying all the ingredients for a mixed feed may not be the most cost effective approach depending on your situation; it may actually cost you more. But, if you live in close proximity to grain mills that carry the right ingredients it would at least be worth looking into. When I had my large flock of sheep I fed cull lima beans that I purchased from a processor up the coast. The price was pennies per pound, which made the 2 hour drive worthwhile when I was buying 4,000 pounds at a time. Shop around, see what’s out there. You may even find a local farmer or grain processor that has old grains or grains not suitable for human consumption, but perfectly fine for your livestock willing to sell to you some. When I was in college I worked for a grain mill that bought grains for companies like Pillsbury. If the grains didn’t meet the moisture thresholds it was sold primarily to feed lots, but we did have a few smaller cattle ranchers buy from us. It’s worth looking into.
4. Don’t feed free choice. This is especially true for poultry and rabbits. Large livestock are usually fed their rations morning and night. I know filling that 5-pound automatic feeder with lay mash is easy, and there is quite a bit of debate around the topic. But, I like letting my girls chose when to eat and when not to eat. I think it keeps them evenly nourished and not gobbling down feed morning and night because they don’t know when they’ll eat again. When is regulating feed a good idea, especially for poultry and rabbits? When your animals free-range and have access to other foods. Have you noticed that your hens eat less when they roam? Another reason to control their feed is if you have a rodent problem. A trough full of feed is like an open invitation to a gourmet buffet to mice, rats and birds.
5. Free range your poultry and fowl as much as possible. Not a good idea with large livestock, though. I’m having visions of sheep on the road or crashing through the laundry line…not a good picture. Not everyone is able to free range, but those that can should. The variety of “goodies” adds important nutrients to their diet, plus helps keep the bug population at bay. Ranging also keeps your girls from getting bored, and it’s just plain delightful watching them scratch and peck around the farm.
6. Bring the yard to the coop or hutch. If your flock or herd can’t roam, or you have to confine them for some reason, bring overripe fruit, spent veggies, weeds and plant trimmings to the coop or hutch. A few years ago I had a problem with coyotes, even during the day, so my girls were confined to the coop and their fenced in run. Have you ever been scolded by an unhappy hen? Not pleasant I can tell you. Over time they came to enjoy having green stuff tossed in the coop. Rabbits, too, will enjoy fresh greens from the garden. They are natural browsers that like variety in their diet. Even sheep, goats and pigs can handle a bit of garden waste. Everyone will definitely appreciate all the fresh greens.
7. Get chaff from the feed store. Every bale of hay will lose a bit of chaff from being moved, creating a carpet of green around those giant stacks at the feed store. Ask if you can pick up a bucket or two, your animals will love you for it. If they are agreeable, move try filling a larger container.
8. Get scrap produce from local markets. It’s getting harder and harder to get stores to “give away” scrap produce, but it’s still worth asking. Trimmings, bruised fruit and overripe produce that can’t be sold are perfect treats for livestock. Bananas are a favorite of rabbits; chickens will love squishy tomatoes, and large livestock will go nuts for leafy greens. I’d stay away from any bakery items, though. They are heavily processed and contain preservatives and additives that we homesteaders are trying to keep out of our food sources, that goes for our eggs and meat, as well.
9. Grow your own. Even the smallest suburban homestead can grow a small patch of greens, cover crops or sunflowers dedicated just for supplemental livestock feed.
10. Create a fodder growing system. For a few dollars and a little bit of space you can start growing nutrient-dense feeds that your livestock will love. Sprouting grains like oats, barley and rye are perfect to start with because all livestock can eat them.
11. Raise meal-worms. I know what you’re thinking…totally gross, right? I’ve seen and done a lot in my life, but even I’m not up to growing squiggly little worm like things. Just the thought of it makes me shudder! BUT—they are protein packed and a fabulous low-cost way to supplement your chicken, duck and geese feed. Don’t try feeding it to other livestock, though. I’m not sure it would be a big hit.
12. Use leftover dairy products or whey from cheese making. Dairy is filled with protein. From leftover yoghurt and cheese to whey, your chickens and pigs will love it. Start them off with small amounts until they get used to it. For pigs, just pour it over the top of their grain. The moisture will help to hydrate them.
13. Feed kitchen scraps. Everyone can do this. I keep a small stainless steel bucket next to the sink and plop in veggie trimmings and leftover bread and melon rinds. As soon as I walk out the back door the ruckus begins. If my girls are out roaming they will come-a-runnin’ wanting their evening treat. Now, they go crazy anytime I have a bucket in my hand.
14. Market your eggs. Selling extra eggs may be be a way to save on feed, but is a great way to cover some of your feed costs, and have your hens pay for themselves. Plus, you’ll never be short on people looking for farm fresh eggs!
15. Cull non-productive hens and does. This may seem like a no-brainer, but many people keep small livestock just for the enjoyment of it, and that’s great. But, if your goal is to reduce feed costs, it may be time to cull those animals that are not productive. The next logical homestead step would be to butcher culled hens and make homemade broth and canned chicken for casseroles or pot pies. I know this may horrify some, but isn’t that what great-grandma would have done?

Independence Day is just around the corner, and like me, I’m sure you are looking for a full-proof recipe that will keep you in on the celebrations and OUT of the kitchen. Am I right?
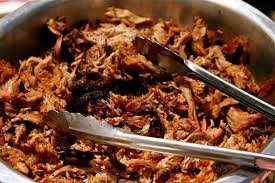
My “go to” favorite recipe is slow, simmering pulled pork in the Crock-Pot. It’s a full proof recipe that can’t be messed up.
I’m serious, you can’t mess this one up. I dare you to try!
It’s also a recipe you’ll love because you can take advantage of all the great sales on pork shoulder roasts during the summer month, or clean out the freezer while waiting for the coming fall harvest.
The other reason I love pulled pork is its versatility. Check it out…there is Carolina pulled pork with its vinegary based sauce, or the spicy Louisiana version. But, my all-time favorite is a Texas style chock full of thick gooey sauce.
This recipe is simple and economical. It can take a tough cut of meat and turn it into something your family and guests will go crazy over. Plus, using a Crock Pot gives you plenty of time to enjoy the long hectic summer months, what a bonus!
And, remember, you can’t mess this up.
Cooked more than the recommended time…no problem.
Cook it days ahead of a party…no problem.
Cook it and freeze for a great winter time treat…no problem.
Change the seasonings to fit your family’s taste…absolutely no problem.
I wasn’t kidding about being versatile.
Even if you want to toss a frozen hunk of meat into the Crock Pot, it’s no problem.
I can’t rave enough about adding this recipe to your farmhouse arsenal of full proof, quick and easy recipes.
Slow Cooker Pulled Pork Recipe
‘
- 1-1/2 cups ketchup
- 1/2 cup brown sugar
- 1/2 cup broth, beef or chicken
- 3 tablespoons Worcestershire sauce
- 4 cloves garlic, crushed
- 1 onion, diced small
- 2 tablespoons browning sauce
Lay onions on the bottom of pot and place pork roast on top.
Mix all other ingredients and pour over roast.
Cook on low for 8-12 hours, or until the meat is falling off the bone. (Sometimes I cook the pulled pork through the night so it’s ready by morning.)
Remove meat from the slow cooker and cool on a cutting board until you can handle it without getting burned. This is where things get to be “hands-on”.
Pull the meat from the bone and separate the fat. Use two forks, pulling in opposite directions, to shred the meat. NOTE: I have read that some use the paddle attachment on their Kitchen Aid mixer to make this part go faster, but I prefer the fork method because the clean-up is easier.
Drain off the fat from the liquid and put the meat back into the slow cooker. Turn on low and let the meat simmer and absorb more of the sauce until it’s ready to serve. After all, it’s all about the sauce…right?
Now you’re ready to pile up those buns!
Want a few more ideas for your pulled pork?
· Use your own favorite BBQ sauce.
· Cook the pork shoulder ahead of the gathering then reheat in the slow cooker until it’s warmed through.
· Cook up a batch of pulled pork and portion it into freezer containers for quick summer meals.
· Pulled pork is the ultimate when piled on a bun and topped with your favorite coleslaw, but if you have family or friends, like me, who are gluten intolerant, skip the bun, it’s great just by itself.
· Try something new by dotting your bun with yellow mustard and lying on a nice thick pickle. Cool, crisp, sweet, tart. Your mouth won’t know what to do.
· Looking for a pulled pork recipe that’s versatile enough to use in many different dishes? Check out this simple take on an American classic and use it in dishes from salads to nachos; homemade pizzas to southwestern tacos. The possibilities are as endless as the days of summer.
Simple Pulled Pork Recipe
· 1 pork shoulder
· 1 onion, diced
· 1 cup broth (chicken, beef or vegetable)
· 2 teaspoon granulated garlic
· 1 teaspoon dry mustard
· 1 teaspoon salt
· ½ teaspoon black pepper
Like any good homesteader I am frugal beyond belief, always looking for ways to cut costs, reuse and repurpose. As the cost of chicken feed and supplements continue to go up I began looking for ways to offset that expense.
Of course, kitchen scrapes, spent veggies from the garden and free ranging for bugs and treats are still the main stays in supplementing feed, but what about other supplements, particularly calcium?
Hens need an ample supply of calcium for good health, and because without it their shells are thin and fragile, sometimes breaking when you collect or store eggs.
What I didn’t realize, before my research, was the wide and varying opinions of where to get calcium for your hens. Some people think only commercially available calcium in the form of oyster shells or limestone from a feed store should be used, but those can be pricey. My frugal farm girl brain wanted something cheaper and more sustainable. I didn’t have far to look for a solution as it turned out. In fact, I didn’t have to look any farther than my chicken coop.
What?? Where did you find calcium in your chicken coop, you ask?
Right inside of each nest box, that’s where!
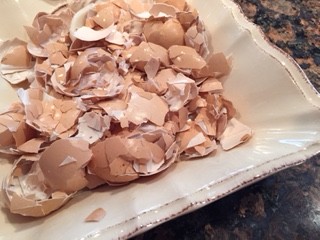
Yep, you got it. Egg shells are high, really high, in calcium and make the perfect renewable source of a supplement your hens need for good health and firm egg shells.
In reality, farmers and homesteaders were feeding egg shells back to their flocks hundreds of years before commercial products ever hit the market.
Many commercial lay rations contain a suitable amount of calcium, but why not let your girls have a free choice of extra calcium whenever they want it? It just makes good sense to feed your hard working girls a little bit extra.
BUT—how do you feed egg shells so they don’t make my hens sick?
Logical question.
Here are a few tips on how I clean and reuse my egg shells.
- Each time I use eggs I rinse and store them in container. As it becomes full I just smash down the shells to make room for more.
- When my container is full, I spread the crushed shells on a cookie sheet and bake in the oven at 350 for about 10-12 minutes. This will make the shells brittle, dry out the inner membrane and kill any bacteria. (I’m not so worried about bacteria when using my own eggs; the hens are use to their own germs. But, store bought eggs will have bacterial strains that your hens are not use to, and that could cause illness.)
- Once the shells have cooled a bit, crush away. You can use a potato masher, put them in a plastic bag and roll with a rolling pin, or just smash them with a wooden spoon, which is how I do it. Some people use a blender or a food processor to get a finer texture, but I’m too lazy to drag those appliances out of the cabinet.
- The goal is to smash the shells small enough that they are unrecognizable to the hens.
- To feed them either mix with their normal rations or offer them “free-choice” in a separate feeder. I use a large rabbit feeder and feed them separately. The hens are perfectly capable of deciding when they need a calcium boost and how much.
I know what you’re thinking.
Won’t feeding eggshells entice my hens to eat eggs?
It might, but not very likely. I’ve never had a problem. In fact, I’ve had more egg eaters when I didn’t feed egg shells, probably because the girls were craving calcium and the eggs were the closest source. But, every flock is different. There’s always one rouge hen that goes crazy and pecks at anything and everything. Once she gets a taste of egg she may become an egg eater, but that’s a whole different problem that I wrote about in “Hens Eating Their Eggs? There is a Reason”.
There you have it…a free source of renewable, calcium rich supplement that will keep your girls happy and you in eggs that you won’t poke a finger through. What more could a farm girl ask for?
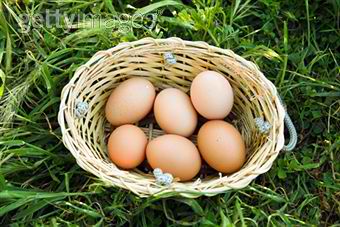
There’s just something about having fresh eggs on a kitchen counter that I love. It speaks to my inner farm girl. It shows me how productive my little farm is, and it reminds me to use eggs often (not that using eggs is a problem around here).
But, when friends and family visit they always ask me, “shouldn’t your eggs be in the fridge”?
The answer to that question is, yes. And, no.
For centuries eggs sat on a counter or table in the kitchen because there was no refrigeration. Just look at any period movie that portrays life in the 1700’s, 1800’s, even the early 1900’s, and I bet if you look closely at the kitchen scenes you’ll see eggs out in the open.
Today’s consumer is so afraid of food and how it can be stored that they think every little bit sitting out is a recipe for food poisoning.
Believe it or not there are several reasons I keep eggs on the counter. For one, when egg laying season hits full force, and I am overwhelmed with eggs, there just isn’t enough room in the fridge to store them all. Second, my favorite baking recipes call for room temperature eggs, and I like having them at the ready instead of delaying while eggs come to room temp. And, thirdly, eggs don’t have to be refrigerated to keep from spoiling.
WHAT???
You heard me right. Eggs DON’T need to be refrigerated, at least not in the short term. I’ll explain when they should in a bit.
So—why don’t eggs have to be refrigerated, you ask?
One simple, yet little know reason.
Hens lay eggs surrounded with a thin, invisible, film called the cuticle or “bloom”. This cuticle film seals the egg, helping to prevent bacteria from entering tiny pores in the shell. The cuticle also helps to prevent the loss of moisture as eggs age. We already knew how wonderful chickens are, but how cool is that? Mother Nature has equipped our hens with a self-sealing mechanism that has enabled eggs to safely stay unrefridgerated for centuries.
BUT—and there’s usually a but, isn’t there? This does not apply to all eggs.
Commercially produced eggs must be washed before they are sold to the public to meet USDA requirements. Washing removes the thin film making eggs more susceptible to contamination. Without the protective cuticle film, eggs must be refrigerated or else they will spoil.
For the home egg producer, however, the question now becomes, to wash or not to wash?
Personally, I don’t wash my eggs and never have, until I am ready to use them. For decades, I have left duck, goose and chicken eggs on the counter to be easily used throughout the week. There is one exception though. If I get an extremely dirty or poopy egg it is washed right away and put in the fridge. Who wants THAT stuff hanging around your kitchen workspace? Also, if I get more eggs than I can use in a week or so they go into the fridge unwashed. Eggs can be stored out of the fridge for about a week and a half. If you don’t think you’ll be using them in that time pop um into the fridge.
So—how do I store eggs on the counter? That’s the fun part.
As I said before, I love having eggs on the counter, those subtle hues of green, blue, tan and almost pink make such an inviting picture. But, what I love even more are eggs in a pretty container. Sometimes I just leave them in my vintage wire collection basket, while other times they are neatly arranged in a colorful ceramic bowl or in a vintage egg crate. I love switching up my containers to create a new look.
For longer term storage, the fridge is still your best bet. But, for everyday use let your imagination run wild and create your own farm girl vignette. You’ll enjoy the view.
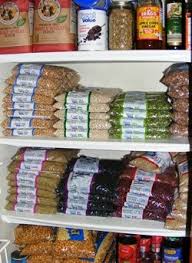
A few posts back I wrote about how a well-stocked pantry can save you money and time, while adding to your homestead’s ability to weather situations that may prevent you from getting to town for supplies. You can read “Creating a Well-Stocked Homestead Pantry”, here.
It’s one thing to have a stocked pantry. It’s quite another to “start” creating and paying for a well-stocked pantry. My larger pantry happened over time, but the smaller “starter” pantry took just a few weeks. For many, building a pantry in a few weeks is thought of as an expensive proposition. But it doesn’t have to be. The tips below will help you get started on building a pantry for only a few dollars each week.
Want to build a homestead pantry on a few dollars a week? Here’s how.
Pick a day of the week to be your starter day, like Monday. Beginning on Monday, and every day after that, put away $2.00. Put it in a jar. Put it in an envelope. Put it in a drawer. Just, put it away.
At the end of seven days, take your $14.00 a go shopping for the staple items that will make up the base of your pantry. You’re only going to spend $14.00. Any change remaining after your purchases will be put back into your collection to use the following week.
Remember…these categories are based on those in “Creating a Well-Stocked Homestead Pantry”. You can reread it here to refresh your memory.
A little note: There is no right or wrong way to supply your pantry. In my sample I tried to cover several categories of what I felt were the most important and would be used more often. You could easily concentrate on just one area until it is filled, or create your own. You know your family and what they will eat better than anyone. If you have to, make your own list.
WEEK 1: Starting Amount – $14.00
- All-purpose white flour (10 lbs.) – $5.12 – Wal-Mart
- Sugar (10 lbs.) – $5.74 – Wal-Mart
- Table Salt (4 lbs.) – $2.77 – Wal-Mart
- Amount Remaining: .37
WEEK 2: Starting Amount – $14.37
- Old-Fashioned Oatmeal (5 lbs.) – $3.95 – Smart & Final bulk section
- White Rice (20 lbs.) – $8.92 – Wal-Mart
- Sea Salt (1 lb.) – $1.00 – Big Lots
- Amount Remaining: .50
WEEK 3: Starting Amount – $14.50
- Pearled Barley (5 lbs.) – $3.95 – Smart & Final
- Spaghetti Noodles (4 lbs.) – $3.59 – Smart & Final
- Egg Noodles (2.5 lbs.) – $6.39 – Smart & Final
- Amount Remaining: .57
WEEK 4: Starting Amount — $14.57
- Dried Great Northern Beans (5 lbs.) – $7.99 – Smart & Final
- Corn Meal (5 lbs.) – $3.99 – Smart & Final
- Baking Powder (12 oz.) – $1.89 – Smart & Final
- Amount Remaining: .70
WEEK 5: Starting Amount – $14.70
- Split Peas (5 lbs.) – $4.29 – Smart & Final
- Flour Whole Wheat – (5 lbs.) – $4.59 – Smart & Final
- Yeast (2 lbs.) – $4.79 – Smart & Final
- Baking Soda (1 lb.) – .89 – Smart & Final
- Amount Remaining: .14
WEEK 6: Starting Amount – $14.14
- Brown Rice (5 lbs.) – $4.29 – Smart & Final
- Tube Pasta (4 lbs.) – $4.00 – Smart & Final
- White Vinegar (1 gal.) – $2.04 – Wal-Mart
- Cider Vinegar (1 gal.) – $3.79 – Wal-Mart
- Amount Remaining: .02
WEEK 7: Starting Amount – $14.02
- Bread Flour (10 lbs.) – $7.29 – Smart & Final
- Dried Pinto Beans (10 lbs.) – $5.99 – Smart & Final
- Amount Remaining: .74
WEEK 8: Starting Amount – $14.74
- Olive Oil (1 qt.) – $7.99 – Smart & Final
- Arborio Rice (2 lbs.) – $3.99 – Smart & Final
- Fine Salt (1 lb.) – $1.00 – Big Lots
- Coarse Salt (1 lb.) $1.00 – Big Lots
- Amount Remaining: .76
WEEK 9: Starting Amount: $14.76
- Butter (3 lbs.) – $7.79 – Costco
- Brown Sugar (4 lbs.) – $4.00 – Smart & Final
- Macaroni (2 lbs.) – $1.98 – Smart & Final
- Amount Remaining: .99
WEEK 10: Starting Amount: $14.99
- Vegetable Shortening (3 lbs.) – $4.39 – Wal-Mart
- Walnuts, halves (1/2 lb.) – $4.25 – Smart & Final
- Almonds, slivered or sliced (1/2 lb.) – $3.29 – Smart & Final
- Sunflower Seeds, shelled (1 lb.) – $1.50 – Big Lots
- Cornstarch (16 oz.) – $1.49 – Wal-Mart
- Amount Remaining: .07
In just a few short weeks you’ll be well on your way to stocking a full pantry. If you don’t want to spend 10-weeks gathering up your supplies, save a bit more each week, or save for a longer period of time then go shopping all at once. Be sure to take advantage of sales and coupons to make your hard earned money go even farther.
At the end, you’ll experience the luxury of walking to the pantry and pulling out what you need to make a meal. No more last minute runs to the grocery store. No more frantic trips ahead of winter storms only to find store shelves empty. Now, you can sail right through whatever life, and Mother Nature throws your way.
Zucchini’s can be very plentiful in the garden. In fact, most home gardeners harvest way more than they can consume. One particularly ambitious year found us planting six, yes six, zucchini plants for a family of two.
Talk about a green flood. After a while I couldn’t even give them away. The chickens had a field day, though.
I thought I knew every possible way to cook or prepare zucchini, but I was wrong. I recently came across a recipe that is so easy and so delicious that it has become our “go to” way of cooking the little green gems…no matter how many we have.
Zucks taste best when they are harvested at about 6-8” long and no more than 1-1/2-inches in diameter.
You’re on your own with the monster-sized zucchini’s that hide until they become so big no one knows what to do with them.
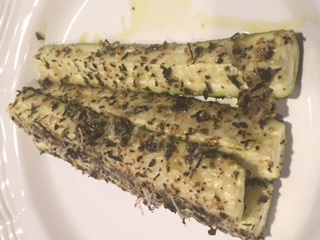
This oven baked recipe is not only healthy and addictive; it also makes for a crispy and tender zucchini stick.
Oven Baked Parmesan Zucchini Sticks
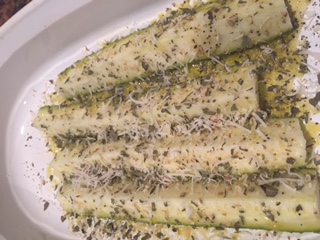
INGREDIENTS:
- 4 zucchini, ends removed, cut lengthwise into quarters
- ½ cup grated parmesan cheese
- ¼ teaspoon garlic granules
- 1 tablespoon Herbs de Provence or Italian herbs
- Kosher salt and ground pepper to taste
- 2 tablespoons olive oil
- 2 tablespoons fresh chopped parsley
DIRECTIONS:
- Preheat oven to 350 degrees. Lightly spray a cooling rack with oil and set on top of a baking sheet.
- In a small bowl, combine parmesan cheese, garlic, herbs and salt and pepper, to taste.
- Place zucchini spears on the cooling rack and drizzle with olive oil. Use your hands to completely coat each spear, and then sprinkle with herb mixture.
- Place baking sheet into oven and bake until tender, about 15 minutes. The turn on broiler and broil for a few minutes until cheese mixture turns golden brown. Watch to make sure the spears don’t burn.
- Plate up, sprinkle with parsley and serve while still warm.
There’s just something about cooking in cast iron that transports me back to days of old.
I’m not sure what it is…the weight, the sizzle, the smell, the feel in my hand. Whatever it is, it makes me feel a bit more comfortable in the kitchen.
I remember my mom cooked in a cast iron skillet, a big, black, deep skillet that turn humble ingredients into warm and filling meals. There were hearty beef stews, thick pork chops and dad’s Sunday fried chicken. Meals just seemed better from that skillet, tasted better.
Over the years I have used many cast iron skillets and pans. Some came from yard sales, some from thrift stores and some were given to me. And, although they were all different they had one thing in common.
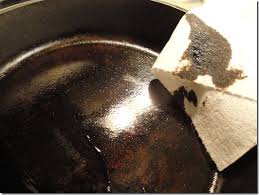
They all needed to be seasoned.
Seasoning cast iron means to slowly bake on thin layers of oil to protect the cast iron from rusting and create a non-stick cooking surface. Every time you cook with oil you are actually re-seasoning your pan.
Whether you have a new cast iron piece or one that has been loved for years, seasoning it will protect it so you can continue making memorable family meals.
To season a cast iron pan in good shape…
- Wipe it clean with paper towels or a cotton rag, reserved just for cleaning your cast iron. If there are crusty bits stuck on, gently scour the pan with a bit of coarse kosher salt, but NO SOAP. Cast iron is porous and the soap can get into the pores. AND NEVER, EVER PUT CAST IRON IN THE DISHWASHER.
- Once the pan is clean, wipe or brush a thin layer of oil all over the pan, including the outside and the bottom. Thin is best because your next step is to wipe the oil off. It may not look like there is any oil on, but actually it has sunk down into the pores, which is what you want. Any cooking oil is fair game as long as it has smoke point higher than 350 degrees. Oils like canola, olive, vegetable or coconut will do. Even rendered Crisco or lard can be used, as long as it’s clean.
- Now, take your paper towels or rag and wipe off the oil until you think there isn’t anything left.
- Place your pan in a pre-heated 200-250 degree oven for 15 minutes.
- Remove from the oven and let cool completely before storing it.
If you have serious crusty bits or rust on your pan, use a well-worn and well-oiled piece of steel wool to scour off the gunk, then…
- Wipe it down – using paper towels or a cotton rag.
- Oil it up – using any common cooking oil, as mentioned above.
- Bake it on – in a preheated 350 degree oven for one hour. Place the pan upside down on the oven rack with a piece of heavy duty aluminum foil underneath to catch any oil drips. When the hour is up turn the oven off and let the pan cool down inside.
Once it’s cool, you’re ready to start cooking.
Hints & Tips:
- Never put cast iron in the dishwasher.
- Never use soap to clean cast iron.
- Never put cold water into a hot cast iron pan. IT WILL CRACK!
- Season after every use to keep cast iron in good shape.
- Learn to cook with cast iron like ya mean it.
Years ago, we were looking for a new church to attend, friends invited us to there’s on a Sunday in summer because they were having a pot luck after the services. Our friends thought it would be a good chance to meet a lot of the congregation.
The spread was huge with lots of homemade dishes, but the one that caught my eye, and my taste buds, was bean casserole the pastor’s wife had made. She called it an Alpine Bean Casserole, which confused me, mainly because there’s nothing “alpine” about beans. Beans don’t grow in alpine conditions and most alpine countries don’t eat a lot of beans. But after I tasted them I didn’t care what she called them, they were wonderful!
Over the year’s this has been my “go to” recipe for any event from beach parties to livestock shows. In fact, I get so many requests for this dish that I wonder if people know I can cook other dishes with as much success. In the words of my dear friend Judy, “we don’t care what else you can cook, just bring the beans”. Well—if you’re going to be known for something I guess your cooking isn’t all that bad.
I’m sure once you try them, you too will agree, they’re pretty darn good. Enjoy!
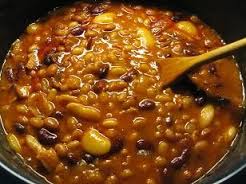
Alpine Bean Casserole
INGREDIENTS:
8 slices bacon, chopped and slightly cooked, but not crispy
4 onions, quartered and sliced thin
1 cup brown sugar
2 Tbsp. dry mustard (can use yellow mustard in a pinch)
½ cup vinegar (white or cider)
14 oz. ketchup
1 14-15 ounce can of each (Do not drain)
Lima beans
Butter beans
Kidney Beans
Garbanzo beans
1 28 ounce can of beans in molasses, like S&W or Bushes. (DO NOT USE beans in tomato sauce, like pork & beans)
DIRECTIONS:
Put all ingredients in a large Dutch oven, stir to combine. Bake at 300 degrees until bubbly and thick, approximately 2-3 hours. Stir occasionally. The longer it cooks the thicker it will become.
You can also use a slow cooker set on low for 8-10 hours or overnight.
NOTES: This is one of those large crowd recipes that always get rave reviews, perfect for potlucks, picnics or BBQ’s. It’s also a recipe that is hard to mess up. I have made it without cooking the bacon, used yellow mustard instead of dry, all kinds of vinegar (except Balsamic) and even added browned ground beef, and it turns out great every time.
There’s nothing I like better than getting something for free, especially if it’s something I need or really want.
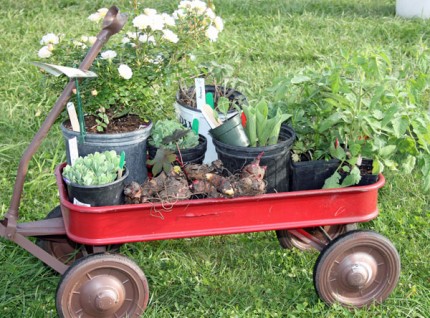
As a suburban homesteader my world revolves around making the most of my little plot of land and that means green things growing; lots and lots of green things. From flowers and shrubs to trees and vegetables I use a variety of ways to get “free” plants to fill out my little farm.
If you need to fill in a garden space or start a brand new garden try these ideas to get you going, while saving a ton of money.
Earth Day – Many Earth Day celebrations give away plants and sometimes soil. Over the years I have gotten shrubs and trees for free, along with a bag of soil or a truck load of compost through City programs. And that’s not all I get. Our Earth Day features several community garden and garden club booths, many of which “give away” plant starts or started vegetables for free or for a small donation.
Local Garden Clubs & Community Gardens – Over the years I have become part of our local garden club and community garden efforts. Through these associations I have been able to get seeds, cutting, plants, divisions of bulbs and irises, and so on. Many of the community garden folks start way more seeds than they have space to plant, so they offer them up at monthly meetings.
Neighbors – Spring is prime landscaping (or, re-landscaping) time. Keep an eye out for neighbors re-doing their yard and ask if you can have some of what they are pulling out. If left up to the landscaper or homeowner, most of those plants will end up in a landfill. Better to have them adorn your yard.
Divide & Conquer – If you already have plants in your yard, see what can be divided, like bulbs or rhizomes. Or, check with friends and offer to help divide some of their plants for a few to take home. More times than not, you’ll end up with a lot more than you can use. Now you can share.
Forage for Seeds & Cuttings – Keep a watchful eye when running errands or traveling locally. Many times you’ll find seed heads ready to burst or plants that grow well from cuttings. It doesn’t have to be so local either. While traveling up north I stopped at a little market to refresh my drink and saw the most gorgeous hollyhocks coming to seed. I asked the cashier if I could have a few seed heads. After looking at me like I was nuts, she said yes. I quickly broke off a few of the dried pods loaded with seeds and wrapped them in a napkin. They became the beginning of a wonderful garden near my greenhouse.
Craigslist – The free section on craigslist is a great place to find free plants. Sometimes the ad requires that you dig up the plant, but most of the time they don’t. Even if you have to pay a few bucks it’s worth keeping track of. When my sister wanted to plant an iris garden she haunted craigslist for weeks before finding a gal who was pulling out her iris bed. Sis got 2 paper grocery bags full of irises for $5.00. When she got ready to plant she realized there were more than 100 rhizomes. Not a bad deal, even if it wasn’t free.
Trade – Gardeners love to share! If you have established plants and would like to add variety to your garden, try trading with other gardeners who have something you want.
Nursery Cast Offs – Not all plants at a nursery or garden center are sold. Some get over grown in their pots, while others get shaded out or covered up by other plants and don’t get enough sun or water. They look too shabby to sell, so they are tossed aside as “not sellable”. Some nurseries or centers, especially locally owned one’s, will gladly give away these sad little cast offs. Think of it as a rescue for plants.
Seed Banks – Some local libraries have begun offering “seed banks”, a place where local gardeners can drop off seeds from their own harvests, and pick up seeds from someone else’s garden. The best part is…no late fees, because the seeds don’t have to be returned. The library just asks that you share what you can.
ASK – This one seems so simple, but in real life it is the least used way of getting free plants. Every time I have admired a plant in someone’s yard and asked for seeds, cuttings, divisions, etc. I have always been told yes. There’s something so gratifying about having one’s yard admired that they just can’t say no.
County Extension Office – Many counties have Cooperative Extension Offices, which are the educational arm of government programs revolving around gardening, farming, and home economic subjects. Sometimes the offices offer free seeds as a way to encourage home gardening and food production. If you don’t find seeds, all is not lost because they have a wealth of information on many interesting topics from beekeeping to livestock production to food preservation, even hunting safety and archery.
Be a Seed Company Volunteer – When seed companies change their displays the company rep often times uses local volunteers to inventory and restock the display rack. As a thank you for helping, the rep usually gives the volunteers a selection of seed packets to show appreciation. For a few hours of my time last year I walked away with dozens of seed packets, and a few new gardening friends, too.
There’s nothing better than herbs fresh picked from the garden and used in a favorite recipe.
I have herbs inter planted with my flower beds and some in the garden to help ward off bugs. And, then there’s my livestock water trough planter that sits on my patio. That one is handy to the kitchen door and is my “go to” herb garden when I get ready to fix a meal.
The warmer months are prime herb growing season, but what is a cook to do during the dark, cold days of winter? How do you get that “just picked” flavor in the dead of winter?
First off…you start long before the cold weather begins. You start with your seed selection and planting of the herb garden, taking into consideration what herbs you use the most and which ones are well suited to being preserved.
There are several ways to preserve herbs; there’s air drying, dehydrating, making herbed vinegars, oils, butter, salt, pesto’s and even herbed sugar, given the right kind of herb.
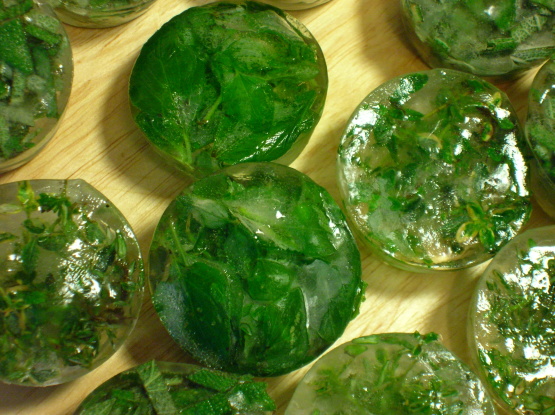
But, the one I like best for preserving that “just out of the garden” flavor is freezing, herb ice cubes as we call them. They are easy, fast and bring life to ever dish we make all winter long.
Follow these easy steps and you’ll be enjoying the taste of fresh herbs no matter what the weather is outside.
STEP ONE: Choose full bodied, blemish free herbs. Pick herbs just before or at the beginning of their flowering cycle. This is the time when the herb oils are at their peak.
STEP TWO: Wash herbs gently and pat dry, or let air dry.
STEP THREE: This is where you have a few choices. You can either freeze herbs in water or oil. Also, decide what size herb cubes you want; regular ice cube tray size or larger cubes using a muffin tin. The ice cube tray will give you about 2-tablespoons of herbs per cube, while the muffin tin will give you about 1/3-cup. (I like the muffin tin size because it gives me enough herbs for several dishes, when defrosted).
STEP FOUR: Mince your herb, either by hand or in a food processor. Be sure to keep the herbs separate if you’re freezing more than one at a time.
STEP FIVE: Pack minced herb into an ice cube tray, about 3/4 full. (I find it easier to have one ice cube tray for each herb, or use each side of the try for one herb. That way they don’t get mixed up).
STEP SIX: Fill each cube, or muffin tin, with boiling water. This will blanch the herbs, helping them to retain their fresh flavor and natural color. OR, you can fill each cube with neutral oil, like vegetable or canola.
STEP SEVEN: Pop the trays, or tins, into the freezer, making sure they are level, so they don’t spill. Once they are frozen solid take cubes out of the tray, or tin, and store in freezer bags or freezer containers.
To use herb ice cubes, take what you need out of the freezer and drop them into your pot. It’s that simple!
Recent comments
Aenean nonummy hendrerit mauris. Phasellus porta.