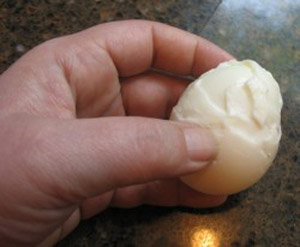
Tricks to Peeling Fresh Hard Boiled Eggs

With all kinds of people raising their own chickens these days and more people buying fresh eggs at local farmers markets you knew there had to be a downside to this picture perfect farm product, didn’t ya?
Well, there is.
And, I was reminded of it this afternoon when I went to make myself lunch – fresh, homemade egg salad. Sometimes it seems nearly impossible to peel a fresh egg so that it looks good enough to use for anything other than what requires chopped eggs.
As you can see from the photograph above–they turn out looking like craggy moonscapes or postmarked, unsightly and just plain old ugly.
Standing there looking out the kitchen window trying in vain to peel the eggs I needed for my lunch, I chuckled to myself, remembering the battles my dad had using fresh eggs for his much-loved deviled eggs. It also reminded me of dad’s solution:
When he planned to make a dish that required pristine perfect hardboiled eggs, like for deviled eggs, he would set aside the number of eggs he needed a week or so in advance. Older eggs peel more easily, mainly because the air pocket inside the egg grows larger. As eggs age, the membrane of the egg doesn’t cling as tightly, allowing nimble-fingers to peel up a well-crackled shell by picking at a bit of membrane and zipping everything off in two or three swipes.
But, if dad was in a hurry, or just couldn’t wait to make deviled eggs, forcing him to use fresh eggs, it was hard to make them look as pristine as the older ones, and so, although they tasted great they never looked anything like ones made with older eggs.
If you can’t wait to use your homegrown eggs either try these tips for peeling fresh eggs. But remember – no matter how careful you are, fresh eggs are hard to peel and may not come out perfect every time.
Set eggs out so they come to room temperature; place in a pot and fill with water so you have at least 2-inches of water covering the eggs. Place on stove over medium-high heat until water comes to a full boil. Take pan off stove, cover and set aside for 12 to 15 minutes (18 minutes for extra large eggs). The hot water will continue to cook the eggs.
When the time is up, drain off the water and replace with cold water. If the water reheats, drain and refill again. (Remember to recycle the water in the garden or on potted plants.)
Once the eggs have cooled completely, gently tap the large end of the egg against a hard surface like your kitchen counter. This should crack the shell.
Turn the egg and crack the other end, then gently crack the shell all the way around. The shell should peel off easily at this point.
Here’s another…
Follow the cooking instructions above. When eggs are finished cooling gently crack them on the side of a pan or the counter. Find the membrane that lies between the cooked egg and the shell. Here’s the key…gently pull off the shell with the membrane sliding your thumb along the smooth shiny cooked egg, bringing the membrane and shell off together so that it doesn’t bring the cooked egg white off with the shell.
And another…
Once the eggs are cooked, drain the water. Shake the pan violently so the eggs crack into tiny pieces on all sides. Fill the pan with very cold water and let stand for several minutes. At this point the shell should come right off after you get it started.
Hard boiled eggs in the shell can be refrigerated up to one week. Hard boiled eggs out of the shell should be used right away.
Recent comments
Aenean nonummy hendrerit mauris. Phasellus porta.