Why Buy It when you can Make it?
I’ve been thinking a lot lately about all the things we buy that could actually be made – by hand. I think about it at work, when I drive my truck and especially when I’m out running errands. I tell myself over and over again, “I could make that”, “Why do I need to buy it?” Yes – why do I need to buy something that is wrapped in layers and layers of plastic and then put into a cardboard box, when I have all I need right at home, bought and paid for, for a lot less than the final product?
And so, my new motto has become “make it, don’t buy it”.
From fresh baked bread to jams; from seasoned mixes to boxed rice substitutes; nesting boxes, sheep fences, garden shelters, I have been on a path of making what I need – myself – and doing a pretty fine job of it too. The best part is I don’t have all those “fake” ingredients and chemicals common in processed foods. Nor, am I perpetuating the slavish working conditions of factory workers in foreign countries.
Won’t you join in and make a few more of your daily needs by hand?
To get started, why not try baking homemade bread or making fresh pizza dough in the coming week?
___________________________________________________________________________________________________________
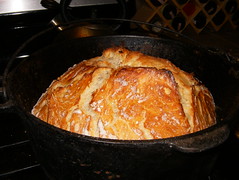
No-Knead Dutch Oven Bread
- 1/4 tsp active dry yeast
- 1 1/2 cups warm water
- 3 cups all-purpose flour, plus more for dusting. You may use white, whole wheat or a combination of the two.
- 1 1/2 tsp salt
- Cornmeal or wheat bran for dusting
In a large bowl, dissolve yeast in water. Add the flour and salt, stirring until blended. The dough will be shaggy and sticky. Cover bowl with plastic wrap. Let the dough rest at least 8 hours, preferably 12 to 18, at warm room temperature, about 70 degrees.
The dough is ready when its surface is dotted with bubbles. Lightly flour a work surface and place dough on it. Sprinkle it with a little more flour and fold it over on itself once or twice. Cover loosely with plastic wrap and let it rest for about 15 minutes.
Using just enough flour to keep the dough from sticking to the work surface or to your fingers, gently shape it into a ball. Generously coat a clean dish towel with flour, wheat bran or cornmeal. Put the seam side of the dough down on the towel and dust with more flour, bran or cornmeal. Cover with another towel and let rise for about 1 to 2 hours. When it’s ready, the dough will have doubled in size and will not readily spring back when poked with a finger.
At least 20 minutes before the dough is ready, heat oven to 475 degrees. Put a 6- to 8-quart heavy covered pot (cast iron, enamel, Pyrex or ceramic) in the oven as it heats. When the dough is ready, carefully remove the pot from the oven and lift off the lid. Slide your hand under the towel and turn the dough over into the pot, seam side up. The dough will lose its shape a bit in the process, but that’s OK. Give the pan a firm shake or two to help distribute the dough evenly, but don’t worry if it’s not perfect; it will straighten out as it bakes.
Cover and bake for 30 minutes. Remove the lid and bake another 15 to 20 minutes, until the loaf is beautifully browned. Remove the bread from the Dutch oven and let it cool on a rack for at least 1 hour before slicing.
___________________________________________________________________________________________________________
 Pizza Dough
- 1/2 package dry yeast
- 1/3 cup warm or room temperature water
- 3/4 cup all-purpose or bread flour
- 3/8 tsp salt
- 3/4 tsp sugar
Add the yeast to the water and let it sit for 10 minutes. It should begin to look slightly foamy. Meanwhile, mix the flour, salt and sugar in a separate bowl. Then add the yeast mixture to those dry ingredients.
Stir it until it’s well-mixed. The dough should be thick, requiring a little effort to mix it. Cover the bowl with plastic wrap or a clean kitchen towel, and let the dough rise in a warm- or room-temperature place for about two hours. Grease your frying pan lightly if it’s not already well seasoned.
After the dough has risen, take it out of the bowl and lay it on a floured cutting board. Knead the dough: Push down on it, pushing it away from you with the heel of your hand. Mound it up into a ball and push down on it again. After 50 or so pushes, the dough should be smoother and less sticky.
The dough can be rolled out with a rolling pin or just pushed into place in the pan with your fingers. It’s going to get covered with toppings anyway. The edges should come up a little on the side of the pan to form a rim.
Although the dough takes about two hours to rise, if you’re short on time for rising, there’s not much difference. After you put the dough into the fry pan, it will rise anyway while you add toppings.
This recipe bakes in a 10- or 12-inch frying pan. Or, you can make two smaller individual pizzas. You can make it however you prefer: low salt, low fat, organic or double the cheese, whatever you fancy. There’s hardly a way to fail other than having the water too hot, which kills yeast.
Recent comments
Aenean nonummy hendrerit mauris. Phasellus porta.