Posts Tagged ‘Soil’
Build a Mini PVC Pipe Garden House
For many years I had trouble with birds (and my own chickens) getting into the garden and eating tender vegetable plants as they emerged from the soil. And, in the colder months I wanted to extend the growing season and protect my crops from frost. I wanted to install a hoop house, the kind I’d seen in magazines or while driving back country roads, but they were too large for one person to manage and too expensive for my limited budget.
I wanted something lightweight, easy to move and something I could make myself with supplies I might already have on hand.
I looked around the farm to see what I could use and hoped that an idea would come to mind. Sure enough, it did. As I stared at my raised beds I thought of a mini greenhouse type structure that could be draped with bird netting in the growing season and float cloth or plastic to extend my plantings.
Here’s what I came up with:
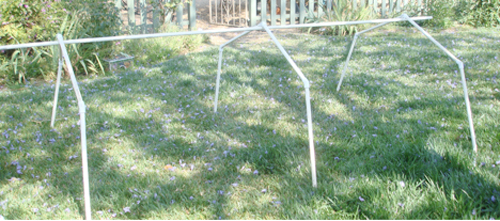
A PVC frame that fits over my 4’x8’ raised beds and is held in place by “C” brackets screwed to the wooden vegetable bed frame. A 10’ piece of PVC runs the length of the uprights to keep the covering draped properly over the frame. At ground level it can be tacked to the wooden vegetable bed or covered with dirt or rocks to keep it from blowing off.
How I made it:
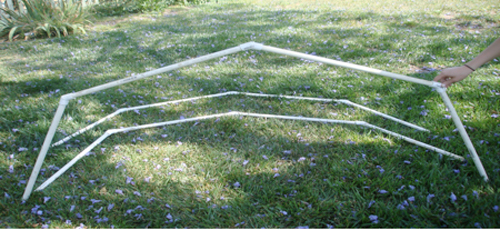
I cut 4 pieces of PVC pipe 2 feet long; two for the sides and two, half the width of the vegetable bed, to make the peaked top. This would be wide enough to reach across the bed and give good clearance for taller plants like lettuce, broccoli or tomatoes. I then assembled the greenhouse frame using 45 degree PVC pipe fittings (these were on hand, but 90 degree might work better on the legs). Once I tested the greenhouse, to see if it did what I thought it would, I glued all the pieces together. I made 3 frames for each 8’ bed.
To install my newly made mini-greenhouse, I screwed “C” brackets into the vegetable bed frame about 6-inches from each end and in the middle of the bed (about the 4’ mark), I then zip tied a 10’ piece of PVC pipe down the middle to keep the peaks upright and to keep any covering from falling in on the plants.
In less than an hour, using the supplies I had on hand, I made enough frames to cover four of my eight vegetable beds; protecting my crops from marauding chickens and scavenging birds.
The Storm Rolls In
The sky turns grey.
The wind blows hard.
The rain comes down.
The ground is quenched.
Seeds swell.
Roots push deep.
Plants grow tall.
Flowers bud.
Crops grow fat.
Harvest is plenty.
I pluck from the ground that which seed and soil and rain and sun hath made grow, and place it on my table to nourish and sustain my life.
Who could ever frown at such a circle? Or, wish it would never happen? Only an ignorant man would wish the rain to never come, the seasons to never change, the wind to never blow, and the dark to never fall, for these are the elements that turn life from quiet and shriveled and thirsting to vibrant and alive.
Welcome the rain and pray for more.
Heart & Soil
What a great way to spend a summer evening. “Heart & Soil”, a sustainable agriculture documentary will take you on a journey into the lives of southwest farmers, energetic farmer’s market and vibrant school lunch programs. The farmers are an inspiration for us all to dig more, grow more or to support those who do.
To learn more about the mission of “Heart & Soil” and their desire to promote local agriculture check out their website at http://heartandsoilfilm.com/index.php
The Real Dirt on Farmer John
THE REAL DIRT ON FARMER JOHN follows Farmer John’s astonishing journey from farm boy to counter-culture rebel to the son who almost lost the family farm to a beacon of today’s booming organic farming movement and founder of one of the nation’s largest Community Supported Agriculture (CSA) farms. The result is a tale that ebbs and flows with the fortunes of the soil and revealingly mirrors the changing American times.
Homemade Seed Tape
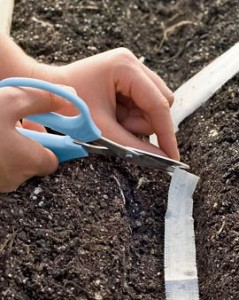
Some seeds are so small and hard to handle that you end up wasting more than you plant, or planting them so close that they need to be thinned heavily. But, it doesn’t have to be that way anymore. You can make you own homemade seed tape with toilet paper and a little bit of honey. The homemade version works just as well as the commercial ones for a lot less money.
Here’s how to make them.
1.) Start with a strip of toilet paper the length of the row you want to plant. If that is too long lengths of 12 to 18-inches is very workable and useable in a garden bed. Spread the toilet paper out flat being careful not to tear it then fold it in half length-wise. After you have creased the TP it can be unfolded to lay flat. Single or double-ply will work, but the single-ply works best because smaller seeds can root through the single layer, plus it decomposes faster. Also try to avoid scented and colored TP as it only adds chemicals to the soil.
2.) Mix about a teaspoon of honey with several drops of warm water to thin it out. The number of seed strips you are making will determine how much honey you will need. Using a small spoon, popsicle stick or paint brush gently spread a thin layer of the honey mixture down the middle of one of the folded sides of TP. Be careful not to press too hard or you will tear the TP.
3.) Before the honey dries, sprinkle an evenly spaced row of seeds down the line of honey. Check each seed packet for the recommended seed spacing. If shaking seeds out of the packet proves too difficult simply pour them into your hand or into a small bowl and place them one at a time onto the TP.
4.) Now fold the unseeded edge of the tape onto the seeded side and gently press so the honey can “glue” the two sides together. The long continuous line of honey will help keep the seeds from slipping out of place.
5.) Using a fine pen gently write the seed name, plant height, row spacing and date seed tape was made onto one edge of the seed tape. Be careful not to tear the tape. Including the plant height and row spacing will help when laying out your garden bed.
6.) After preparing the garden bed lay seed tape in desired location. Cover tape with a light peat moss mixture to the depth recommended on the seed packet. Water and keep moist as with direct sown seeds, especially after seeds have sprouted. The toilet paper tape will protect seeds from birds and small animals and from being blown away by the wind or washed away by rain or sprinklers.
The toilet paper quickly and easily decomposes never to be seen again and what remains is a perfectly laid out garden bed.
![]() photo credit: Minneapolis.Metblogs
photo credit: Minneapolis.Metblogs
DIRT! The Movie
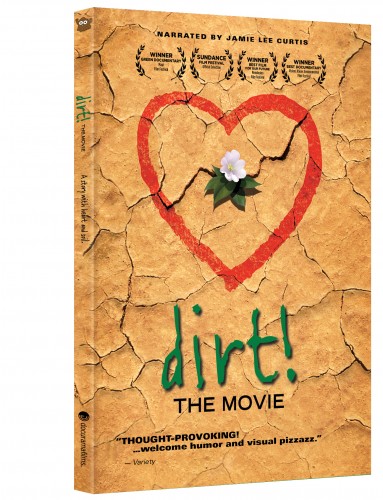
“Floods, drought, climate change, even war are all directly related to the way we are treating dirt.”
DIRT! The Movie–directed and produced by Bill Benenson and Gene Rosow–takes you inside the wonders of the soil. It tells the story of Earth’s most valuable and underappreciated source of fertility–from its miraculous beginning to its crippling degradation.
The opening scenes of the film dive into the wonderment of the soil. Made from the same elements as the stars, plants and animals, and us, “dirt is very much alive.” Though, in modern industrial pursuits and clamor for both profit and natural resources, our human connection to and respect for soil has been disrupted. “Drought, climate change, even war are all directly related to the way we are treating dirt.”
DIRT! the Movie–narrated by Jaime Lee Curtis–brings to life the environmental, economic, social and political impact that the soil has. It shares the stories of experts from all over the world who study and are able to harness the beauty and power of a respectful and mutually beneficial relationship with soil.
DIRT! the Movie is simply a movie about dirt. The real change lies in our notion of what dirt is. The movie teaches us: “When humans arrived 2 million years ago, everything changed for dirt. And from that moment on, the fate of dirt and humans has been intimately linked.” But more than the film and the lessons that it teaches, DIRT the Movie is a call to action.
“The only remedy for disconnecting people from the natural world is connecting them to it again.”
What we’ve destroyed, we can heal.
Church Grows More Than Faith
… One foggy Maryland morning last spring, I was among more than 400 people who donned jeans and boots, packed shovels and hoes, and headed to…church. After months of hoarding leaves from suburban yards and gathering manure from local farmers, parishioners at Cedar Ridge Community Church in Spencerville were ready to spend a Sunday transforming hard clay into dark, rich humus.
Creating a farm might seem an unlikely mission for a congregation of urban dwellers and suburbanites. For Cedar Ridge, the idea had grown out of a year of prayerful reflection about how to use our 63 acres in a way that would cherish the earth and its inhabitants. We also hoped that working the soil and giving organic food to our neighbors in need would help us to grow spiritually.
Click Here to read how a small Maryland congregation came together to build a church garden; cherishing the earth and feeding a community in need.
Make Your Own Garden Trellis
Hint & Tip
Make your own garden trellis
Before you chop up grape cane or berry vine pruning’s for the compost, consider saving them to make your own garden trellises.
Simply pull off any leaves and scrap off the thorns and you have the perfect material for making trellises that can be used for vining peas, beans or even small cucumbers.
Before the canes dry completely, take several sturdy straight pieces for the uprights, then twine the remainder around the uprights in the diameter you want. Leave room at the bottom so the trellis can be pushed into the soil.
Once finished, tie the intersections to hold the trellis together. Vine trellises will last a few seasons and can then be chopped up and composted. You’ll save money on buying premade- trellises and your garden will have a fine country feel with natural made trellises.
(if you don’t have grapes or berries on your suburban homestead you can also use small diameter saplings)
Recent comments
Aenean nonummy hendrerit mauris. Phasellus porta.