How to Create a Deep Mulch Garden
It may be the beginning of a new year for us all and the dead of winter for some, but I, like many other die hard homesteaders can’t help but think about spring and a garden bursting with fresh grown produce.
But, before we sink seeds into the soil and sprouts rise to the sky there is much work and planning to be done. My favorite winter break project is to lay out my spring garden. Long stormy days just cry out for gardeners to put pen to paper. Sheets and sheets of graph paper lay strewn across my kitchen table, colorful felt pens stand in an old mason jar and the ideas of how I want my garden to look swirl in my head. It’s a creative time, but also an important time that takes thought.
My garden planning starts long before spring temperatures warm the soil enough to plant. The work of preparing the soil is just as important as which seeds to order and should be given as much care. The nutrients derived from mulch and compost are the basis of a productive garden and should not be overlooked.
How we Converted a Traditional Garden into a Productive Deep Mulch Garden
The steps below will work for first-time gardeners and seasoned gardeners trying to resurrect an unproductive garden.
1. We start in the fall. Bedding from the sheep trailer, that had been pooped on and peed on and stomped on, fluffed and turned all during show season is the first layer tilled into the garden beds, followed by a layer of rich compost.
2. After garden beds are cleared in the fall and any beds not in use for fall vegetables, each bed is spread with a very thick layer of a hay, straw, shavings, leaf and grass clipping mixture, about 6 to 8 inches. The thickness is important because the heat generated during decomposing helps kill weed seeds. If you are able, a 10-12 inch thick layer would be great. I get my spent hay from local horse farms because it is readily available. Straw can be purchased from local feed stores, and leaves or grass clippings can be gathered from the yard or from neighbors.
The amount of mulch you need depends on the size of your garden plot. I use 32-gallon trash cans to transport mulch and calculate 6-8 cans per 4’x12′ bed. A good rule of thumb is about a ½-ton minimum of loose matter for a 50’x50’ garden plot.
3. In early spring, all the layers are tilled in along with a broad spectrum fertilizer. This is allowed to sit for a few weeks while the soil warms enough to plant.
4. When it’s time to plant, I spread another thick layer of mulch over the beds. Using my garden diagram as a guide I decide where to put the rows and separate the mulch to expose a strip of soil.
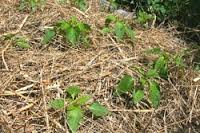
5. I plant direct-sow seeds directly in the soil, like normal. When the seedlings are about 2 inches tall, I pull the mulch back around the sprouts to block weeds and conserve water. Veggies that were started inside are transplanted in the same way—pull the mulch away to expose a row of soil, plant and pull mulch back around each transplant. I check the garden often to see if more mulch is needed or bare spots have developed. This is where grass clippings come in handy. I keep a pile near the garden beds so I can spread it on any time.
6. When the growing season is over and everything has been harvested, I lightly till again and cover all the beds with a fresh layer of mulch. This will sit all winter until we start again in the spring with a new layer of mulch.
7. I rotate the beds used for fall/winter veggies so each bed has a chance to get mulched and composted every few years.
At this point I should offer a word of warning.
With the deep mulch method you will be spending a lot less time weeding and maintaining your garden. Don’t feel guilty! Just enjoy!
So…what do my garden chores look like now?
• I check small seedlings often to make sure the mulch hasn’t covered tender sprouts. When veggies are bigger this won’t be an issue.
• Water as needed. Of course, this will vary depending on your area and amount of rainfall. I end up watering only twice a week, except during really hot weather. The mulch will help retain moisture in the soil.
• If any weeds pop through the mulch simply pull them and add more mulch to the area, but there won’t be many if the mulch layer is thick enough.
• Lastly, I often breath a deep sigh of relief, grab a chair, a glass of tea and enjoy my garden!
Once you’ve tried deep mulching you’ll never want to go back to your old way of gardening. But, don’t get too caught up in the details of variety or quantity of mulch. Just mulch!! It’s really hard to mess this up as long as you use a pretty thick layer. Now, you’ll have fresh grown produce from a garden that doesn’t take over your life. How great is that!
Recent comments
Aenean nonummy hendrerit mauris. Phasellus porta.