Homemade Fish Emulsion

When I was in grade school (a million years ago) we would read books about the Pilgrims and the Indians this time of year. What always struck me as odd was the part of the stories that talked about how the Indians buried a fish in the hole where they planted corn or pumpkin or squash seeds. Little did I know at the time that the decomposing fish provided food and nutrients to the germinating seeds and growing plants, much the same way topical fertilizers do today.
But, unlike in the Pilgrim days, if you search for fish fertilizer, sometimes called fish emulsion, in garden or farm stores you’ll quickly discover that they are quite expensive, too expensive for a frugal farm girl, like me. So years ago I set out to learn how to make my own. What I found out was if you have access to fish parts the process is fairly easy. Fortunately, I had a father-in-law who was an avid fisherman, and not just the catch and release type. He only believed in catching and eating. I also live fairly close to the coast with a small, but vibrant fishing industry, so my supply of fish guts was pretty steady.
Once I had the supply part figured out, it was easy going from there on.
To make your own Homemade Fish Emulsion, follow these 5 simple steps and you’ll be well on your way to creating your own nutrient packed, Pilgrim era fertilizer that your plants will love.
STEP 1: Find yourself a fairly large barrel with a lid, like a 33-gallon plastic trashcan or one of those blue water collection barrels, and label it FISH FERTILIZER, ‘cause you won’t want to mistakenly use it for anything else. A lid is important to keep the critters out, so make sure it fits securely.
STEP 2: Gather up your fish guts and bones and skins and toss them into the barrel. Crab and shrimp parts also work well because they are loaded with calcium. They take a bit to break down, but they’re worth it. You want to fill the barrel about 1/3 of the way, so if you don’t want to make very much or you don’t have access to a lot of fish parts use a 5-gallon bucket and stick with the 1/3 ratio. You’ll see why in a second.
STEP 3: Layer in some brown stuff, just like you would with a compost pile, so you have a nice carbon/nitrogen mix. Leaves work great. Layering the fish then leaves and so on will help the materials break down. You want the barrel to be about 2/3’s full.
STEP 4: Pour on a bit of sugar for the bacteria and micro-organisms to feed on and to help lessen the fishy smell. It also adds a bit more carbon to the mix. I use a livestock molasses that can be purchased in a gallon jug from a farm supply or feed store. Use ¼ to ½ cup for smaller buckets and about a cup for the larger barrels. This isn’t a fine science so don’t get obsessed with it. The sugar helps with the fermenting process.
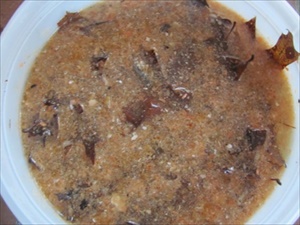
STEP 5: Fill the bucket with water to a few inches from the top. Now stir you’re gunky, sloppy mess until everything is well incorporated. Looks great, doesn’t it? Yep — it’s supposed to look that gross. Now place the lid on, but not too tight, the pressure that builds up from the fermenting will blow the lid off. You’ve been warned.
NOTE: Try not to let flies in the barrel or you’ll have a stellar breeding ground for maggots, and that’s not what we want. One solution is to drill a few holes in the lid and then line the underneath side with a fine mesh. This will let the gases release, but won’t let the flies in.
Now comes the hard part.
Let it sit for a few weeks, a month is better, so everything can ferment. Give it a good stir every few days to keep things well mixed and decomposing. It will ferment faster in warmer weather than in cooler weather, but it smells worse in warmer weather. You’ve been warned, again. After about a month your brew is ready to use!
Using Fish Emulsion
There are several different ways you can use your fish emulsion. One is to stir it well and then scoop out what you want to use, drizzling it around your plants. This gives plants bio-available nutrients in a soluble form. You can also strain off the solids and use just the liquid in a watering can like you would a manure tea, using the solids to start another batch. Or, you can use it as a drench, diluting 2-3 tablespoons in a gallon of water, and then applying it around the base of your plants. Some people use it as a foliar spray, but there’s something so unappealing about rotting fish guts coming in contact with my salad greens that I personally refrain. But, if you’re braver than me, mix 1 tablespoon of emulsion per gallon of water and use a foliar sprayer, applying it in the cooler part of the day rather than in the heat of the day.
Other Tips for Using Fish Emulsion:
- Kick start your compost pile by using ½-cup in a gallon of water and layering it in.
- Your brew will keep for a year if you make it in large batches. Smaller batches can be made seasonally.
- This stuff smells! Store it in an out-of-the-way place so the odor won’t knock you off your feet.
- Did I mention this stuff smells? EVERYTHING it comes in contact with will smell like dead fish. Choose your buckets, stirs and sprayers or water cans with this in mind, and be careful not to get it on your clothes or shoes when using it, the deodorizers don’t work very well.
- Solids can be used up to three times before they lose their potency. After that you can add them to your compost pile.
Sources for Fish Parts:
- Your own fishing trips
- Fisheries
- Local fishermen
- Farmer’s Markets
- Grocery store fish counter or fish market
Recent comments
Aenean nonummy hendrerit mauris. Phasellus porta.