Archive for August, 2015

Why Raise Chickens on a Suburban Homestead?
So—you have started to turn your city plot of land into a suburban homestead. You have begun living frugally, you’ve simplified your life; begun to grow your own food and learned to preserve the harvest. Now, it’s time to start raising chickens. Why? You may ask. My answer…why not?
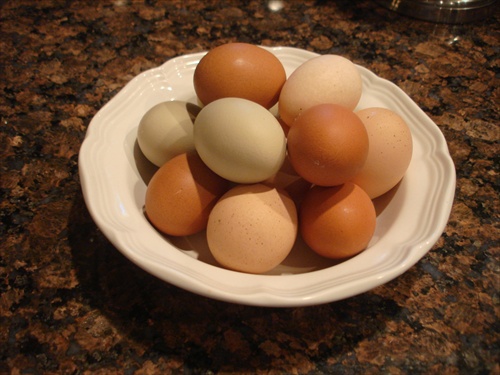
For one thing there’s the egg thing. Fresh out-of-the-nest eggs with bright orange yolks and shells that take a bit of effort to crack. Then of course there’s the supply and cost of eggs in the retail market–$6.00 per dozen and rising last I checked.
But, besides the eggs, you know that the hens producing those wonderful eggs have lived a charmed life compared to their industrialized cousins, full of fresh air and sunshine; kitchen scraps and garden trimmings. The zero foot print isn’t bad either. After all there are no resources used to get those eggs from the coop to your kitchen, unless of course you count the steps you take.
Another advantage of having your own chickens is the unending supply of fantastic manure they produce, which your garden and trees will thank you for by giving you an exceptional harvest. And, if you clean and re-bed your nesting boxes and coop before the fall weather sets in you’ll have a great supply of mulch to winterize your perennials.
Free-range chickens are also the perfect low cost rototiller. While they are clucking about entertaining you, they are also churning up the soil, grubbing around for nasty bugs and even the occasional small rodent that may venture into their path. And then, there’s the personality thing. Chickens are wonderfully funny and will give you and your kid’s hours of enjoyment. There’s nothing I like better than standing at the kitchen sink watching my girls cluck and scratch and run around the yard. They are way better than your cat! Your cat may be entertaining too, but she won’t give you breakfast. Am I right?
But, more importantly, at least to me, the best reason to raise your own chickens is good quality, wholesome, chemical free and humanely processed meat. That’s right, the meat chicken thing. In an 8’x10’ fenced in area, over the course of 70 days I can raise enough scrumptious meat to feed this little homestead for an entire year. This isn’t a permanent pen either. When the meat chickens are gone the pen gets taken down so the space can be used for another purpose.
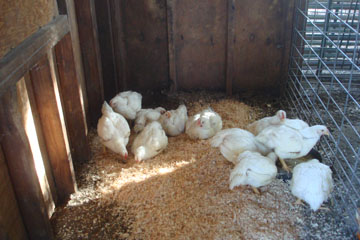
Week 5: In the barn.
The journey to raising your own chickens doesn’t have to be an arduous one, lasting months or years. It can become your reality in just a few weeks. Even if you live in a big city, raising chickens can be a leap worth taking. And, I bet you’ll find out that your neighbors think it’s a cool idea, too.
There are a few things to know about raising chickens—egg layers or meat—so check out these articles for more information.
The Practice of Keeping Chickens
Raising Meat Chicken in Suburbia
Why Every Homestead Needs a Crock Pot

A busy schedule. After school activities. Lambing, kidding, calving, farrowing season. Any day, really. There’s no day that a slow cooked meal in a crock pot won’t serve. With busy modern lives it’s partly about the convenience–the crock pot meal frees the cook from the kitchen. But, it’s also that a slow cooked meal provides a lot more than just a meal…a whole lot more.
When DD was young, raising animals, showing sheep, playing volleyball, and attending 4-H meetings it was a hard worked crock pot that made it possible for us to eat a warm hearty meal at the end of a long and busy day rather than swing by some fast food joint for a quick bite. It was so nice to come home hot, sweaty and tired, open the front door and immediately inhale the aroma of a simmering beef stew, lamb shank or Italian chicken. And, I knew that in the length of time it took DD to shower and slip into a soft cuddly pair of sweat pants I could make a salad and heat up a loaf of bread or a few dinner rolls, rounding out the crock pot dish to a truly wonderful meal.
It’s certainly true that a crock pot meal is delicious by definition. That any combination of meats and vegetables cooked through with a savory sauce is the star attraction of any meal. And, yes a crock pot meal is pretty much hands off and will provide plenty for leftovers or to be frozen for later consumption. But, when we think back on those busy days it’s not the tasty meal we remember. It’s the time we had together after a long day. Instead of scurrying around, stirring pots, sifting flour or baking, trying to get dinner on the table we spent time talking about our day, the milestones in our lives and our dreams for the future. For good or bad, what we remember was the time spent together, really being together. All we had to do to have a quality evening was put some meat and vegetables in a pot, pour in the liquid, place the lid on and set it to low before we started our day.
Pulling the lid off the crock pot, with all that steam surging up made the whole day special. It gave us an extra hour of family time, of laughter, of cuddling, of tranquility, of love. Crock pot cooking can give you extra “me” time, extra alone time, extra solace, extra time talking to friends or relatives instead of worrying about what’s for dinner. So–each time you enjoy or, better yet pass down your favorite crock pot recipe, remember that those dishes are just the by-product. What the crock pot really gave you was time well spent as a family.
Frugal Friday – Water, a Precious Resource
We hardly think about the amount water (or other liquids) wasted each time we dump a glass of ice, a partial glass of tea, or a pot of water from cooking and canning. Even emptying the glasses from the dinner table will surprise you. To save this precious resource, keep a pitcher near the kitchen sink as a collection pot for all that liquid, then use it on potted plants. Careful, though, hot water should be cooled completely before using on plants.
You’ll be amazed at how much you collect on a daily basis.
How to Make 3-Bean Salad
Summer is still in full swing in my neck of the woods and gardens literally explode with veggies waiting to be harvested. To keep pace with all that is produced, canning pots and vacuum sealers seem to run all the time. This preserved harvest will wait to be consumed in the months to come, when days are short, nights are long and we can do nothing but dream of digging our hands into fresh spring earth.
I try to revel in each season as it comes, but my planning mind is always one step (or one season) ahead. We may be in summer, but my mind is thinking fall and winter, and what we need to do to prepare, and what we can be enjoying that will remind us of summer.
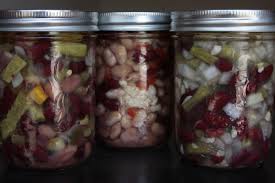
But, we have to deal with what is at this moment. This week has been about beans and different ways I can use them that will be a delight in the not-to-distant future. So I settled on a batch of 3-Bean Salad. There’s nothing like that tangy sweet with firm beans and crisp veggies to harken us back to long lazy days. It will be just the treat we need when paired with slow cooked pulled pork on some stormy wet weekend. It will not only be delicious, but invoke the pleasures of spring and summer. This simple to make summertime favorite is easy and makes 8 to 9 half pints.
3-Bean Salad Recipe
2 cups green or yellow beans (or a combination of both), cut into 1-inch pieces
1 can red kidney beans, drained and rinsed
1 can cannellini beans, drained and rinsed
½ can garbanzo beans, drained and rinsed
1 medium onion (about ½ cup), sliced thin
1-1/2 stalks celery (about ½ cup), sliced thin
½ red bell pepper (about ½ cup), sliced thin
½ green bell pepper (about ½ cup), sliced thin
Brine:
1 cup white vinegar
8 oz. l fresh lemon juice
1-1/2 cups white sugar
2-1/2 cups water
½ cup vegetable oil
1 Tbsp. Kosher, canning or pickling salt
DIRECTIONS:
Wash and snap fresh beans. Blanch for three minutes and cool completely in an ice bath. Drain and rinse canned beans. Slice and measure other vegetables.
Combine vinegar, lemon juice, sugar and water, and bring to a boil. Remove from heat. Add salt and oil, and mix well. Add beans and veggie mix and bring to a simmer over medium-low heat. Cool and refrigerate for 12 to 14 hours. This starts the marinating process.
Sanitize jars, lids and rings while heating bean mixture to a boil. Fill hot jars with bean mixture and top with brine leaving ½-inch of headspace. Remove bubbles with a plastic or wooden spatula. Wipe rims with a slightly damp clean cloth, place lids and rings on and tighten finger tight. Process in a water bath for 15 minutes at a full boil. Once jars have “popped” tighten rings again, cool and wait to ENJOY!
Recent comments
Aenean nonummy hendrerit mauris. Phasellus porta.