Archive for March, 2015
Grass fed vs. Grain fed – A Suburban Homesteaders Dilemma
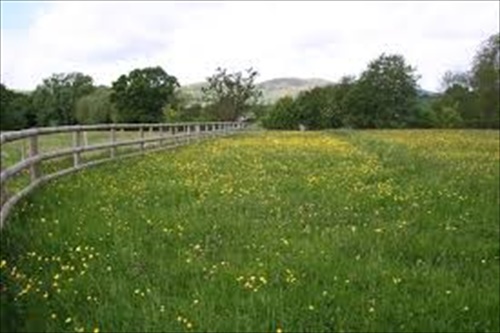
Staunch disagreements sweep across the country debating the benefits and economics of grass fed animals versus grain fed. Pasture raised meat might be better for you, but that could depend on the quality of the pasture they are raised on. And, when it comes to the taste and tenderness of the meat the grass vs. grain could bring a whole different story to light.
Grass vs. grain is an added dilemma, especially for suburban homesteaders or those trying to live a self-sufficient life on a parcel too small to pasture large meat animals successfully. This has always been our challenge…wanting to raise quality meat and process it humanely, but not having the space for them to roam as we’d like.
Our dream may be of wide open spaces, rolling grasslands dotted with livestock, but our reality is not that grand. For us, our reality is a 1/3-acre lot at the edge of town, with pens large enough for animals to roam around and laze in the sun, and sheltered areas so they can come in from the rain.
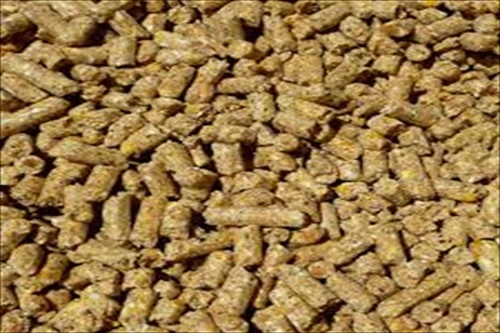
Old-time farmers and leather-faced cowboys may scoff at the idea of raising a hog or lamb in a few months on feed store grains. They may prefer the aged taste of hogs raised mostly on acorns, or beef raised on the range. My late father-in-law had a way with meat, whether it came from the range, the barn, the grocery store or was hunted. He had his special mixes of herbs and spices and rubs. He was particular about how to rub the meat, whether to inject brine into a turkey or lamb before cooking. And, of course, there was the wood he used for smoking; hickory for hams, cedar for fish and citrus for lamb and poultry. He was very specific that each wood gave the meat a distinct flavor. But his steadfast rule, the one he never altered from, was that to get a moist, juicy and tender piece of meat you must cook it low and slow. That was his motto.
Over the years, I have raised animals on pasture while living on a 700 acre farm and in smaller accommodations now that I live on a 1/3-acre suburban homestead. I have followed the principles of good nutrition, given my animals plenty of water, fresh air and sunshine. And, I’ve tried to follow my father-in-laws instructions on how to cook meat. His work was magic that was not pasted down, though.
I have butchered year old rams raised on pasture, 6-month old freezer lambs raised on grain and hay, and 7-week old chickens, rabbits and ducks raised on our suburban homestead. I have developed my own style of cooking, not so similar to his, but one that is all my own. But, the real reason our meats tastes so good is not because it was raised on grass or grain, but because I became a better cook over time.
Tonight I enjoyed a lamb shank dinner. It’s a cheaper cut of meat that can be tough whether raised in a factory, on a farm or on a suburban homestead. I dredged it in flour and seasoned it with salt and pepper before searing it to seal in the juices, but that was just the beginning of creating an entrée that would end up falling off the bone and so tender it would almost melt in your mouth.
The magic was in the olive oil and balsamic vinegar; the spices, wine, garlic, and herbs that I have learned to use from fellow sheep breeders, cooks and fine epicurean magazines. Out came a shank as luscious as any rack of lamb, leg or loin produced by a 5-star restaurant.
Even a cheap chicken wing can taste like manna from heaven if you use the right seasonings and the best southern frying methods. You can even make cardboard taste good with the right seasonings and cooking techniques.
I think the taste of our chickens today is influence somewhat by their ability to grub around in the dirt, and the way in which we butcher, cool and freeze them, and I know that our home-raised lambs taste a lot different than what I’ve eaten in restaurants, but the real difference is in the art of the kitchen. My chickens taste just as great whether they are raised on feed store grains or kitchen scrapes, worms and bugs.
So…what’s the point of my story?
Just this…
Don’t get hung up on whether you have rolling pastures for grazing or a round pen on a suburban lot for grain-fed. The bigger issue, the bigger point is that you are raising something on your own, for your own family. You are learning about animal husbandry, processing livestock and stocking up; taking one step closer to being as self-sufficient as you choose to be. And that in itself makes a great end product. That’s the magic!
Growing Spring Peas…Yes, Peas!

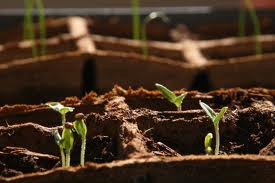
There’s nothing easier for a new gardener than to grow spring peas. Their variety, quick germination, easy growing habit and short to harvest nature are bound to boost any gardener’s confidence.
Peas are a cool weather crop and are usually the first seeds to be planted indoors in pots or outdoors in the ground. No garden, or garden season, would be complete without this old time favorite. And, after you have grown and eaten your own fresh peas I think you’ll agree.
There are three main varieties of peas:
- Sweet Peas, sometimes called Shelling Peas because their shell is not edible like other peas. These peas are taken out of the shell before cooking or eating.
- Snow Peas have flat edible pods with a tiny pea inside. These are common in Asian dishes or stir fry’s.
- Snap Peas also have an edible pod, but the pea inside is full size. These can be blanched and eaten, or eaten raw.
To have the most success with your pea beds start in the fall with a rich layer of well-rotted compost and manure turned into your planting area. Peas love well-drained soil, but do not like fertilizers much, so use it sparingly, if at all. Peas do however, like phosphorus and potassium, and a good sprinkling of wood ash worked into the soil before planting would be to their liking.
In most areas, peas can be directly sown in the garden 4 to 6 weeks before the last frost. Pt up peas for indoor growing in areas of the country that stay cold into the spring months. Peas are a cool weather crop, so soil temperatures should be between 45 and 70 degrees. The ground should be cool when planting, but not wet. It can be tricky to time the weather conditions. If you have wet soil for long periods consider creating raised beds or plant in pots.
Plant pea seeds 1-inch deep and 2-inches apart. When the shoots emerge you can set your poles or trellises for climbing varieties. Peas do not like a lot of water so water sparingly, but don’t let the roots dry out or no pods will form. Also, pea roots are fragile, so be cautious when pulling weeds and avoid hoeing a pea bed. If peas are a staple in your garden it’s best to rotate with other crops to avoid a buildup of soil-borne diseases.
To keep a pea crop producing long into the season, pick the pods often as this encourages more pods to develop. The best time to pick is in the morning when the dew has dried. It is also the time of day when peas are the crispiest. When picking, it’s best to use two hands, one to hold the vine secure and one to pick the pea. You don’t want to run the risk of breaking the vines off. Fresh peas can be kept in the fridge for about 5 days, but to enjoy your pea harvest well into the warmer months freeze them. If any peas miss being picked you can still use them. Simply dry and shell them. Dried peas are prefect in winter soups and stews.
But, let’s not forget—It’s Spring! And with that comes the start of salad season at our house. Yep, we are die-hard consumers of salads in many shapes and styles. The long hot months cry out for light and cool, yet nutritious meals. If it can be chopped, sliced, diced or shredded and laid on a bed of lettuce greens we are happy women. And, why not? Our area is considered the salad bowl of CA; a state that grows over 250 different crops.
But, this early in the season means only one thing…Pea Salad!
A wonderfully light and crispy salad accented with Pancetta, cheddar and onions, and a hint of fresh dill. What could be more glorious, except for maybe that delightful little POP each time you chomp down on those fresh peas. It makes the perfect side dish or potluck take-along and goes great with grilled meats. Even a baked salmon dinner will scream SPRING when served with this pea salad at its side.
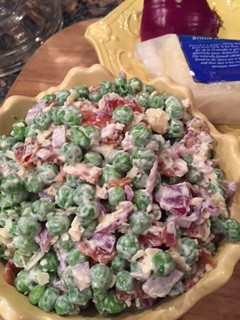
PANCETTA, CHEDDAR & PEA SALAD
INGREDIENTS
- ½ pound of pancetta, cooked, drained and crumbled or finely chopped
- 1 pounds vine fresh peas (or frozen, thawed in fridge overnight)
- ¾ cup coarse grated extra-sharp white Cheddar cheese
- ½ small red onion, peeled, and finely diced
- ½ cup of mayonnaise
- ¼ teaspoon kosher salt
- ¼ teaspoon coarsely ground black pepper
- ¼ teaspoon fresh dill, chopped fine
INSTRUCTIONS
- Stir all ingredients together, put in a tightly covered container in the refrigerator for several hours so the flavors have a chance to meld. Gently stir from top to bottom before serving. Store in fridge for up to 3 days, but it won’t last that long…trust me!
NOTE: The salad can be served immediately after making it, but tastes even better if allowed to sit, tightly covered, in the refrigerator for an hour or up to three days. It should be eaten within 3 days of being made, though.
What is your favorite way to serve peas?
Homemade English Muffins

This breakfast favorite is not English at all. In fact, the Brits never even heard of it until the 1990’s when Best Foods began shipping it to England.
What we know today as an English muffin was the invention of English immigrant, Samuel Bath Thomas. Yes—that Thomas. Sometimes called a “toaster crumpet” or “Union Jack”, it was first created in 1894 as a replacement for the very English “crumpet” and was immediately embraced by fine hotels and restaurants in New York as a more elegant alternative to toast. Ultimately, it became the quintessential American favorite for breakfast.
Homemade English muffins are so delicious that you won’t want to go back to store-bought ever again! And, they are the perfect complement to your homegrown and homemade jams and preserves! The only drawback—the process will keep you close to the kitchen for several hours. But, they are well worth the time and effort.
English Muffin Recipe
Ingredients:
1 cup whole milk
¼ cup melted butter (salted or unsalted)
2 tbsp. white sugar
6 cups all-purpose flour
1 yeast package
2 tbsp. Wheat Germ
1 cup warm water (110 degrees)
1 teaspoon salt
Directions:
Warm milk in a small saucepan until it bubbles; remove from heat. Mix in sugar, stirring until dissolved. Let cool until lukewarm. In a small bowl, dissolve yeast in warm water. Let stand until creamy, about 10 minutes.
In large bowl, combine the milk, yeast mixture, wheat germ, butter, salt, and 3 cups of flour. Beat until smooth, add salt and add the remaining three cups of flour, or enough to make a soft dough. Knead. Place in a greased bowl, cover with a towel, and let rise in a warm place. About an hour.
Punch down. Roll out to ½-inch thick. Cut rounds with biscuit cutter or an inverted drinking glass. Sprinkle cookie sheet with cornmeal and set the rounds on top to rise. Dust tops with cornmeal as well. Cover and let rise for ½ hour.
Heat a greased griddle to about 270. Cook muffins on griddle for about 10 minutes on each side. Keep baked muffins in a warm oven (no higher than 250) until all have been cooked. Each batch takes about 20 to 30 minutes. Allow to cool and place in plastic bags for storage. They freeze well.
To serve, split and toast. Serve with butter and your favorite homemade jam, jelly or preserve.
For a great weekend breakfast, toast and top the muffin with a cooked sausage patty and a poached egg then smother the whole thing with homemade gravy for a fabulous Barnyard Benedict.
For a lighter treat, toast and spread with homemade cream cheese and sliced seasonal fruit.
For a kid friendly breakfast or snack, toast and spread with peanut butter and a drizzle of honey.
How to Un-gunk the Garbage Disposal
Garbage disposals are supposed to make life easier, right? But, on an organic homestead where most kitchen scraps are either fed to chickens or composted this kitchen appliance can be more of a pain than its worth. Because it’s not used very often kitchen sinks get clogged, drain slowly and most of all smell sour.
Rather than remove it all together try these tips for using it wisely, even when it’s used sparingly.
Use the disposal every few days to keep it from rusting, corroding or getting gunked up.
Always use the disposal with a strong flow of cold water to help solidify grease and oils. Warm or hot water liquefies oils and can cause clogging.
When using the disposal keep it and the water running until everything is ground up well, then let the water run for about 20 seconds more before turning it off.
Grinding eggs shells, small pits and bones will help “scour” and “scrub” the walls of the disposal.
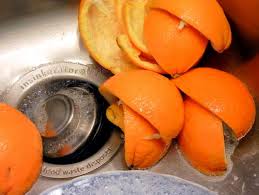
Cut large foods, like melon rinds, into small bits and grind them one-by-one so you don’t over work the disposal.
Don’t grind fibrous foods like artichokes, celery or corn husks because they don’t grind up well and can clog the drain.
For a good deep cleaning when you don’t want to use damaging bleach or drain cleaners, pour 1/3 cup of Borax into the drain and let stand for about an hour. Rinse thoroughly with hot water to move the Borax down the drain.
For a fresh disposal all year long, grind citrus peels, like lemon, orange, grapefruit.
Kitchen Fixes for Garden Problems
Solving garden woes is as close as your kitchen pantry—and free!
As an organic gardener the last thing I want around my veggies, fruits, flowers or free ranging chickens is a bunch of toxic chemicals. But, I still want to deal with the garden pests and problems that arise during the growing season. So, when I spy the creepy, crawlies, invaders, marauders or garden challenges I head to my pantry for the solution.
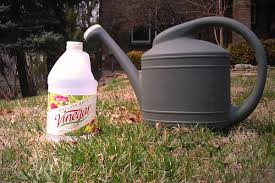
Getting rid of weeds — Plain white vinegar will kill weeds outright. But, be careful. It’s not selective and will also burn any plant it comes into contact with. For best results, spray on a sunny, warm day-75 degrees or more-and stick to non-planted surfaces like walkways, gravel or brick pathways, or in between cracks in cement. It won’t get down to the root, so a few applications may be needed. It’s a cheap way to forego Round-Up so keep plenty around.
Banish aphids and mites — These tiny pests can suck the life’s blood right out of vegetables, fruits, flowers and shrubs. If a plant has liquid in its leaves these guys will find it. To drive them out mix a few drops of liquid dish soap with water in a spray bottle and spray each affected plant generously. For larger areas mix 2-tbsps of soap with a gallon of water and pour into a pump sprayer.
Enriching sandy soil — Used coffee grounds, from your morning fix, can also fix sandy soil and increase water capacity by adding organic matter. The grounds can also improve the friability of clay soils. Simply dig them into problem areas. If your garden needs more than your morning brew can provide check out your local coffee house. Most Starbucks, Coffee Bean & Tea Leaf, and Peet’s Coffee locations offer used grounds for free, just ask.
Slaughter slugs — Slugs are attracted by the fermenting yeast in beer. Pour beer into a shallow pan like a pie tin and sink it into the soil. The smell will have slugs stampeding and maybe even dying happy.
Seasonal powdery mildew — Warm days and cool nights creates the perfect breeding ground for the mildew spores. And, the wind helps spread it from plant to plant. Mix a tbsp. of baking soda and 1 to 3 drops of horticultural oil in a gallon sprayer of water to help prevent the unsightly fungus. Spray both sides of affected leaves weekly for best results.
Eliminating earwigs — Earwigs are omnivores (plant eaters) and never live in the human ear as some old wives tales tell. To trap them, lay paper towel tubes, wrapping paper tubes or any type of cardboard tube filed with large diameter straws and place under plants where you see earwigs or earwig damage. Earwigs are active at night, so in the daylight they hide…in the tubes. Now you can grab the tubes, cover the ends with your hand and dispose of the earwigs. Some people even shake them into a bucket of soapy water.
Repelling wildlife — Ground squirrels, moles, gophers and even deer can wreak havoc on a garden. To ward them off sprinkle a generous handful of cayenne pepper on and around plants you don’t want them munching on.
Garden solutions are as close as your kitchen pantry and cost just pennies on the dollar.
Clipping Wings so Hens Can’t Fly
 With a reduced flock of hens in the barn I found myself craving some new additions a few weeks ago. As the feeling intensified the urge to buy more hens also grew. But, with a kid gone off to university, scholarship application deadlines looming and a hectic work schedule brooding a new batch of chicks was just not in the cards for our little farm, at least not this spring.
I was in our local hardware store lamenting my plight when the owner and friend suggested I call his friend who raised a variety of breeds. Armed with that knowledge nothing was going to stop me from adding to my flock. So, a few days later I called John and asked about breeds and age. Low and behold he had several hens for sale that had just started lying. Perfect, I thought. No brooding. No increase to my electric bill and instant egg production. I have to admit the birds were a bit more than I like to pay, $20 each, but when I took into consideration the time and money in chick starter it seemed like a fair trade. So we made arrangements to meet that weekend to hand off the hens.
I bought 2 Cuckoo Marans and 2 Americana’s. The Maran’s lay dark, almost chocolate brown eggs and the Americana’s lay bluish green eggs. Now with the others who lay a light brown egg we get a veritable rainbow of egg colors.
Perfect scenario, right? WRONG. The new additions had been raised on a large cattle ranch to the north of town, out in the calm and quiet of the range and hills. They were not use to the local commotion of my semi-rural street, with truck and motorcycles zipping down the street. They were nervous and flighty. I kept them in the coop for a week to get them acclimated to their new surroundings. But, that clearly was not enough time because the first day I let them out three got spooked and flew over the fence and into the commercial tree nursery that borders the east side of our property.
Of course I yelled for back up and Brianne came running. Not the school holiday she was hoping for, but pretty normal for us. After assessing the situation I grabbed the large fishing net, handed it to Brianne who immediately looked at me with this stunned, but knowing face, “you want me to climb the fence and net the hens? “Yep”, I said, “that’s the plan”. Shaking her head she shimmied over the fence and proceeded to corral the wayward hens. As she stalked through the low lying shrubs I sprinkled scratch feed near an opening in the bushes. Seemed like the perfect place to corner the new hens. Things went fairly well with the first two birds. In short order they were caught and put back into the coop for another week or so of acclimating. But, the third hen posed more of a challenge. After a few hours of trying to corner, corral, trap, cajole, tempt and sometimes outright pounce on the damn thing we gave up and figured she would either be lost to a night-time predator or fly back over the fence to be with the rest of the flock.
I was not happy at losing a $20 bird, but I also had no more time to chase her all over the open space of the nursery with no hope of catching her by hand. Nature would have to take its course, for good or bad. And, so it did.
A few days went by before the rather tuft up hen, tired of the outside world and the dangers that lay there flew back over the fence almost right in front of me. I stood there in amazement as she sauntered over to the coop and squawked and paced to be with the rest of the brood. She didn’t even flinch when I walked into the barn and unlatched the gate to the coop. She jumped through the doorway running for water and feed like she hadn’t eaten in days.
Not to assume she had learned her lesson I decided to clip the wings of all our newcomers so there would be no more escapees.
Clipping chicken wings is a fairly simple process that doesn’t cause the birds any pain or discomfort, if you do it right. Here are the steps.
- Have a pair of sharp scissors handy.
- Catch the bird you want to clip and hold her close and snug to your body with your hand underneath her for support, but don’t squash her.
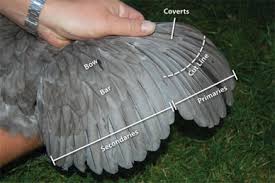
- Splay the wing out so you can see the different layers of feathers.
- Locate the primary feathers. They will be long and near the end of the wing. There are about 10 of them. Check to see if the feather is immature with blood flow in the shaft or mature with a hallow shaft. If immature, cut above the blood flow.
- Clip across the primary feathers about half way down the length of the feather. Don’t get too close or you may cut the flesh. Check underneath every few feathers to make sure you are on the right track.
It’s that easy.
Where the Garden Begins
It’s here! The gardening season is right at our doorstep and I, for one, can not contain my excitement. Come June you might find me complaining about the work, but in the early spring it is all about pleasure. Going out into the garden before work to peek at the rows of feathery carrot tops, squat bean leaves, and strong tomato starts brings me a lot of pleasure, and even more satisfaction.
Evenings will be spent filling pots with compost and peat moss, sowing seeds of squash and pumpkins and cucumbers; flowers and herbs. Dinner will come late on these days for the mind will turn to future food security.
My gardens modest start begins in a collection of clay and plastic pots collected from family and friends and thrift store excursions. The black flats that hold my future garden are absconded from local nurseries and the famers market. Each flat holds six pony packs or a dozen 4-inch pots.
In past years the flats set snuggly on my little potting bench or patio table. But this year they will line the growing shelf of my newly finished greenhouse, soaking up the warm sun from the west facing bank of windows.
Classic Lemon Curd
It may be the dead of winter for most of the country, but here on the Central Coast the sun is shining in more ways than one. Yes, there are bright blue skies with no hint of storm clouds in our future. But, that is not the only sunshine we get. You see it is lemon harvest time and that means tons and tons of glorious yellow lemons bursting sweet, tangy and juicy. With our Mediterranean climate we actually get 4 to 5 lemon crops, referred to as picks by local growers, in a year. That means we are never too far away from picking those little bright globes.
Lemons are a very versatile fruit, perfect for dishes from entrees to desserts. One of my favorites is lemon curd. And, today was all about stocking up on Lemon Curd, a creamy sweet custard like concoction bursting with lemony flavor. Warm or cold, lemon curd is the perfect accompaniment to fresh fruit, gingerbread, angle food cake, pound cake, spooned over ice cream or used as the base for a fruit tart. No matter how it is used it will chase away the gloom of any stormy winter’s day.
I use a classic lemon curd recipe from the Ball Canning book. It’s simple to make and freezes for up to a year.
Classic Lemon Curd
Ingredients:
6 large egg yolks
3/4 cup sugar
Grated peel of one large lemon
1 cup fresh lemon juice (about 5 medium)
1/2 cup (1/4 lb) cold unsalted butter, cut into 8 pieces
Freezer containers
Directions:
PRESS egg yolks through a sieve set over a heavy saucepan to remove all egg whites.
ADD sugar, lemon peel and lemon juice. Whisk just to combine.
COOK over medium heat, stirring constantly with a wooden spoon. Make sure to stir down the sides of the saucepan. Cook until mixture coats the back of the wooden spoon, about 20 minutes. Remove from heat.
ADD butter, one piece at a time, stirring after each addition to assure the mixture is smooth.
LADLE lemon curd into clean freezer containers and cool.
Now…anytime you feel the need for a bit of sunshine in your day you can pull it right from the freezer.
Enjoy!
Starting from Humble Beginnings
 When I was young my mom worked at the public library in a small town on the other side of our valley. It was a small mostly farming community with acres of fruit orchards, poultry farms and row crops; the kind of town with a main street and few stop lights…if any at all at that time. The library was on the corner of the main street and a winding road that lead through citrus orchards and over the hills to the north side of our county. The library was tiny by today’s standards, maybe 1,500 square feet. Across the street was the local junk store, the kind that people prowl through to find deals and treasures.
With three kids at home and new to the area money was tight. Tight enough that buying things like bedroom furniture was a luxury rather than a necessity. My mom was always combing garage sales and junk stores to furnish her new home. It was in that little junk store, in that tiny town that my mom found most of what we kids grew up with.
Each month mom would cart home her latest find and dad would clean it up, make any necessary repairs and paint or refinish it. I remember there was a dresser with big round knobs and a bed with a carved headboard; a vanity with an attached mirror and a stool, and a few bookcases.
It’s funny how those junk store finds served us well all through our growing up years and even into college. The paint or stain may have changed, but their functionality and meaning never did. Decades have passed since these little treasures entered our home, but surprisingly some are still with us today, some whole and some broken up and used for different purposes.
The bed carried Brianne through junior high before it was sold at a garage sale; sent on for another little girl to enjoy. The dresser serves as storage for a collection of floral arranging vases. The vanity, with its mirror long gone, has been refinished many times and now sits as a bedside table in my sister’s house. And that little bench for the vanity, well it has been repurposed—again—as a side table in my greenhouse sitting area.
I found the little gem while helping sis clean out her garage last summer. After days of stripping off layers of old paint—pink, purple, white—I finally got down to the bare wood, now more than 60-years old. But, as with years past and changing tastes the little bench was destined to a new life as a shabby chic table; a place where I could set a glass of tea, a book to be read or a stack of seed and gardening catalogs to be perused while working in my greenhouse.
The joy in repurposing is the pleasure of seeing objects in a different way, how the things around us can be used in many different ways. The challenge for each of us is to see with new eyes, in a new way.
Over the years I have taken many pieces of furniture and made them new again. An entertainment center that stands in my greenhouse is a potting cabinet, filled with the tools and supplies of an avid gardener; a buffet serves as a focal point and useful storage in my bathroom; a three-tiered plant stand holds bathroom towels, soaps and lotions a long side the tub; an old potting bench turned beverage station sits on the patio. And, my coming project…a refinished server will become a decorative vignette and buffet for my patio dining area.
Inspiration changes with the times, but the things we love stay with us forever, even if they do get a face lift from time to time. What do you have around your house that can be used in a new way? I bet there are several, so let you mind wander and see where it takes you.
Homemade Chicken Treats
 Winter can be tough on chickens. Keeping them warm, having enough “unfrozen” water available and getting them enough energy to keep them healthy during the long winter months. This winter, especially, has been hard on livestock and humans alike. The endless freezing temps and unceasing snow fall has made everyone feel like Spring will never come.
Harsh winters also mean that chickens are not able to scratch about—their favorite past time—for bugs, weeds and spent produce. Boredom can set in and so can the fighting and cannibalism that goes along with spending long days cooped up in, well, coops.
One way to fend off the torment of winter is to give your chickens a supply of good treats. Not just scratch or the occasional green tops, if you can get them in some parts of the country, but a wholesome combination of nutrients and energy boosters.
Homemade chicken treats are a cheap and easy way to give your girls what they are craving. The combination of grains for nutrition, molasses for energy, lard or tallow and egg shells in a great mixture that will help them keep warm while their bodies digest, give them energy and keep them occupied and entertained as they scratch and eat the treat blocks.
To make your own chicken treats try this easy recipe below.
2 cups Scratch
1 cup Old fashioned oat meal
1 cup Cornmeal
¾ cup Wheat germ
½ cup Dried fruit, chopped
½ cup Crushed egg shells
4 Eggs, beaten, plus the shells, crushed
¾ cup Blackstrap molasses
½ cup Coconut oil, Tallow or Lard (liquefied)
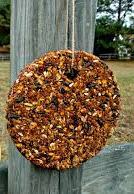
Preheat oven to 325. Mix all dry ingredients together then add all the wet ingredients and mix well. Pat into pie dishes. The block should be about 2 inches thick. Recycled pie plates work great for this. If you want to hang your block use a chopstick or straw to make a hole about an inch from the edge. Bake for 30 minutes then cool completely. Run a knife around the edge, tip the pie plate over and let the block fall out. Thread twine through the hole, tie a knot and hang where the girls can reach it.
If you have a smaller flock 6-inch pie tins can be used and the extra treat blocks can be frozen until needed, just thaw completely before hanging out for the chickens.
For a fun alternative use cookie cutters to make decorative shapes. Poke two holes in each cookie, thread twine through the holes to make a garland and hang it in the coop or outside on sunny days.

Recent comments
Aenean nonummy hendrerit mauris. Phasellus porta.